Cách tạo Navigation Drawer
Bài đăng này đã không được cập nhật trong 8 năm
Giới thiệu về Navigation Drawer
Navigation Drawer là một menu kéo hiện thị như là một ngăn xếp ở cách cạnh biên của màn hình. Nó được ẩn đi khi không sử dụng, nhưng sẽ xuất hiện khi người sử dụng vuốt ngón tay của họ từ mép trái của màn hình hoặc người sử dụng vuốt từ phía mép trên của màn hình ứng dụng , người sử dụng trạm vào icon trên thanh công cụ.
Hôm nay sẽ trình bày cho các bạn làm sao để thực thi Navigation Drawer sử bằng các sử dụng DrawerLayout APIs có sẵn trong thư viện hỗ trợ.(Support Library)
Thiết kế Navigation Drawer
Trước khi chúng ta quyết định sử dụng Navigation Drawer trong ứng dụng của bạn, bạn nên nghiêm cứu những trường hợp của người sử dụng và các nguyên tắc trong Navigation Drawer Guide
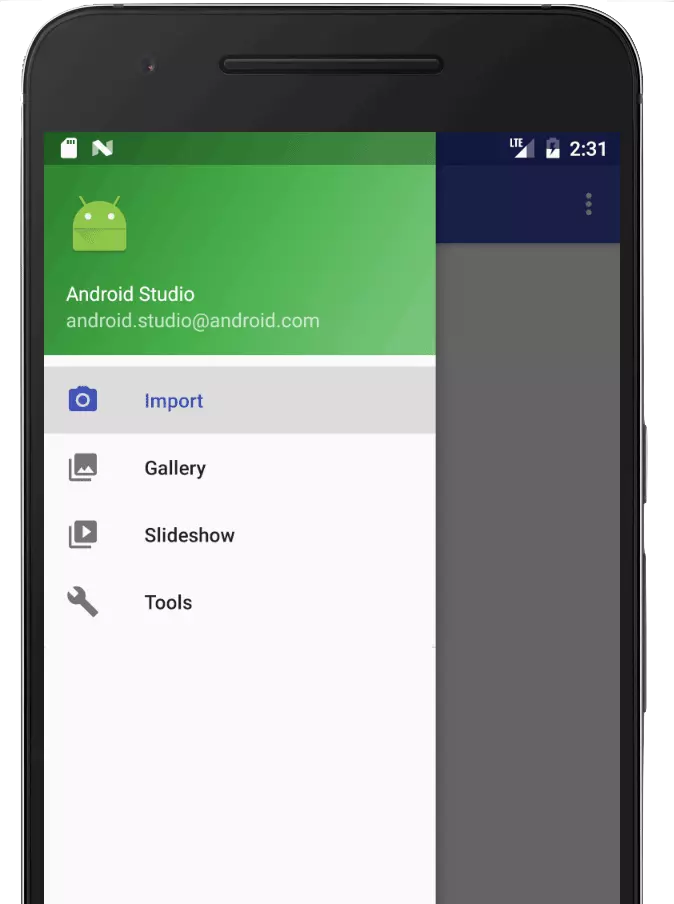
Hình 1: Navigation Drawer
Thêm vào dependencies
Hướng dẫn này chúng ta sử dụng APIs từ thư viện hỗ trợ của android , vì thế chúng ta cần các phụ thuộc vào build.gradle trong ứng dụng của bạn
dependencies {
  implementation 'com.android.support:appcompat-v7:27.1.0'
  implementation 'com.android.support:design:27.1.0'
}
Thêm Drawer vào Layout của bạn
Để thêm Navigation Drawer , bạn cần khai báo DrawerLayout như là một view gốc . Bên trong DrawerLayout, thêm view có chứa nội dung chính của layout và một view khác nó chứa nội dung của Navigation Drawer. Cho ví dụ như sau : Layout dưới đây sử dụng DrawerLayout với 2 view con: FrameLayout để chứa nội dụng chính và NavigationView để chứa nội dung của NavigationDrawer
<?xml version="1.0" encoding="utf-8"?>
<!-- Use DrawerLayout as root container for activity -->
<android.support.v4.widget.DrawerLayout xmlns:android="http://schemas.android.com/apk/res/android"
    xmlns:app="http://schemas.android.com/apk/res-auto"
    android:id="@+id/drawer_layout"
    android:layout_width="match_parent"
    android:layout_height="match_parent"
    android:fitsSystemWindows="true">

    <!-- Layout to contain contents of main body of screen (drawer will slide over this) -->
    <FrameLayout
        android:id="@+id/content_frame"
        android:layout_width="match_parent"
        android:layout_height="match_parent" />

    <!-- Container for contents of drawer - use NavigationView to make configuration easier -->
    <android.support.design.widget.NavigationView
        android:id="@+id/nav_view"
        android:layout_width="wrap_content"
        android:layout_height="match_parent"
        android:layout_gravity="start"
        android:fitsSystemWindows="true" />

</android.support.v4.widget.DrawerLayout>
Các chú ý quan trong khi tạo Navigation Drawer
- FrameLayout thì thiết lập với match_parent với cả chiều rộng và chiều cao. Bới vì nó sẽ hiển thị giao diện khi mà Navigation Drawer ẩn
- NavigationView phải chỉnh thanh ngang với thuộc tính android:layout_gravity. Thiết lập giá trị với "start" to Navigation Drawer xuất hiện từ bên trái ra.
- NavigationView thiết lập thuộc tính android:fitsSystemWindows bằng "true" để đảm bảo nội dung của Navigation Drawer không được phủ lên thanh trạng thái và cách hệ thống khác.
Khai báo các item menu cho Navigation Drawer
Để cấu hình danh sách Menu Item trong Navigation Drawer với thuộc tính app:menu, Giống như code ở bên dưới:
<android.support.design.widget.NavigationView
    android:id="@+id/nav_view"
    android:layout_width="wrap_content"
    android:layout_height="match_parent"
    android:layout_gravity="start"
    android:fitsSystemWindows="true"
    app:menu="@menu/drawer_view" />
Tạo menu tương ứng với tên: drawer_view.xml
<?xml version="1.0" encoding="utf-8"?>
<menu xmlns:android="http://schemas.android.com/apk/res/android" >
<group android:checkableBehavior="single">
    <item
        android:id="@+id/nav_camera"
        android:icon="@drawable/ic_menu_camera"
        android:title="@string/import" />
    <item
        android:id="@+id/nav_gallery"
        android:icon="@drawable/ic_menu_gallery"
        android:title="@string/gallery" />
    <item
        android:id="@+id/nav_slideshow"
        android:icon="@drawable/ic_menu_slideshow"
        android:title="@string/slideshow" />
    <item
        android:id="@+id/nav_manage"
        android:icon="@drawable/ic_menu_manage"
        android:title="@string/tools" />
</group>
</menu>
Bạn có thể tạo nhóm với các item riêng biệt bằng cách sử dụng android:checkableBehavior="single" được thiết lập ở nhóm. Nó cho phép bạn hiển thị danh sách các item
Thêm Header cho Navigation Drawer
Bạn có thể thêm Header tại phía trên của Drawer bằng cách sử dụng app:headerLayout như code phía bên dưới:
<android.support.design.widget.NavigationView
    android:id="@+id/nav_view"
    android:layout_width="wrap_content"
    android:layout_height="match_parent"
    android:layout_gravity="start"
    android:fitsSystemWindows="true"
    app:menu="@menu/drawer_view"
    app:headerLayout="@layout/nav_header" />
Tạo layout Header với tên : nav_header.xml
   <?xml version="1.0" encoding="utf-8"?>
<LinearLayout xmlns:android="http://schemas.android.com/apk/res/android"
    android:layout_width="match_parent"
    android:layout_height="192dp"
    android:background="?attr/colorPrimaryDark"
    android:padding="16dp"
    android:theme="@style/ThemeOverlay.AppCompat.Dark"
    android:orientation="vertical"
    android:gravity="bottom">

    <TextView
        android:layout_width="match_parent"
        android:layout_height="wrap_content"
        android:text="My header title"
        android:textAppearance="@style/TextAppearance.AppCompat.Body1"/>

</LinearLayout>
Xử lý Click sự kiện
Để nhận sự kiện khi người sử dụng chạm nhẹ vào của danh sách item trong Drawer , thực thi câu lệnh OnNavigationItemSelectedListener và gắn nó tới NavigationView bằng cách gọi setNavigationItemSelectedListener(), Ví dụ:
public class MainActivity extends AppCompatActivity {

    private DrawerLayout mDrawerLayout;

    @Override
    protected void onCreate(Bundle savedInstanceState) {
        super.onCreate(savedInstanceState);
        setContentView(R.layout.activity_main);

        mDrawerLayout = findViewById(R.id.drawer_layout);

        NavigationView navigationView = findViewById(R.id.nav_view);
        navigationView.setNavigationItemSelectedListener(
                new NavigationView.OnNavigationItemSelectedListener() {
                    @Override
                    public boolean onNavigationItemSelected(MenuItem menuItem) {
                        // set item as selected to persist highlight
                        menuItem.setChecked(true);
                        // close drawer when item is tapped
                        mDrawerLayout.closeDrawers();

                        // Add code here to update the UI based on the item selected
                        // For example, swap UI fragments here

                        return true;
                    }
                });
    }
}
Khi mà item được chạm , đoạn code này sẽ thiết lập lựa chon item và Drawer cũng được đóng bởi hàm closeDrawers().
Thêm Button Navigation Drawer cho thanh công cụ (Action bar)
DrawerLayout cung cấp cho người dùng mở và đóng Navigation Drawer với việc vuốt bên mép của màn hình. Nhưng nếu giao diện của bạn bao gồm cả App Bar, Bạn nên cho phép người dùng đóng mở Drawer bằng cách nhấn vào Icon Drawer ở góc phía trên bên trái của App Bar.
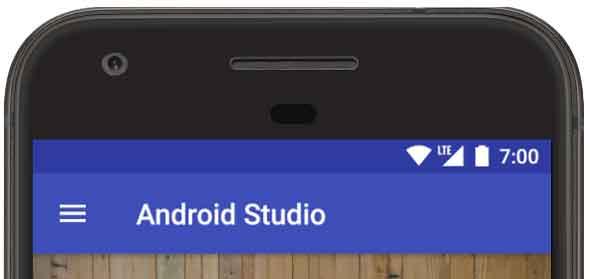
Hình 2: Navigation Drawer button ở bên trái
Thêm toolbar tới layout của bạn
Navigation Drawer nên xuất hiện ở phía trước App Bar . Để tạo được nó, bạn cần sử dụng Toolbar như là App Bar của bạn. Bạn có thể thê Toolbar như sau:
<android.support.v4.widget.DrawerLayout ...>

    <FrameLayout
        android:id="@+id/content_frame"
        android:layout_width="match_parent"
        android:layout_height="match_parent">

        <android.support.v7.widget.Toolbar
            android:id="@+id/toolbar"
            android:layout_width="match_parent"
            android:layout_height="?attr/actionBarSize"
            android:background="?attr/colorPrimary"
            android:theme="@style/ThemeOverlay.AppCompat.ActionBar" />

    </FrameLayout>
...

</android.support.v4.widget.DrawerLayout>
Sau đó mở AndroidManifest và thiết lập như sau:
<manifest ...>
  <application
      ...
      android:theme="@style/Theme.AppCompat.Light.NoActionBar" >
  ...
</manifest>
Nếu bạn muốn override một số kiểu trong theme , bạn có thể xem ở đây Styles and Themes
Thiết lập Toolber như Action Bar
Bây giờ, Toolbar đã xuất hiện trong layout nhưng không có chức năng như App Bar. Để áp dụng Toolbar như App bar, đầu tiên bạn phải chắc chán rằng Activity của bạn đã được thừa kế từ AppCompatActivity. Sau đó gọi setSupportActionBar(); và truyền toolbar vào:
public class MainActivity extends AppCompatActivity {

@Override
protected void onCreate(Bundle savedInstanceState) {
    super.onCreate(savedInstanceState);
    setContentView(R.layout.activity_main);

    Toolbar toolbar = findViewById(R.id.toolbar);
    setSupportActionBar(toolbar);

    ...
}
}
Thêm Button Navigation Drawer
Bây giờ thêm button để mở Drawer , Đầu tiên, bạn cần thêm icon Button vào trong app của bạn. Nếu bạn chưa có icon nào thì bạn có thể tải về từ trang : Material Design Icons page.
public class MainActivity extends AppCompatActivity {

  @Override
  protected void onCreate(Bundle savedInstanceState) {
      super.onCreate(savedInstanceState);
      setContentView(R.layout.activity_main);

      Toolbar toolbar = findViewById(R.id.toolbar);
      setSupportActionBar(toolbar);
      ActionBar actionbar = getSupportActionBar();
      actionbar.setDisplayHomeAsUpEnabled(true);
      actionbar.setHomeAsUpIndicator(R.drawable.ic_menu);

      ...
  }
}
Mở Drawer khi trạm vào button
Để mở Drawer , khi người dùng chạm vào button, bạn ghi đè onOptionsItemSelected()
public class MainActivity extends AppCompatActivity {

private DrawerLayout mDrawerLayout;

@Override
protected void onCreate(Bundle savedInstanceState) {
    super.onCreate(savedInstanceState);
    setContentView(R.layout.activity_main);

    mDrawerLayout = findViewById(R.id.drawer_layout);
    ...
}

@Override
public boolean onOptionsItemSelected(MenuItem item) {
    switch (item.getItemId()) {
        case android.R.id.home:
            mDrawerLayout.openDrawer(GravityCompat.START);
            return true;
    }
    return super.onOptionsItemSelected(item);
}
}
Lắng nghe sự kiện đóng hay mở Drawer và thay đổi trạng thái
Nếu ứng dụng của bạn cần phản hồi khi Drawer đóng hay mở , hoặc chỉ đơn giản là thay đổi trạng thái và vị trí. Bạn có thể thực thi DrawerLayout.DrawerListener và truyền nó vào ** addDrawerListener()** như sau :
public class MainActivity extends AppCompatActivity {
    private DrawerLayout mDrawerLayout;

    @Override
    protected void onCreate(Bundle savedInstanceState) {
        super.onCreate(savedInstanceState);
        setContentView(R.layout.activity_main);

        mDrawerLayout = findViewById(R.id.drawer_layout);
        ...

        mDrawerLayout.addDrawerListener(
                new DrawerLayout.DrawerListener() {
                    @Override
                    public void onDrawerSlide(View drawerView, float slideOffset) {
                        // Respond when the drawer's position changes
                    }

                    @Override
                    public void onDrawerOpened(View drawerView) {
                        // Respond when the drawer is opened
                    }

                    @Override
                    public void onDrawerClosed(View drawerView) {
                        // Respond when the drawer is closed
                    }

                    @Override
                    public void onDrawerStateChanged(int newState) {
                        // Respond when the drawer motion state changes
                    }
                }
        );
    }
    ...
}
Cảm ơn các bạn đã đọc bài viết về Navigation Drawer
Nguồn : https://developer.android.com/training/implementing-navigation/nav-drawer.html#ListItemClicks
All rights reserved
