Cách sử dụng Deep Linking trong React Native
Bài đăng này đã không được cập nhật trong 4 năm
Trong bài viết này tôi sẽ giới thiệu cho các bạn cách sử dụng Deep linking trong react native trong cả 2 nền tảng android và ios Bài viết được tham khảo từ đây
Deep linking là gì
Deep linking là một đường dẫn đưa bạn tới một nội dung nào đó và cụ thể trong lập trình ứng dụng là một màn hình được setup riêng với link đó .
Vậy có những loại Deep linking nào ?
- Custom URI Schemes : Custom URI Schemes là hình thức nguyên thuỷ nhất của deep linking . Chúng được tạo ra như những liên kết riêng cho ứng dụng của bạn mà không cần sử dụng Internet . Điểm mạnh của loại này là dễ dàng setup và sử dụng . Đây là một ví dụ vể URI Scheme : “demo://path/to/content”
- iOS Universal Links : Apple đã giới thiệu Universal Links trong iOS 9 như một giải pháp cho việc thiếu chức năng dự phòng trong của URI scheme deep links.
- Android App Links : Không chịu kém cạnh với Apple , nên Google đã đáp trả bằng cách tạo ra App Links như một công cụ tương đương với Universal Links của IOS Trong bài viết này mình xin tập trung vào URI Schemes và sử dụng nó đi với thư viện react-navigation
Set Up Project
- Tạo project React Native
Set up react navigation trong project (https://reactnavigation.org/docs/getting-started/#installing-dependencies-into-an-expo-managed-project)
Đầu tiên , mình sẽ tạo ra 4 màn hình HomeScreen , NotificationScreen , ProfileScreen , SettingScreen
function HomeScreen({ navigation }) {
	return (
		<View style={{ flex: 1, alignItems: "center", justifyContent: "center" }}>
			<Button title="Go to Profile" onPress={() => navigation.navigate("Profile", { id: 1 })} />
		</View>
	);
}

function NotificationsScreen({ navigation }) {
	return (
		<View style={{ flex: 1, alignItems: "center", justifyContent: "center" }}>
			<Button title="Go to Settings" onPress={() => navigation.navigate("Settings")} />
			<Button title="Go back" onPress={() => navigation.goBack()} />
		</View>
	);
}

const ProfileScreen = ({ route, navigation }) => {
	const {
		params: { id },
	} = route;
	return (
		<View style={{ flex: 1, alignItems: "center", justifyContent: "center" }}>
			{id != 1 && <Text style={styles.attributeTitle}>Deeplink id = {id}</Text>}
			<Button title="Go to Notifications" onPress={() => navigation.navigate("Notifications")} />
			<Button title="Go back" onPress={() => navigation.goBack()} />
		</View>
	);
};

function SettingsScreen({ navigation }) {
	return (
		<View style={{ flex: 1, alignItems: "center", justifyContent: "center" }}>
			<Button title="Go back" onPress={() => navigation.goBack()} />
			<Button title="Go Linking Buttons" onPress={() => navigation.navigate("LinkingButton")} />
		</View>
	);
}

const Stack = createStackNavigator();

function MyStack() {
	return (
		<Stack.Navigator>
			<Stack.Screen name="Home" component={HomeScreen} />
			<Stack.Screen name="Notifications" component={NotificationsScreen} />
			<Stack.Screen name="Profile" component={ProfileScreen} />
			<Stack.Screen name="Settings" component={SettingsScreen} />
		</Stack.Navigator>
	);
}
export default function App() {
	return (
		<NavigationContainer>
			<MyStack />
		</NavigationContainer>
	);
}
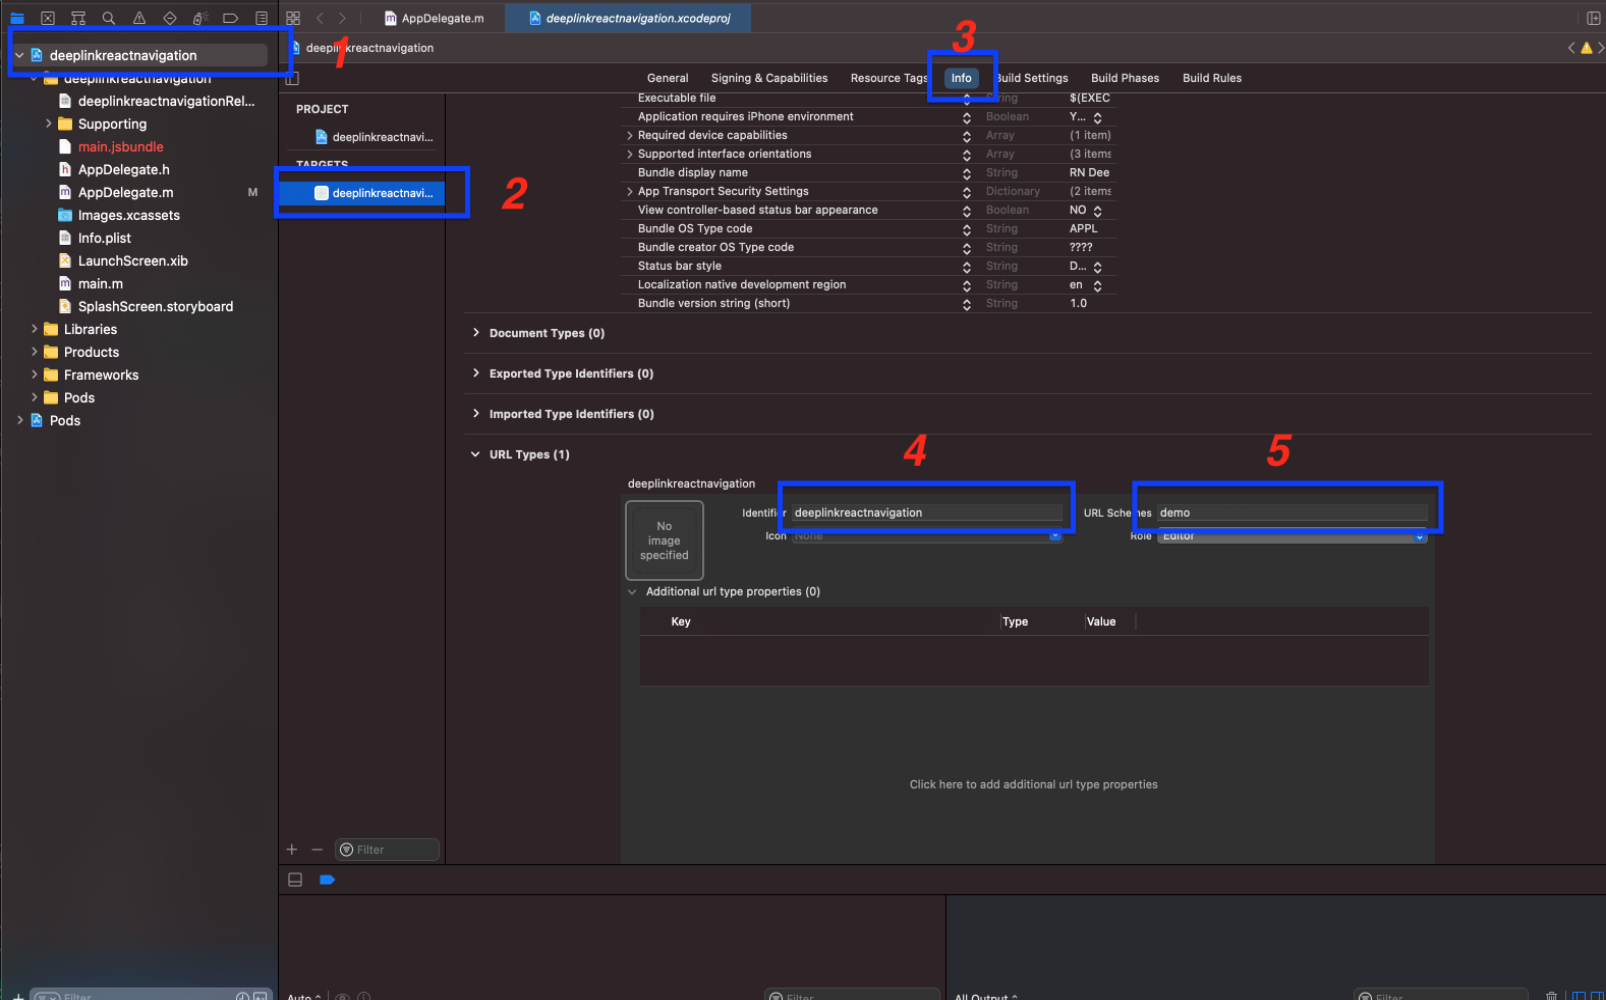
- Set up URI SCHEME cho IOS
Mở folder ios và double click vào file .xcworkspace sau đó làm theo các bước sau đây![]()
- Set up URI SCHEME cho Android
Trong folder android , mở file theo đường dẫn android/app/src/main/AndroidManifest.xml . Them intent-filter bên trong the MainActivity. như sau
    <activity
      android:name=".MainActivity"
      android:label="@string/app_name"
      android:configChanges="keyboard|keyboardHidden|orientation|screenSize|uiMode"
      android:launchMode="singleTask"
      android:windowSoftInputMode="adjustResize"
      android:theme="@style/Theme.App.SplashScreen"
    >
      <intent-filter>
        <action android:name="android.intent.action.MAIN"/>
        <category android:name="android.intent.category.LAUNCHER"/>
      </intent-filter>

      <intent-filter>
        <action android:name="android.intent.action.VIEW" />
        <category android:name="android.intent.category.DEFAULT" />
        <category android:name="android.intent.category.BROWSABLE" />
        <data
          android:host="app"
          android:scheme="demo" />
      </intent-filter>
    </activity>
- Handle Deep link của react native, tạo file linking.js như sau
const config = {
  screens: {
    Home: {
      path: "home",
    },
    Profile: {
      path: "profile/:id",
      parse: {
        id: (id) => `${id}`,
      },
    },
    Notifications: "notifications",
    Settings: "settings",
  },
};

const linking = {
  prefixes: ["demo://app"],
  config,
};

export default linking;
Mình sẽ giải thích các deep link tương ứng với từng màn hình
- demo://app/home - deep link này sẽ đi tời màn hình HomeScreen
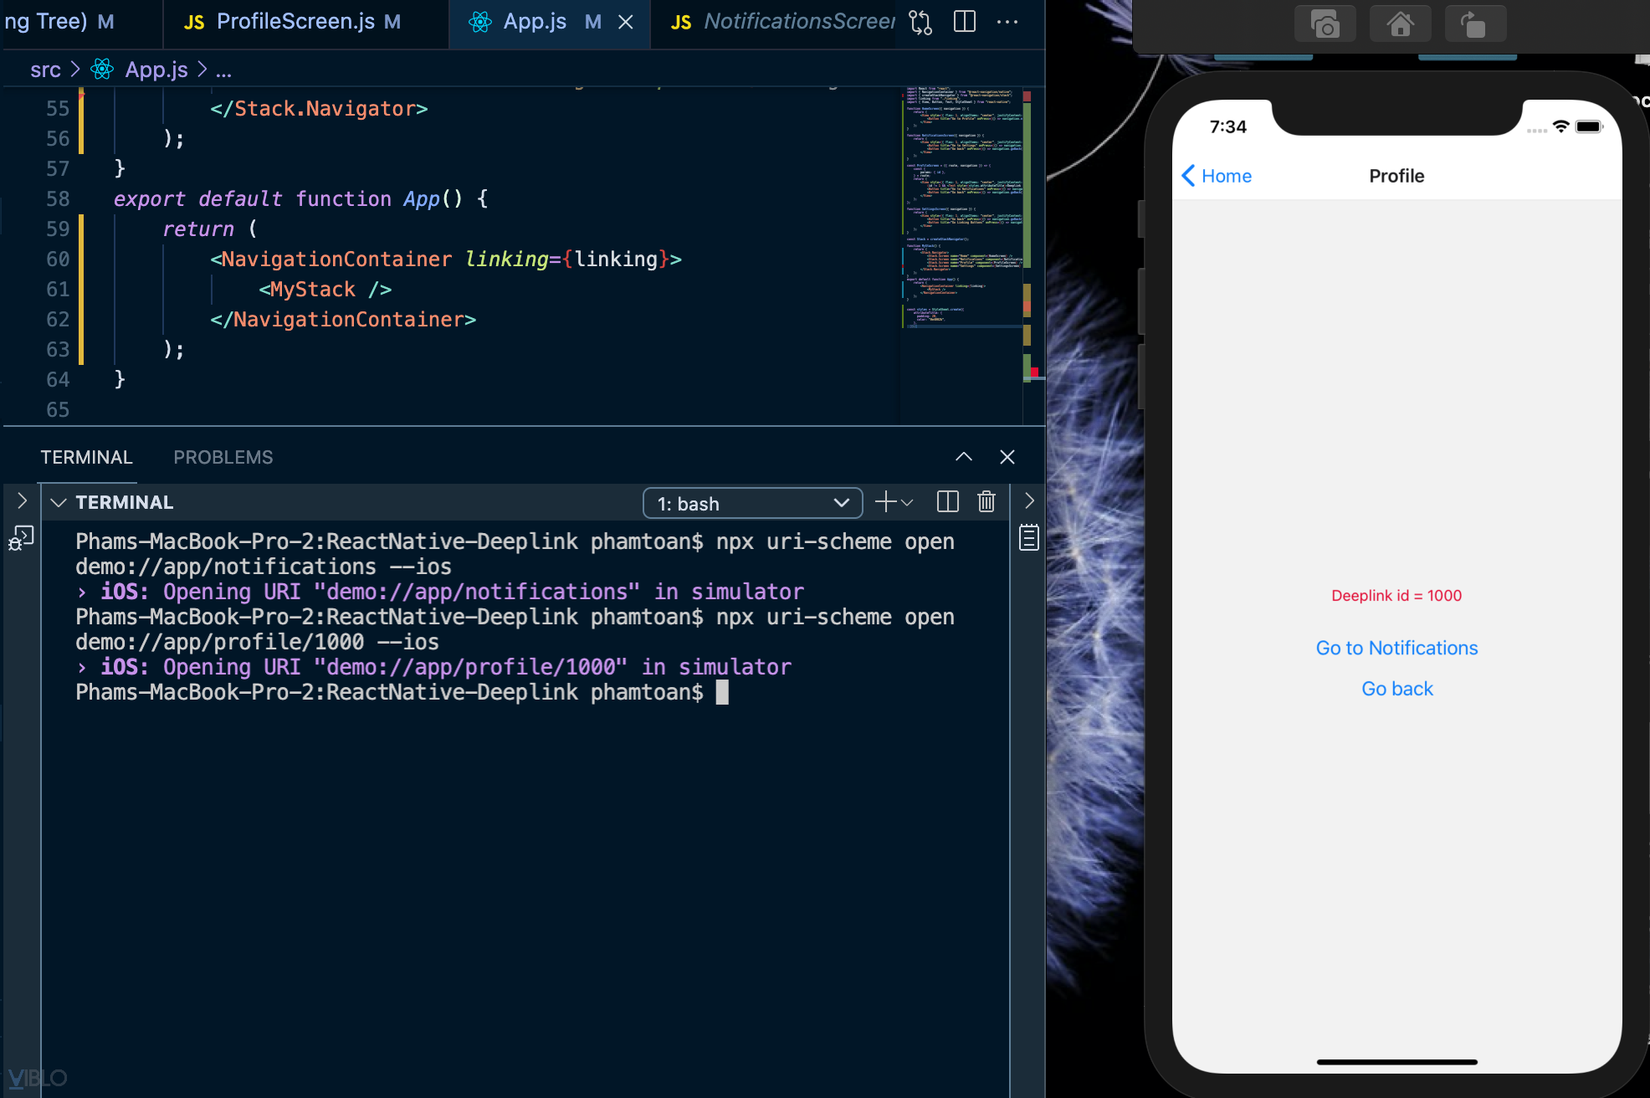
- demo://app/profile/:id - deep link này sẽ đi tời màn hình ProfileScreen với 1 param là id được truyền vào
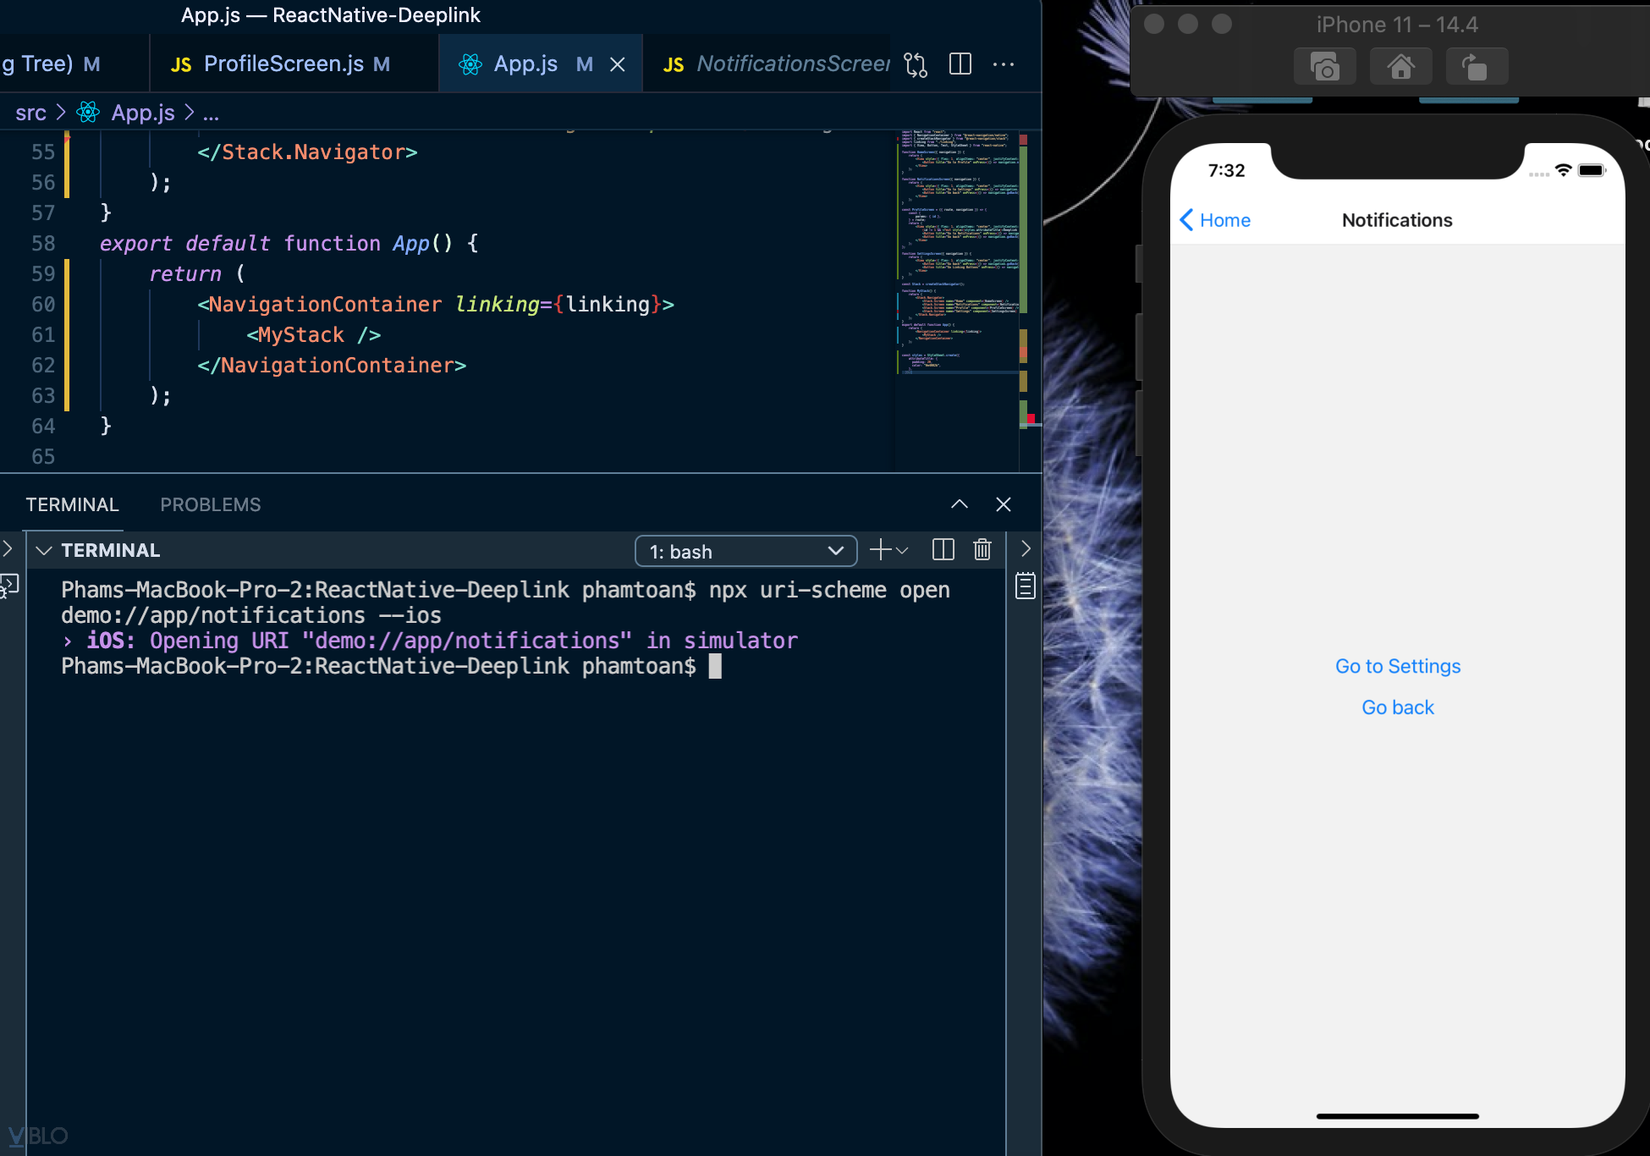
- demo://app/notifications -deep link này sẽ đi tời màn hình NotificationScreen
- demo://app/settings - deep link này sẽ đi tời màn hình SettingScreen
Thêm thuộc tính linking trong NavigationContainer với value là linking được export phía trên
export default function App() {
	return (
		<NavigationContainer linking={linking}>
			<MyStack />
		</NavigationContainer>
	);
}
Kiểm tra kết quả
Chúng ta sẽ chạy các lệnh sau :
npx uri-scheme open demo://app/notifications --ios ( với Android sẽ thay bằng --android)
 npx uri-scheme open demo://app/profile/:1000 --ios

Như vậy mình đã hướng dẫn các bạn sử dụng Deep linking trong React Native như thế nào , trong phần tiếp theo mình sẽ hướng dẫn các bạn sử dụng Push Notification + Deep linking
All rights reserved
