Building a Music Streaming App using React Native
Bài đăng này đã không được cập nhật trong 7 năm
Bài viết được dịch từ nguồn: https://hackernoon.com/building-a-music-streaming-app-using-react-native-6d0878a13ba4
React Native là một framework để xây dựng các ứng dụng dựa trên React và Javascript. Trong bài này, tôi sẽ trình bày quá trình xây dựng một App tự như Spotify. Điều thực sự thú vị nó sẽ hoạt động cho cả iOS và Android và ứng dụng sẽ có nguồn gốc 100% native (không có WebView hoặc bất cứ thứ gì).
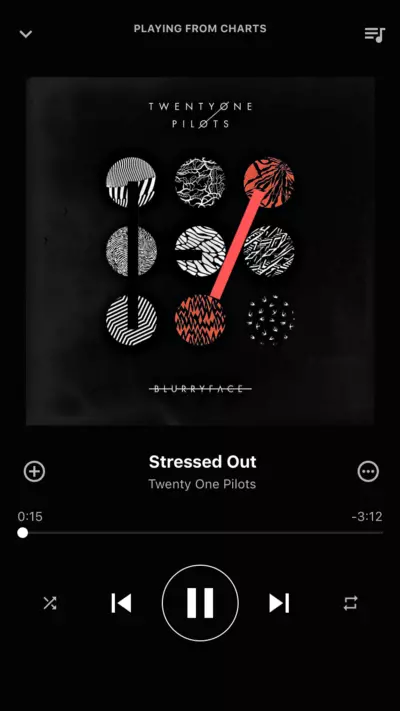
Chúng tôi sẽ xây dựng màn hình Now Playing, trông giống như thế này trên Spotify:
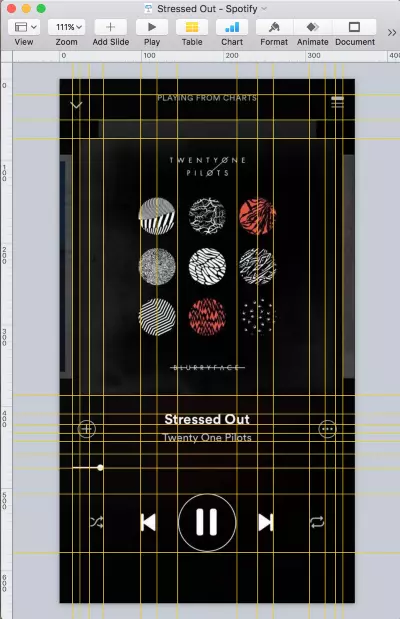
Vì tôi không phải là nhà thiết kế và tôi thực sự thích thiết kế Spotify sạch sẽ, chúng tôi sẽ sử dụng nó làm tài liệu tham khảo để xây dựng Player của chúng tôi. Trong hình ảnh, một ảnh chụp màn hình trong Keynote và thêm thước kẻ trên ảnh để đo chính xác vị trí, lề, kích thước phông chữ, v.v. cho tất cả các yếu tố khác nhau trong giao diện người dùng. Chúng tôi sẽ sử dụng các phép đo này để tạo kiểu cho ứng dụng UI của chính chúng tôi.
Bây giờ chúng tôi có một thiết kế (bị copy), chúng tôi đã sẵn sàng để bắt đầu code. Vì vậy, hãy cùng nhau tạo một App React Native mới. Mở một cửa sổ terminal và chạy các lệnh sau:
$ npm install react-native-cli@latest
$ react-native init ReactMusic
Điều đó mất một lúc, phải không? Chúng tôi gần như đã sẵn sàng, chỉ cần thêm một vài lệnh để chạy:
$ react-native run-ios      # Launch an iOS emulator and run the app
$ android avd &             # Launch an Android emulator
$ react-native run-android  # Run the app on the Android emulator
$ subl .                    # Open up the project in Sublime Tex
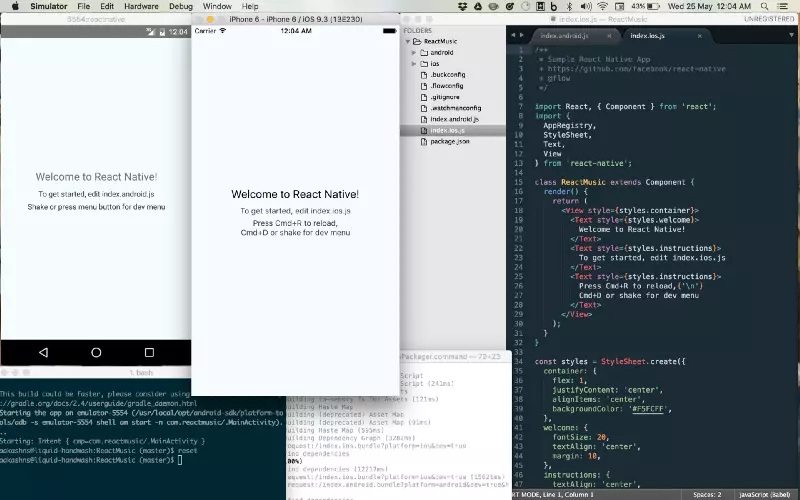
Nếu lệnh cuối cùng không phù hợp với bạn, chỉ cần mở thư mục ReactMusic, trong bất kỳ trình editor nào bạn chọn hoặc thực hiện việc này. Ứng dụng của bạn phải chạy và chạy trên cả hai trình giả lập và màn hình của bạn sẽ trông như thế này:
Mở index.ios.js và index.android.js. Bạn có thể nhận thấy rằng nó giống nhau. Chúng tôi sẽ loại bỏ tất cả và bắt đầu lại. Hãy để thư viện tạo một thư mục gọi là ứng dụng bên trong thư mục gốc của dự án. Sau đó tạo ứng dụng App / App.js và với code sau:
import React, { Component } from 'react';

import {
  View,
  Text,
} from 'react-native';

export default class App extends Component {
  render() {
    return (
      <View style={styles.container}>
        <Text style={{color: 'white'}}>
          Hello React Native!
        </Text>
      </View>
    );
  }
}

const styles = {
  container: {
    flex: 1,
    backgroundColor: 'rgb(4,4,4)',
  },
}
Bây giờ, chúng ta có thể xóa tất cả code khỏi index.ios.js và index.android.js và chỉ cần render App component trong cả hai:
import React, { Component } from 'react';
import { AppRegistry } from 'react-native';
import App from './app/App';

AppRegistry.registerComponent('ReactMusic', () => App);
Nếu bạn tải lại trình giả lập (Cmd + R cho iOS và Fn + F2 cho Android), bây giờ bạn sẽ thấy một màn hình đen với một số chữ màu trắng trên đó. Bạn cũng có thể thiết lập Tải xuống trực tiếp trong trình giả lập để tự động tải lại Javascript mỗi khi bạn lưu tệp sau khi thực hiện thay đổi.
Nếu chúng ta quay lại và nhìn lại giao diện người dùng, chúng ta có thể thấy rằng nó được tạo thành từ năm phần chính:
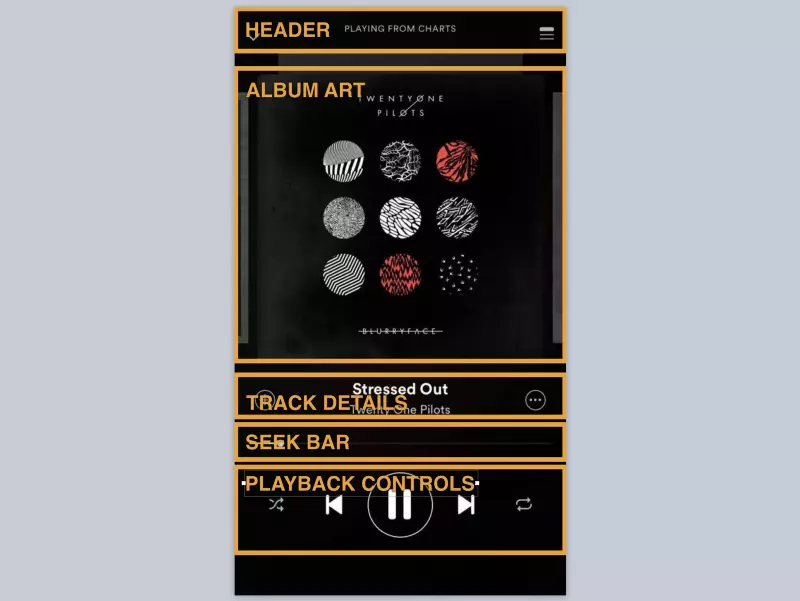
Chúng tôi sẽ tạo một component cho mỗi phần này, bắt đầu với Header, đây thực sự chỉ là một tiêu đề và hai button. Chúng tôi sẽ sử dụng TouchableOpacity để hiển thị các button. Tạo một thư mục img trong thư mục gốc của dự án để lưu trữ các biểu tượng và hình ảnh. Bạn có thể nhận biểu tượng cho các tiêu đề từ Google’s Material Icons. Tải xuống keyboard arrow down và queue music’ và sao chép tệp từ thư mục ios của biểu tượng được đặt vào thư mục img của dự án. Code cho phần Header:
const Header = ({ message, onDownPress, onQueuePress, onMessagePress }) => (
  <View style={styles.container}>
    <TouchableOpacity onPress={onDownPress}>
      <Image style={styles.button}
        source={require('../img/ic_keyboard_arrow_down_white.png')} />
    </TouchableOpacity>
    <Text onPress={onMessagePress}
      style={styles.message}>{message.toUpperCase()}</Text>
    <TouchableOpacity onPress={onQueuePress}>
      <Image style={styles.button}
        source={require('../img/ic_queue_music_white.png')} />
    </TouchableOpacity>
  </View>
);
Thực hiện theo các liên kết trong mô tả dưới đây cho code đầy đủ. Bạn có thể đặt code này trong app / Header.js, sau đó import và sử dụng thành phần Header trong app / App.js:
import Header from './Header';

class App extends Component {
  render() {
    return (
      <View style={styles.container}>
        <Header message="Playing from Charts" />
      </View>
    );
  }
}
Tiếp theo, chúng tôi có một component thực sự đơn giản để hiển thị ảnh bìa album:
const AlbumArt = ({ url, onPress}) => (
  <View style={styles.container}>
    <TouchableOpacity onPress={onPress}>
      <Image style={styles.image} source={{uri: url}} />
    </TouchableOpacity>
  </View>
);
Tiếp theo, chúng tôi có tiêu đề của bài hát và nghệ sĩ:
const TrackDetails = ({
  title,
  artist,
  onAddPress,
  onMorePress,
  onTitlePress,
  onArtistPress,
}) => (
  <View style={styles.container}>
    <TouchableOpacity onPress={onAddPress}>
      <Image style={styles.button}
        source={require('../img/ic_add_circle_outline_white.png')} />
    </TouchableOpacity>
    <View style={styles.detailsWrapper}>
      <Text style={styles.title} onPress={onTitlePress}>{title}</Text>
      <Text style={styles.artist} onPress={onArtistPress}>{artist}</Text>
    </View>
    <TouchableOpacity onPress={onMorePress}>
      <View style={styles.moreButton}>
        <Image style={styles.moreButtonIcon}
          source={require('../img/ic_more_horiz_white.png')} />
      </View>
    </TouchableOpacity>
  </View>
);
Đối với Seek Bar, chúng tôi sẽ sử dụng react-native-slider, có các tùy chọn kiểu đa nền tảng tốt hơn.
$ npm install --save react-native-slider
Sau đó, chúng tôi có thể triển khai thanh Tìm kiếm:
var Slider = require('react-native-slider');

function pad(n, width, z=0) {
  n = n + '';
  return n.length >= width ? n : new Array(width - n.length + 1).join(z) + n;
}

const minutesAndSeconds = (position) => ([
  pad(Math.floor(position / 60), 2),
  pad(position % 60, 2),
]);

const SeekBar = ({
  trackLength,
  currentPosition,
  onSeek,
  onSlidingStart,
}) => {
  const elapsed = minutesAndSeconds(currentPosition);
  const remaining = minutesAndSeconds(trackLength - currentPosition);
  return (
    <View style={styles.container}>
      <View style={{flexDirection: 'row'}}>
        <Text style={styles.text}>
          {elapsed[0] + ":" + elapsed[1]}
        </Text>
        <View style={{flex: 1}} />
        <Text style={[styles.text, {width: 40}]}>
          {trackLength > 1 && "-" + remaining[0] + ":" + remaining[1]}
        </Text>
      </View>
      <Slider
        maximumValue={Math.max(trackLength, 1, currentPosition + 1)}
        onSlidingStart={onSlidingStart}
        onSlidingComplete={onSeek}
        value={currentPosition}
        style={styles.slider}
        minimumTrackTintColor='#fff'
        maximumTrackTintColor='rgba(255, 255, 255, 0.14)'
        thumbStyle={styles.thumb}
        trackStyle={styles.track}/>
    </View>
  );
};
Bạn cũng có thể thêm một component controls:
const Controls = ({
  paused,
  shuffleOn,
  repeatOn,
  onPressPlay,
  onPressPause,
  onBack,
  onForward,
  onPressShuffle,
  onPressRepeat,
  forwardDisabled,
}) => (
  <View style={styles.container}>
    <TouchableOpacity activeOpacity={0.0} onPress={onPressShuffle}>
      <Image style={[styles.secondaryControl, shuffleOn ? [] : styles.off]}
        source={require('../img/ic_shuffle_white.png')}/>
    </TouchableOpacity>
    <View style={{width: 40}} />
    <TouchableOpacity onPress={onBack}>
      <Image source={require('../img/ic_skip_previous_white_36pt.png')}/>
    </TouchableOpacity>
    <View style={{width: 20}} />
    {!paused ?
      <TouchableOpacity onPress={onPressPause}>
        <View style={styles.playButton}>
          <Image source={require('../img/ic_pause_white_48pt.png')}/>
        </View>
      </TouchableOpacity> :
      <TouchableOpacity onPress={onPressPlay}>
        <View style={styles.playButton}>
          <Image source={require('../img/ic_play_arrow_white_48pt.png')}/>
        </View>
      </TouchableOpacity>
    }
    <View style={{width: 20}} />
    <TouchableOpacity onPress={onForward}
      disabled={forwardDisabled}>
      <Image style={[forwardDisabled && {opacity: 0.3}]}
        source={require('../img/ic_skip_next_white_36pt.png')}/>
    </TouchableOpacity>
    <View style={{width: 40}} />
    <TouchableOpacity activeOpacity={0.0} onPress={onPressRepeat}>
      <Image style={[styles.secondaryControl, repeatOn ? [] : styles.off]}
        source={require('../img/ic_repeat_white.png')}/>
    </TouchableOpacity>
  </View>
);
Cuối cùng, chúng ta có thể đặt tất stateless components này trong App.js để kiểm tra giao diện người dùng và test nó:
import Header from './Header';
import AlbumArt from './AlbumArt';
import TrackDetails from './TrackDetails';
import SeekBar from './SeekBar';
import Controls from './Controls';

class App extends Component {
  render() {
    return (
      <View style={styles.container}>
        <Header message="Playing from Charts" />
        <AlbumArt url="http://36.media.tumblr.com/14e9a12cd4dca7a3c3c4fe178b607d27/tumblr_nlott6SmIh1ta3rfmo1_1280.jpg" />
        <TrackDetails title="Stressed Out"
          artist="Twenty One Pilots" />
        <SeekBar trackLength={204} currentPosition={156} />
        <Controls />
      </View>
    );
  }
}
Đây là một so sánh, với một ảnh chụp màn hình từ Spotify và ứng dụng của chúng tôi:
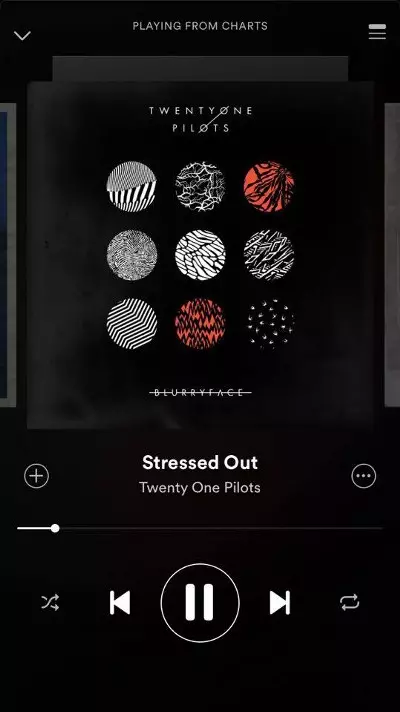
Không tệ lắm hả? Bây giờ để phát âm thanh, chúng tôi sẽ sử dụng react-native-video. Đây là cách sử dụng nó:
npm install react-native-video — save
$ npm install -g rnpm
$ rnpm link react-native-video
$ react-native run-ios
$ react-native run-android
Bây giờ, kết nối các button play và pause trong component được gọi là Player:
export default class Player extends Component {
  constructor(props) {
    super(props);
    this.state = {
      paused: true,
      totalLength: 1,
      currentPosition: 0,
      selectedTrack: 0,
    };
  }

  setDuration(data) {
    this.setState({totalLength: Math.floor(data.duration)});
  }

  setTime(data) {
    this.setState({currentPosition: Math.floor(data.currentTime)});
  }

  seek(time) {
    time = Math.round(time);
    this.refs.audioElement && this.refs.audioElement.seek(time);
    this.setState({
      currentPosition: time,
      paused: false,
    });
  }

  render() {
    const track = this.props.tracks[this.state.selectedTrack];
    const video = (
      <Video source={{uri: track.audioUrl}} // Can be a URL or a local file.
        ref="audioElement"
        paused={this.state.paused}               // Pauses playback entirely.
        onLoad={this.setDuration.bind(this)}    // Callback when video loads
        onProgress={this.setTime.bind(this)}    // Callback every ~250ms with currentTime
        style={styles.audioElement} />
    );

    return (
      <View style={styles.container}>
        <StatusBar hidden={true} />
        <Header message="Playing From Charts" />
        <AlbumArt url={track.albumArtUrl} />
        <TrackDetails title={track.title} artist={track.artist} />
        <SeekBar
          onSeek={this.seek.bind(this)}
          trackLength={this.state.totalLength}
          onSlidingStart={() => this.setState({paused: true})}
          currentPosition={this.state.currentPosition} />
        <Controls
          onPressPlay={() => this.setState({paused: false})}
          onPressPause={() => this.setState({paused: true})}
          paused={this.state.paused}/>
        {video}
      </View>
    );
  }
}
Và chúng ta có thể sử dụng nó trong ứng dụng bằng cách xác định một vài bản nhạc:
import React, { Component } from 'react';
import Player from './Player';

export const TRACKS = [
  {
    title: 'Stressed Out',
    artist: 'Twenty One Pilots',
    albumArtUrl: "http://36.media.tumblr.com/14e9a12cd4dca7a3c3c4fe178b607d27/tumblr_nlott6SmIh1ta3rfmo1_1280.jpg",
    audioUrl: "http://russprince.com/hobbies/files/13%20Beethoven%20-%20Fur%20Elise.mp3",
  },
  {
    title: 'Love Yourself',
    artist: 'Justin Bieber',
    albumArtUrl: "http://arrestedmotion.com/wp-content/uploads/2015/10/JB_Purpose-digital-deluxe-album-cover_lr.jpg",
    audioUrl: 'http://oranslectio.files.wordpress.com/2013/12/39-15-mozart_-adagio-fugue-in-c-minor-k-546.mp3',
  },
  {
    title: 'Hotline Bling',
    artist: 'Drake',
    albumArtUrl: 'https://upload.wikimedia.org/wikipedia/commons/c/c9/Drake_-_Hotline_Bling.png',
    audioUrl: 'http://russprince.com/hobbies/files/13%20Beethoven%20-%20Fur%20Elise.mp3',
  },
];

export default class App extends Component {
  render() {
    return <Player tracks={TRACKS} />
  }
}
Cuối cùng hãy run App và test thử nhá.
Cảm ơn và hi vọng bài viết có ích cho công việc của bạn.
All rights reserved
