Building a Gallery using React.js, Webpack, Bootstrap, and SASS (CSS)
Bài đăng này đã không được cập nhật trong 4 năm
Không có cách nào tốt hơn để bắt đầu học React bằng những kiến thức phức tạp . Xem hướng dẫn này và bắt đầu xây dựng ứng dụng React luôn nào!
 Để khai thác tối đa các tính năng của JSX, gói và ES6 với React, chúng ta cần công cụ như Webpack và Babel. Vì vậy, trong các phần sau, chúng ta sẽ thấy làm thế nào để thiết lập một môi trường phát triển React với các công nghệ này.
1. Setting up the project
Hãy bắt đầu lệnh npm init trong terminal của bạn. Bạn sẽ có tệp package.json giống như sau:
{
  "name": "react-starter",
  "version": "1.0.0",
  "description": "A React Starter Kit to use as a starting point for working on simple ReactJS app",
  "main": "index.js",
  "scripts": {
    "test": "echo \"Error: no test specified\" && exit 1"
  },
  "repository": {
    "type": "git",
    "url": "git+https://github.com/gdangelo/react-starter.git"
  },
  "keywords": [
    "ReactJS"
  ],
  "author": "Grégory D'Angelo",
  "license": "ISC",
  "bugs": {
    "url": "https://github.com/gdangelo/react-starter/issues"
  },
  "homepage": "https://github.com/gdangelo/react-starter#readme"
}
2. Installing and configuring Webpack
Webpack là module bundler hoàn hảo để sử dụng nó cùng với React. Từ code ứng dụng của chúng ta (có dependencies) và tạo ra static assets dựa trên một số cấu hình. Webpack cũng có một máy chủ phát triển phục vụ các static assets và xem các thay đổi trong các tập tin nguồn của chúng ta. Quá trình bundling được thực hiện khi thay đổi.
Thế nên , cài đặt nó bằng cách sử dụng npm với dev dependency:
npm install --save-dev webpack
Tiếp theo chúng ta cần tạo file webpack.config.js chứa tất cả các cài đặt cấu hình cần thiết để Webpack thực hiện công việc của nó. Thêm các cài đặt cơ bản sau trong tệp tin cấu hình :
var path = require("path");

module.exports = {
 entry: "./src/index.js",
 output: {
   path: path.resolve(__dirname, './build'),
   filename: "bundle.js"
 }
};
The entry Chỉ định file đầu vào của ứng dụng React của chúng ta. Nó sẽ được sử dụng bởi Webpack như là điểm xuất phát cho quá trình bundling. The output Webpack phải làm gì sau khi hoàn tất quá trình bundling. Thư mục build / sẽ được sử dụng để xuất file có tên bundle.js. Bây giờ chúng ta đã có các cài đặt cơ bản, chúng ta cần phải di chuyển code React từ index.html sang index.js. Chúng ta cũng sẽ yêu cầu react và react-dom các thư viện từ index.js. Đầu tiên hãy sửa đổi index.html
<!DOCTYPE html>
<html lang="en">
  <head>
    <meta charset="UTF-8">
    <title>Hello, React!</title>
  </head>
  <body>
    <div class="container"></div>

    <script type="text/javascript" src="build/bundle.js"></script>
  </body>
</html>
Install react and react.dom using npm :
npm install --save react react-dom
Tạo file index.js trong ./src:
var React = require('react');
var ReactDOM = require('react-dom');
var App = require('./components/App/App');

var element = React.createElement(App, {});
ReactDOM.render(element, document.querySelector('.container'));
Hãy tạo App.js trong ./components/App:
var React = require('react');

module.exports = React.createClass({
  render: function () {
    return React.createElement('h1', null, 'Hello, React!');
  }
});
Bây giờ hãy chạy lệnh sau trong terminal :
./node_modules/.bin/webpack
Nó tạo ra bundle.js trong thư mục ./build. Bạn có thể mở index.html trong trình duyệt của bạn và xem thông báo "Hello, React!"
3. Setting up Babel-loader
Để sử dụng cú pháp JSX và ES6 trong ứng dụng React, chúng ta sẽ cần phải sử dụng một công cụ chuyển chúng thành vanilla JavaScript. Nó sẽ được thực hiện với Webpack và loaders(bộ tải). Loaders được sử dụng bởi Webpack để xử lý file trước khi gói chúng. Chúng ta sẽ sử dụng Babel để xử lý trước các file. Chúng ta có thể thiết lập trình nạp Babel bằng cách cài đặt các gói npm sau:
npm install --save-dev babel-loader babel-preset-es2015 babel-preset-react babel-preset-stage-0
Babel-preset-es2015 và babel-preset-react là các plugin Babel được sử dụng để biên dịch ES2016 sang ES6 và biến đổi cú pháp JSX thành JS tương ứng. Để thực hiện các bản dịch tương ứng, chúng ta cần cho Babel sử dụng hai plugin này bằng cách thêm dòng sau vào tệp .babelrc:
{
 "presets" : ["es2015", "react", "stage-0"]
}
Bây giờ chúng ta cần cập nhật cài đặt cấu hình Webpack để sử dụng trình nạp babel:
var path = require("path");

module.exports = {
 entry: "./src/index",
 output: {
   path: path.resolve(__dirname, './build'),
   filename: "bundle.js"
 },
 resolve: {
   extensions: ['', '.js', '.jsx']
 },
 module: {
   loaders: [
     {
       test: /\.jsx?$/,
       exclude: /node_modules/,
       loaders: ['babel']
     }
   ]
 }
};
Trong tệp tin cấu hình, chúng tôi đã xác định một mảng của loaders mà chỉ chứa trình nạp babel-loaders. Áp dụng cho các tệp phù hợp với test regex và loại trừ các tệp phù hợp với exclude regex. Trong trường hợp này, nó sẽ xử lý tất cả các tệp với phần mở rộng .js hoặc .jsx ngoại trừ các tệp tin bên trong thư mục node_modules Bây giờ chúng ta có thể sử dụng JSX và ES6 trong ứng dụng React của chúng tôi:
// App.jsx

import React, { Component } from 'react';

class App extends Component {

  render() {
    return <h1>Hello, React!</h1>;
  }

}

export default App;
// index.js

import React from 'react';
import { render } from 'react-dom';
import App from './components/App/App';

let element = React.createElement(App, {});
render(element, document.querySelector('.container'));
Một lần nữa chạy Webpack và xem kết quả
4. Configuring Webpack Dev Server and React Hot loader
Như đề cập đến trước đây, Webpack đi kèm với một máy chủ development chạy lại quá trình bundling Do đó, chúng ta sẽ sử dụng WebpackDevServer để biên dịch. Cài đặt nó qua npm:
npm install --save-dev webpack-dev-server
//webpack.config.js
var path = require("path");
var webpack = require("webpack");

module.exports = {
 entry: [
   'webpack-dev-server/client?http://localhost:8080', // WebpackDevServer host and port
   './src/index' // Your appʼs entry point
 ],
 output: {
   path: path.resolve(__dirname, 'build'),
   publicPath: '/build/',
   filename: "bundle.js"
 },
 resolve: {
   extensions: ['', '.js', '.jsx']
 },
 plugins: [
   new webpack.HotModuleReplacementPlugin(),
   new webpack.NoErrorsPlugin()
 ],
 module: {
   loaders: [
     {
       test: /\.jsx?$/,
       exclude: /node_modules/,
       loaders: ['babel']
     }
   ]
 }
};
Lưu ý rằng chúng ta đã thêm một client host và cổng vào điểm truy cập webpack-dev-server. Cũng cần phải xác định tệp output.publicPath phù hợp với tệp output.path từ chế độ xem của trang index.html. Cuối cùng, chúng tôi đã thêm một phần cho các plugin và yêu cầu HotModuleReplacementPlugin và NoErrorsPlugin. Bây giờ, bạn có thể chạy WebpackDevServer với lệnh sau và mở http: // localhost: 8080 URL trong trình duyệt:
./node_modules/.bin/webpack-dev-server
Thực hiện một số thay đổi trong phần Thành phần phản ứng lại và lưu tệp của bạn. Chú ý quá trình bundling trên terminal của bạn và những thay đổi xảy ra trực tiếp trong trình duyệt.Tuy nhiên để có thể làm mới trực tiếp trong khi chỉnh sửa các thành phần React của chúng ta bằng cách bảo vệ trạng thái, chúng ta sẽ sử dụng plugin React Hot Loader. Gói NPM duy nhất mà chúng ta cần phải cài đặt là react-hot-loader:
npm install --save-dev react-hot-loader
///webpack.config.js
var path = require("path");
var webpack = require("webpack");

module.exports = {
  entry: [
    'webpack-dev-server/client?http://localhost:8080', // WebpackDevServer host and port
    'webpack/hot/only-dev-server', // "only" prevents reload on syntax errors
    './src/index' // Your appʼs entry point
  ],
  output: {
    path: path.resolve(__dirname, './build'),
    publicPath: '/build/',
    filename: "bundle.js"
  },
  resolve: {
    extensions: ['', '.js', '.jsx']
  },
  plugins: [
    new webpack.HotModuleReplacementPlugin(),
    new webpack.NoErrorsPlugin()
  ],
  module: {
    loaders: [
      {
        test: /\.jsx?$/,
        exclude: /node_modules/,
        loaders: ['react-hot', 'babel']
      }
    ]
  }
};
Chạy npm start.
5. Adding styles with Sass
Đối với JSX, chúng tôi sẽ sử dụng bộ tải để xử lý đánh dấu Sass giống như trong CSS của chúng tôi. Cài đặt chúng với npm:
npm install --save-dev style-loader css-loader postcss-loader postcss autoprefixer precss
style-loader and css-loader cho phép chúng ta load tệp tin css trong các react components. Trong khi, postcss-loader là loader để xử lý CSS của chúng ta với các plugin. Chúng ta sẽ sử dụng autoprefixer and precss
///webpack.config.js
var path = require("path");
var webpack = require("webpack");
var autoprefixer = require('autoprefixer');
var precss = require('precss');

module.exports = {
  entry: [
    'webpack-dev-server/client?http://localhost:8080', // WebpackDevServer host and port
    './src/index' // Your appʼs entry point
  ],
  output: {
    path: path.resolve(__dirname, 'build'),
    publicPath: '/build/',
    filename: "bundle.js"
  },
  resolve: {
    extensions: ['', '.js', '.jsx']
  },
  plugins: [
    new webpack.HotModuleReplacementPlugin(),
    new webpack.NoErrorsPlugin()
  ],
  module: {
    loaders: [
      {
        test: /\.jsx?$/,
        exclude: /node_modules/,
        loaders: ['babel']
      }, {
        test: /\.scss$/,
        loaders: ['style-loader', 'css-loader', 'postcss-loader']
      }
    ]
  },
  postcss: function () {
    return [autoprefixer, precss];
  }
};
Trong project này, mỗi component sẽ có tập tin scss riêng của nó. Hơn nữa một tập tin scss phổ biến sẽ giữ tất cả các biến được sử dụng trên tất cả components. Tạo tệp variables.scssfile trong ./src/components và thêm một số biến:
/*
 * Colors
 * ========================================================================== */

$blue:                  #e9f0f5;
$grey:                  #ccc;
$grey-dark:             #89949B;
$grey-light:            #B8C3C8;
$red:                   #EA7882;

/*
 * Typography
 * ========================================================================== */

$font-family-base:      'Segoe UI', 'HelveticaNeue-Light', sans-serif;

/*
 * Layout
 * ========================================================================== */

$max-content-width:     1000px;
Sau đó thêm file App.scss trong ./src/components/App với nội dung sau:
@import '../../../node_modules/normalize.css/normalize.css';
@import '../variables.scss';

/*
* Base styles
* ========================================================================== */

html {
 color: #222;
 font-weight: 100;
 font-size: 1em; /* ~16px; */
 font-family: $font-family-base;
 line-height: 1.375; /* ~22px */
}

.container {
 margin: 0 auto;
 padding: 0 0 40px;
 max-width: $max-content-width;
}
chúng ta đã sử dụng normalize.css. Vì vậy, bạn cần phải cài đặt nó qua npm:
npm install --save normalize.css
Cuối cùng, require stylesheet bên trong React component
import React, { Component } from 'react';
import s from './App.scss';

class App extends Component {

 render() {
   return <h1>Hello, React!</h1>;
 }

}

export default App;
Dự án của bạn bây giờ sẽ được cấu trúc như sau:
- src
    - components
    - App
        - App.jsx
        - App.scss
    - index.js
    - variables.scss
- .babelrc
- index.html
- package.json
6. Building the Image Gallery
install Bootstrap:
bower install --save bootstrap
//index.html
<!DOCTYPE html>
<html lang="en">
  <head>
    <meta charset="UTF-8">
    <title>Image Gallery</title>
    <link rel="stylesheet" href="bower_components/bootstrap/dist/css/bootstrap.min.css">
  </head>
  <body>
    <div class="container"></div>

    <script src="bower_components/jquery/dist/jquery.min.js"></script>
    <script src="bower_components/bootstrap/dist/js/bootstrap.min.js"></script>

    <script type="text/javascript" src="build/bundle.js"></script>
  </body>
</html>
Bây giờ, chúng tôi sẽ triển khai mục thư viện như là một React component. Vì vậy, hãy tạo ./src/components/GalleryItem.jsx với nội dung sau:
import React, { Component } from 'react';
import s from './GalleryItem.scss';

class GalleryItem extends Component {

  constructor(props) {
    super(props);
    // Manually bind this method to the component instance...
    this.handleIncrement = this.handleIncrement.bind(this);
    this.handleMouseEnter = this.handleMouseEnter.bind(this);
    this.handleMouseLeave = this.handleMouseLeave.bind(this);
  }

  static defaultProps = {
    title: "Camera",
    subtitle: "Lorem ipsum",
    image: "https://cloud.githubusercontent.com/assets/4352286/11920432/f0aaff34-a76f-11e5-8456-a5d78b089233.jpg"
  }

  state = {
    hovering: false,
    liked: this.props.liked || false,
    counts: (Math.round(Math.random() * 20) + 4)
  }

  handleIncrement() {
    if(this.state.liked) return;
    this.setState({
      liked: true,
      counts: this.state.counts+1
    });
  }

  render() {
    return (
      <div className="col-xs-6 col-sm-4">
        <div className="thumbnail">
          <div
            className="image-preview"
            onMouseEnter={this.handleMouseEnter}
            onMouseLeave={this.handleMouseLeave}>

            <a className="gallery" href={this.props.image} title={this.props.title}>
              {this.state.hovering ? this.icons() : null}
              <img src={this.props.image} alt={this.props.title} />
            </a>
          </div>
          <div className="caption text-center">
            <h4>{this.props.title}</h4>
            <h5>{this.props.subtitle}</h5>
            <a className={"btn btn-primary" + (this.state.liked ? " liked" : "")} onClick={this.handleIncrement}>
              <span className="glyphicon glyphicon-heart"></span> {this.state.counts}
            </a>
          </div>
        </div>
      </div>
    );
  }

  icons() {
    return <div className="overlay"><span className="glyphicon glyphicon-zoom-in"></span></div>;
  }

  handleMouseEnter() {
    this.setState({hovering: true});
  }

  handleMouseLeave () {
    this.setState({hovering: false});
  }

};

export default GalleryItem;
./src/components/GalleryItem.scss
@import '../variables.scss';

/*
 * GalleryItem styles
 * ========================================================================== */

 .btn {
   border: 2px solid $grey;
   border-radius: 20px;
   padding: 3px 20px;
 }

 .btn-primary {
   background-color: white;
   color: $grey-dark;
   &:hover, &:focus, &:active, &.liked {
     background-color: $red;
     border-color: $red;
     color: white;
   }
 }

 .thumbnail {
   border-radius: 8px;
   padding: 12.5px;

   .image-preview {
      display: inline-block;
      position: relative;
      margin: 0 auto;
      img {
        width: 100%;
        height: 100%;
        display: inline-block;
      }
      .overlay {
         position: absolute;
         top: 0;
         left: 0;
         width: 100%;
         height: 100%;
         background-color: black;
         opacity: 0.7;
         cursor: pointer;
      }
      .glyphicon-zoom-in {
        font-size: 40px;
        color: white;
        position: absolute;
        left: 50%;
        top: 50%;
        transform: translate(-50%, -50%);
      }
    }
   .caption {
     padding: 0;
     text-transform: uppercase;
     h5 {
       color: $grey-light;
     }
   }
 }
Như chúng ta đã định nghĩa GalleryItem của chúng ta là một thành phần tái sử dụng được, chúng ta có thể viết ít code để xây dựng toàn bộ bộ sưu tập hình ảnh.
./src/components/Gallery/Gallery.jsx
import React, { Component } from 'react';
import GalleryItem from '../GalleryItem/GalleryItem';
import s from './Gallery.scss';

class Gallery extends Component {

 constructor(props) {
   super(props);
   // Manually bind this method to the component instance...
   this.renderItems = this.renderItems.bind(this);
 }

 render() {
   return (
     <div className="row">
       {this.renderItems()}
     </div>
   );
 }

 renderItems() {
   return this.props.items.map(function(item){
     return <GalleryItem key={item.id} {...item} />;
   });
 }

};

export default Gallery;
// index.js

import React from 'react';
import { render } from 'react-dom';
import App from './components/App/App';

let options = {
  galleryItems: [
    { id: 1, title: "Camera", subtitle: "5th Jan - 12th Jan", image: "https://cloud.githubusercontent.com/assets/4352286/11920432/f0aaff34-a76f-11e5-8456-a5d78b089233.jpg", liked: true },
    { id: 2, title: "Notebook", subtitle: "13th Feb - 5th Aug", image: "https://cloud.githubusercontent.com/assets/4352286/11920434/f0ac4d44-a76f-11e5-9190-b93bc72688ed.jpg" },
    { id: 3, title: "Thinking", subtitle: "13th Dec - 14th Dec", image: "https://cloud.githubusercontent.com/assets/4352286/11920433/f0ab6a28-a76f-11e5-8ee9-525dc22ca8a8.jpg" }
  ]
};

let element = React.createElement(App, options);
render(element, document.querySelector('.container'));
// App.jsx

import React, { Component } from 'react';
import Gallery from '../Gallery/Gallery';
import s from './App.scss';

class App extends Component {

  render() {
    return <Gallery items={this.props.galleryItems} />;
  }

}

export default App;
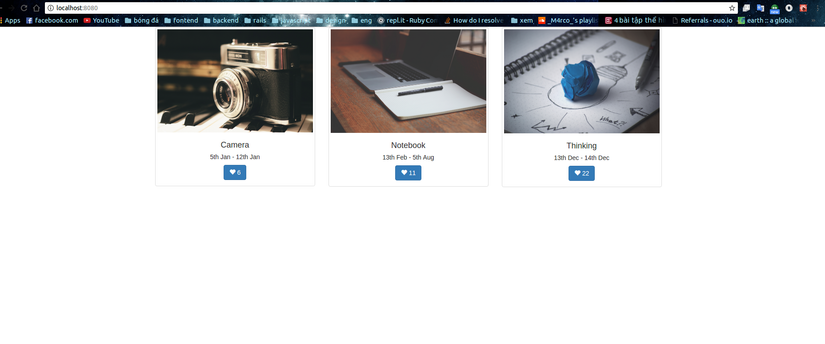
Vì vậy, chúng tôi có một bộ sưu tập hình ảnh đẹp ở đây, nhưng nó không phải là tất cả những gì tuyệt vời nếu chúng ta không thể phóng to vào hình ảnh và xem trình chiếu. Để có một slideshow, chúng tôi sẽ bao gồm thư viện của bên thứ ba để đơn giản hóa mã của Gallery của chúng tôi.
bower install --save blueimp-gallery
<!DOCTYPE html>
<html lang="en">
  <head>
    <meta charset="UTF-8">
    <title>Image Gallery</title>
    <link rel="stylesheet" href="bower_components/bootstrap/dist/css/bootstrap.min.css">
    <link rel="stylesheet" href="bower_components/blueimp-gallery/css/blueimp-gallery.min.css">
  </head>
  <body>
    <div class="container"></div>
    <div id='blueimp-gallery' class='blueimp-gallery blueimp-gallery-controls'>
      <div class='slides'></div>
      <h3 class='title'></h3>
      <p class="description"></p>
      <a class='prev'>‹</a>
      <a class='next'>›</a>
      <a class='close'>×</a>
      <a class='play-pause'></a>
      <ol class='indicator'></ol>
    </div>

    <script src="bower_components/jquery/dist/jquery.min.js"></script>
    <script src="bower_components/bootstrap/dist/js/bootstrap.min.js"></script>
    <script src="bower_components/blueimp-gallery/js/blueimp-gallery.min.js"></script>

    <script type="text/javascript" src="build/bundle.js"></script>
  </body>
</html>
//Gallery.jsx
import React, { Component } from 'react';
import GalleryItem from '../GalleryItem/GalleryItem';
import s from './Gallery.scss';

class Gallery extends Component {

  constructor(props) {
    super(props);
    // Manually bind this method to the component instance...
    this.renderItems = this.renderItems.bind(this);
  }

  componentDidMount() {
    let links = document.getElementsByClassName('gallery');
    $('.gallery').unbind('click').bind('click', event => {
      blueimp.Gallery(links, {
        index: event.currentTarget,
        event: event
      });
    });
  }

  render() {
    return (
      <div className="row">
        {this.renderItems()}
      </div>
    );
  }

  renderItems() {
    return this.props.items.map(function(item){
      return <GalleryItem key={item.id} {...item} />;
    });
  }

};

export default Gallery;
chạy npm start, mở trình duyệt của bạn và xem kết quả
 nguồn http://www.eloquentwebapp.com/building-a-gallery-using-reactjs-webpack-bootstrap-and-sass/
All rights reserved
