Build và test app sử dụng Apple Push Notification Service (APNs)
Bài đăng này đã không được cập nhật trong 4 năm
1. Apple Push Notification Service (APNs):
Push notification cho phép chúng ta tiếp cận người dùng và thực hiện 1 số tác vụ ngay cả khi người dùng không sử dụng app. 1 số việc mà push notification có thể làm
- Hiển thị 1 đoạn text
- Chạy 1 file âm thanh của hệ thống hoặc của người dùng.
- Hiển thị số hiệu trên icon của app
- Cho phép người dùng tương tác mà ko cần mở app.
- Hiển thị file media đính kèm
- Bật ứng dụng từ dưới background và thực hiện 1 tác vụ nào đó.
2. Thiết lập ứng dụng để sử dụng APNs:
2.1 Thiết lập trong project:
Chọn App Setting -> Capabilities bật Push Notifications -> chọn team để kích hoạt tính năng Sau khi kích hoạt thành công project của chúng ta sẽ như hình sau:
Trong project mở file AppDelegate.swift và thêm 1 số đoạn code:
func registerForPushNotification() {

    UNUserNotificationCenter.current().requestAuthorization(options: [.alert, .sound, .badge], completionHandler: {(granted, error) in
        if granted {
            print("Permission is granted")
        } else {
            print("Permission is fail")
        }
    })

    UNUserNotificationCenter.current().getNotificationSettings(completionHandler: {settings in
        guard settings.authorizationStatus == .authorized else {
            print("authorizations status is failed.")
            return
        }

        UIApplication.shared.registerForRemoteNotifications()
    })
}
Thêm hàm
registerForPushNotification()
vào trong hàm
func application(_ application: UIApplication, didFinishLaunchingWithOptions launchOptions: [UIApplicationLaunchOptionsKey: Any]?)
Để lấy device token ta thêm đoạn code sau:
func application(_ application: UIApplication, didRegisterForRemoteNotificationsWithDeviceToken deviceToken: Data) {
    let tokenParts = deviceToken.map{ data in
        return String(format: "%02.2hhx", data)
    }

    let token = tokenParts.joined()
    print("Device token: \(token)")
}

func application(_ application: UIApplication, didFailToRegisterForRemoteNotificationsWithError error: Error) {
    print("fail to register with error: \(error)")
}
nếu chạy trên simulator sẽ không có được token, thay vào đó màn hình sẽ show ra lỗi

do đó chúng ta cần device thật để lấy được device token:

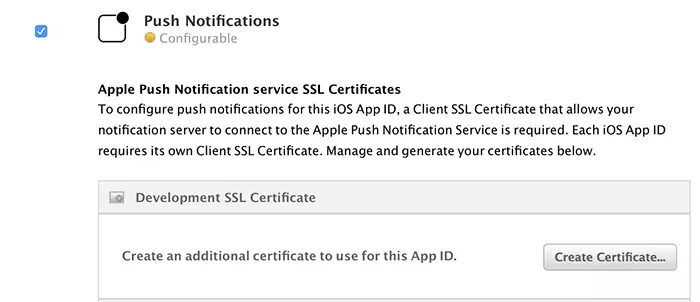
2.2 Thiết lập trong account apple developer:
Sau khi đã config xong trong project chúng ta sẽ tiến hành thiết lập trên account develop. Đăng nhập vào trang https://developer.apple.com bằng account developer, chọn mục App IDs -> chọn bundle của app -> chọn edit Chúng ta tích vào mục Push Notifications, ở đây chúng ta sẽ thiết lập push cho môi trường develop, môi trường production cũng sẽ tương tự như vậy.
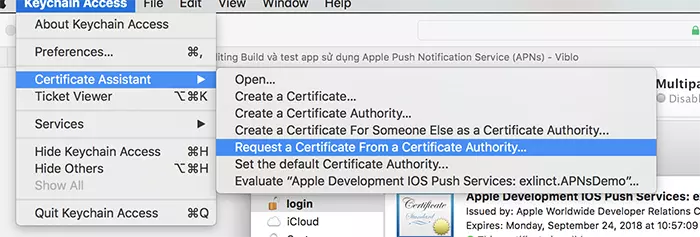
Để config push môi trường develop, trước tiên chúng ta sẽ tạo certificate tương ứng mới máy mac của chúng bằng cách vào Launchpad -> Other -> Keychain Access rồi chọn:
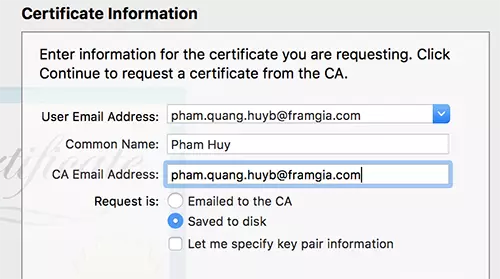
nhập email tên rồi chọn save to disk
Sau khi đã tạo xong file certificate, chúng ta sẽ đăng ký nó với account develop bằng cách chọn Development SSL Certificate -> Continue -> Choose file -> trỏ đến folder chứa file certificate và chọn. Khi đăng ký thành công tại Push Notification, Development SSL Certificate sẽ hiện lên file config push notification develop

Đến đây là chúng ta đã hoàn thành việc config push notificaiton trên project và account develop.
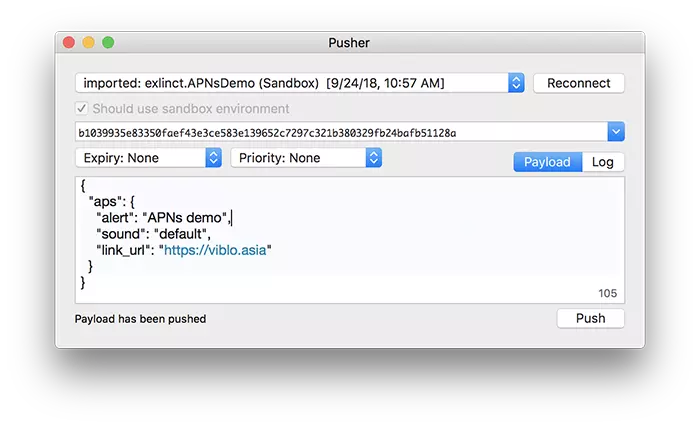
3. Test push notification:
Thường thì chúng ta sẽ nhờ bên server test hoặc là tạo file .pem và test trong terminate, ở đây mình giới thiệu 1 ứng dụng đã được cấu hình sẵn, chúng ta chỉ việc export file .p12 -> chọn từ ứng dụng là đã có thể test
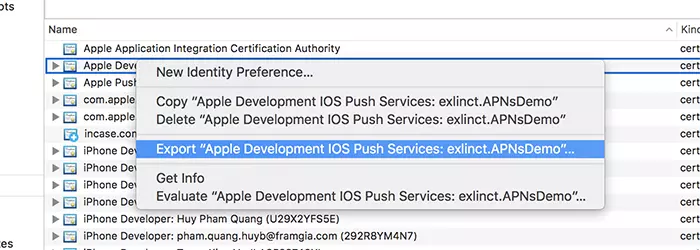
Đây là link github của ứng dụng, chúng ta sẽ download nó về extract ra. Chúng ta sẽ tạo file p.12 bằng cách tại mục Development SSL Certificate chúng ta download file .cer về và kích để insert vào máy. Sau đó vào Keychain Access chọn Cetificates -> chọn file certificate chúng ta vừa down và chạy chuột phải vào nó chọn export save nó vào folder có thể đặt password hoặc không
Bật ứng dụng Pusher lên, chọn file .p12 chúng ta vừa tạo, nhập device toke chúng ta có khi build app lên:
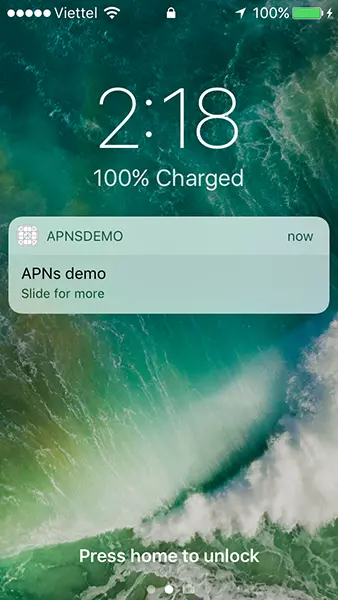
Sau khi ấn push chúng ta sẽ thấy trên device hiện lên notifcation:
4. Demo
https://github.com/pqhuy87it/MonthlyReport/tree/master/APNsDemo
All rights reserved
