Best practices for ExpressJS (Part II)
Bài đăng này đã không được cập nhật trong 4 năm
Tiếp nối phần 1. Mình sẽ tiếp tục phần 2 hướng dẫn các bạn viết controller, model, migration dựa vào module sequelize.
Ứng dụng của chúng ta sẽ cho phép tạo, thêm, sửa, xóa và liệt kê danh sách công việc todo task. Cơ sở dữ liệu sẽ gồm 2 bảng Todos và TodoItems.
Tạo các models
Quan hệ giữa 2 bảng Todos và TodoItems là 1-n. Một Todo có nhiều TodoItem và một TodoItem thuộc về một Todo.
Chạy lệnh sau:
$ sequelize model:create --name Todo --attributes title:string
Câu lệnh này sẽ sinh ra 1 file todo.js trong thư mục server/models và file <date>-create-todo.js migration file trong thư mục server/migrations. <date> sẽ là thời gian model được tạo ra.
Todo model sẽ như sau:
'use strict';
module.exports = function(sequelize, DataTypes) {
  var Todo = sequelize.define('Todo', {
    title: DataTypes.STRING
  }, {
    classMethods: {
      associate: function(models) {
        // associations can be defined here
      }
    }
  });
  return Todo;
};
Trong file này, chúng ta định nghĩa Todo model có trường title có kiểu dữ liệu là String.
Code tự động sinh ra là ES5. Chúng ta có thể refactor sang ES6. Tương tự tạo TodoItem model như sau:
$ sequelize model:create --name TodoItem --attributes content:string,complete:boolean
Chúng ta cũng sẽ định nghĩa mối quan hệ giữa các model như sau:
// server/models/todo.js

module.exports = (sequelize, DataTypes) => {
  const Todo = sequelize.define('Todo', {
    title: {
      type: DataTypes.STRING,
      allowNull: false,
    },
  });

  Todo.associate = (models) => {
    Todo.hasMany(models.TodoItem, {
      foreignKey: 'todoId',
      as: 'todoItems',
    });
  };

  return Todo;
};
Todo.associateclass method là phương thức chúng ta định nghĩa mối quan hệ giữaTodovàTodoItem.as: todoItemsnghĩa là mỗi khi query thì mộttodosẽ bao gồmtodo itemscủa nó dưới nhãn làtodoItemsthay vìTodoItems. ModelTodoItemsgiờ như sau:
module.exports = (sequelize, DataTypes) => {
  const TodoItem = sequelize.define('TodoItem', {
    content: {
      type: DataTypes.STRING,
      allowNull: false,
    },
    complete: {
      type: DataTypes.BOOLEAN,
      defaultValue: false,
    },
  });

  TodoItem.associate = (models) => {
    TodoItem.belongsTo(models.Todo, {
      foreignKey: 'todoId',
      onDelete: 'CASCADE',
    });
  };

  return TodoItem;
};
Chú ý là onDelete: CASCADE chỉ rõ Postgres rằng nếu chúng ta xóa 1 todo thì các todo items của nó cũng sẽ bị xóa theo.
Các file migrations cũng được refactor sang ES6 như sau:
// server/migrations/<date>-create-todo.js
module.exports = {
  up: (queryInterface, Sequelize) =>
    queryInterface.createTable('Todos', {
      id: {
        allowNull: false,
        autoIncrement: true,
        primaryKey: true,
        type: Sequelize.INTEGER,
      },
      title: {
        type: Sequelize.STRING,
        allowNull: false,
      },
      createdAt: {
        allowNull: false,
        type: Sequelize.DATE,
      },
      updatedAt: {
        allowNull: false,
        type: Sequelize.DATE,
      },
    }),
  down: (queryInterface /* , Sequelize */) => queryInterface.dropTable('Todos'),
};
// server/migrations/<date>-create-todo-item.js
module.exports = {
  up: (queryInterface, Sequelize) =>
    queryInterface.createTable('TodoItems', {
      id: {
        allowNull: false,
        autoIncrement: true,
        primaryKey: true,
        type: Sequelize.INTEGER,
      },
      content: {
        type: Sequelize.STRING,
        allowNull: false,
      },
      complete: {
        type: Sequelize.BOOLEAN,
        defaultValue: false,
      },
      createdAt: {
        allowNull: false,
        type: Sequelize.DATE,
      },
      updatedAt: {
        allowNull: false,
        type: Sequelize.DATE,
      },
      todoId: {
        type: Sequelize.INTEGER,
        onDelete: 'CASCADE',
        references: {
          model: 'Todos',
          key: 'id',
          as: 'todoId',
        },
      },
    }),
  down: (queryInterface /* , Sequelize */) =>
    queryInterface.dropTable('TodoItems'),
};
Cuối cùng chúng ta chạy lệnh migrate để tạo migration:
$ sequelize db:migrate
Tạo controller và routing
Chúng ta sẽ tạo 2 controller todosController và todoItemsController với các chức năng tạo mới, liệt kê, sửa, xóa.
Tạo todoController
Tạo 1 file todo.js trong thư mục server/controllers. Trong file này thêm chức năng create.
// server/controllers/todos.js
const Todo = require('../models').Todo;

module.exports = {
  create(req, res) {
    return Todo
      .create({
        title: req.body.title,
      })
      .then(todo => res.status(201).send(todo))
      .catch(error => res.status(400).send(error));
  },
};
Tiếp đến chúng ta tạo file index.js trong server/controllers để export controller.
// server/controllers/index.js

const todos = require('./todos');

module.exports = {
  todos,
};
Tạo routes
Tạo 1 file index.js trong thư mục server/routes:
// server/routes/index.js

const todosController = require('../controllers').todos;

module.exports = (app) => {
  app.get('/api', (req, res) => res.status(200).send({
    message: 'Welcome to the Todos API!',
  }));

  app.post('/api/todos', todosController.create);
};
Như vậy chúng ta vừa tạo route cho phương thức POST để create Todo.
Tiếp theo chúng ta thêm route này vào file app.js của ứng dụng.
app.js

const express = require('express');
const logger = require('morgan');
const bodyParser = require('body-parser');

const app = express();
app.use(logger('dev'));
app.use(bodyParser.json());
app.use(bodyParser.urlencoded({ extended: false }));

// Require our routes into the application.
require('./server/routes')(app);
app.get('*', (req, res) => res.status(200).send({
  message: 'Welcome to the beginning of nothingness.',
}));

module.exports = app;
Chú ý là phải thêm vào trước app.get('*', ...) vì ứng dụng sẽ tự tìm kiếm các route theo thứ tự để match, nếu không phù hợp mới chuyển sang route ở dưới. app.get('*', ...) là catch tất cả các request và return message luôn.
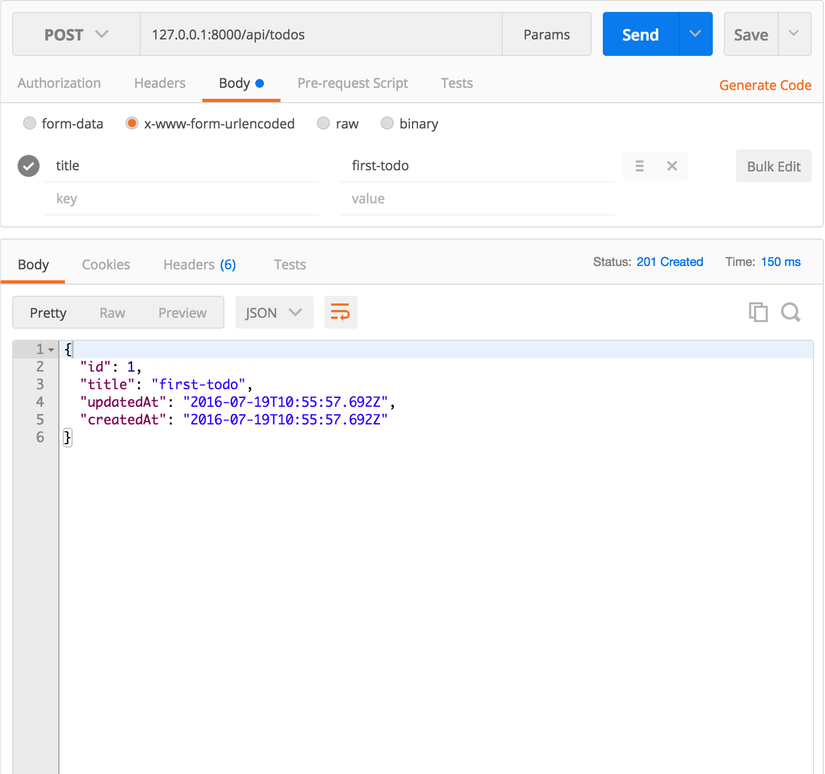
Bây giờ chúng ta sẽ dùng POSTMAN để tạo mới 1 todo.
Liệt kê danh sách todos
Thêm chức năng list todo vào controller todosController sau phương thức create.
// server/controllers/todos.js
...
list(req, res) {
  return Todo
    .all()
    .then(todos => res.status(200).send(todos))
    .catch(error => res.status(400).send(error));
},
...
Tiếp theo mở file server/routes/index.js để tạo 1 URL map với todo GET request để liệt kê danh sách todos;
// server/routes/index.js
...
app.post('/api/todos', todosController.create);
app.get('/api/todos', todosController.list);
...
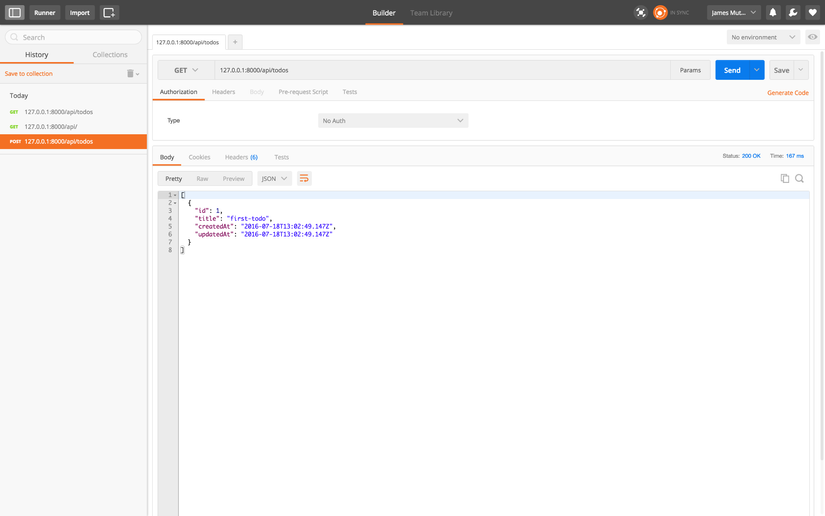
Mở POSTMAN và test url mới này.
Tạo todo Items
Tương tự tạo 1 file todoitems.js trong thư mục server/controllers . Chức năng create todoItems sẽ như sau:
// server/controllers/todoitems.js

const TodoItem = require('../models').TodoItem;

module.exports = {
  create(req, res) {
    return TodoItem
      .create({
        content: req.body.content,
        todoId: req.params.todoId,
      })
      .then(todoItem => res.status(201).send(todoItem))
      .catch(error => res.status(400).send(error));
  },
};
Thêm controller todoItem vào file index.js trong thư mục controller.
// server/controllers/index.js

const todos = require('./todos');
const todoItems = require('./todoitems');

module.exports = {
  todos,
  todoItems,
};
Bây giờ chúng ta chỉ cân thêm url cho chức năng tạo mới todoItems. Thêm đoạn code sau:
server/routes/index.js
...
app.post('/api/todos/:todoId/items', todoItemsController.create);
...
:todoId để cho Express biết segment đó chính là 1 parameter.
Test bằng POSTMAN:
Liệt kê todoItems trong todos
Sửa controller todosController.list một chút để nó có thể trả về thêm list todoItems.
// server/controllers/todos.js
...
list(req, res) {
  return Todo
    .findAll({
      include: [{
        model: TodoItem,
        as: 'todoItems',
      }],
    })
    .then(todos => res.status(200).send(todos))
    .catch(error => res.status(400).send(error));
},
...
Chú ý là chúng ta cần require TodoItem model ở đầu file server/controllers/todos.js. Vì trong method list có dùng tới model này.
Xem xét kết quả bằng POSTMAN:
Lấy một todo đơn lẻ
Tiếp theo chúng ta sẽ thêm một chức năng retrieve để get 1 todo theo id. Thêm đoạn code sau vào file server/controllers/todos.js
// server/controllers/todos.js

...
retrieve(req, res) {
  return Todo
    .findById(req.params.todoId, {
      include: [{
        model: TodoItem,
        as: 'todoItems',
      }],
    })
    .then(todo => {
      if (!todo) {
        return res.status(404).send({
          message: 'Todo Not Found',
        });
      }
      return res.status(200).send(todo);
    })
    .catch(error => res.status(400).send(error));
},
...
Thêm route cho hàm retrieve.
// server/routes/index.js

...
app.get('/api/todos/:todoId', todosController.retrieve);
...
Request /api/todos/1 bằng POSTMAN , kết quả như sau:
Cập nhật todo
Tương tự chúng ta thêm hàm update todo như sau:
// server/controllers/todos.js
...
update(req, res) {
  return Todo
    .findById(req.params.todoId, {
      include: [{
        model: TodoItem,
        as: 'todoItems',
      }],
    })
    .then(todo => {
      if (!todo) {
        return res.status(404).send({
          message: 'Todo Not Found',
        });
      }
      return todo
        .update({
          title: req.body.title || todo.title,
        })
        .then(() => res.status(200).send(todo))  // Send back the updated todo.
        .catch((error) => res.status(400).send(error));
    })
    .catch((error) => res.status(400).send(error));
},
...
Thêm route:
server/routes/index.js
...
app.put('/api/todos/:todoId', todosController.update);
...
Chú ý là update thì chúng ta dùng method PUT.
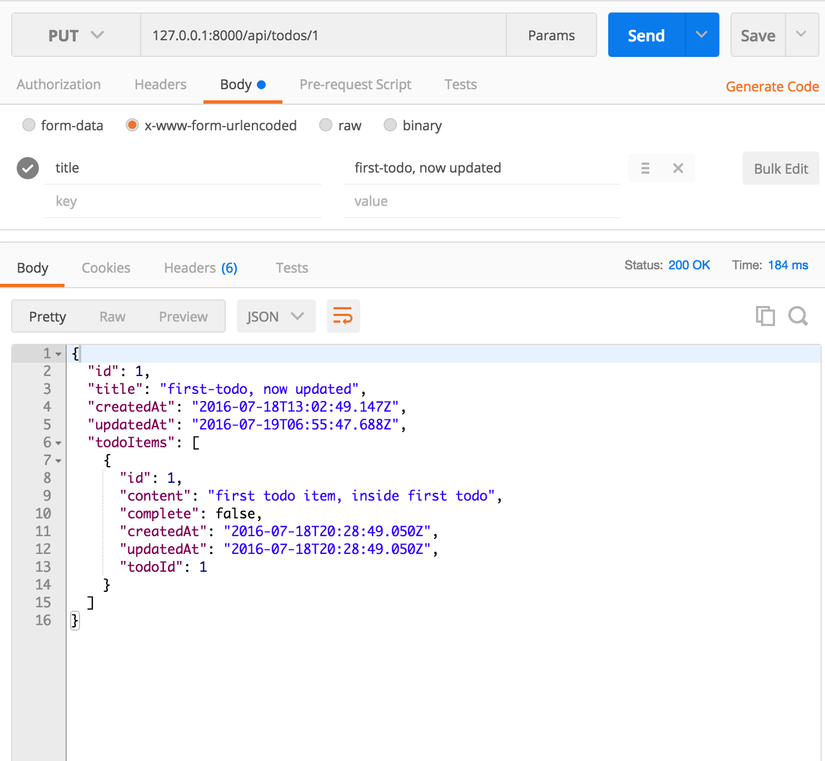
Test bằng POSTMAN
Deleting todos
Cuối cùng chúng ta tạo chức năng delete todo.
// server/controllers/todos.js

...
destroy(req, res) {
  return Todo
    .findById(req.params.todoId)
    .then(todo => {
      if (!todo) {
        return res.status(400).send({
          message: 'Todo Not Found',
        });
      }
      return todo
        .destroy()
        .then(() => res.status(204).send())
        .catch(error => res.status(400).send(error));
    })
    .catch(error => res.status(400).send(error));
},
...
Code cũng tương tự chức năng update 1 todo. Do đã config onDelete là CASCADE nên các todo items cũng bị xóa theo.
Thêm route :
// server/routes/index.js

...
app.delete('/api/todos/:todoId', todosController.destroy);
...
Nếu test bằng POSTMAN chúng ta có thể ngạc nhiên vì không thấy bất cứ data nào trả về. Sửa đổi một chút code trả về một status = 200 và một message xóa thành công.
...
  return todo
    .destroy()
    .then(() => res.status(200).send({ message: 'Todo deleted successfully.' }))
    .catch(error => res.status(400).send(error));
...
Cập nhật và xóa Todo Items
Tương tự như chức năng update và delete todo chúng ta thêm đoạn code sau vào controller todoitems.
// server/controllers/todoitems.js

...
update(req, res) {
  return TodoItem
    .find({
        where: {
          id: req.params.todoItemId,
          todoId: req.params.todoId,
        },
      })
    .then(todoItem => {
      if (!todoItem) {
        return res.status(404).send({
          message: 'TodoItem Not Found',
        });
      }

      return todoItem
        .update({
          content: req.body.content || todoItem.content,
          complete: req.body.complete || todoItem.complete,
        })
        .then(updatedTodoItem => res.status(200).send(updatedTodoItem))
        .catch(error => res.status(400).send(error));
    })
    .catch(error => res.status(400).send(error));
},

destroy(req, res) {
  return TodoItem
    .find({
        where: {
          id: req.params.todoItemId,
          todoId: req.params.todoId,
        },
      })
    .then(todoItem => {
      if (!todoItem) {
        return res.status(404).send({
          message: 'TodoItem Not Found',
        });
      }

      return todoItem
        .destroy()
        .then(() => res.status(204).send())
        .catch(error => res.status(400).send(error));
    })
    .catch(error => res.status(400).send(error));
},
...
Thêm route cho 2 chức năng này, file index.js route như thế này:
// server/routes/index.js


const todosController = require('../controllers').todos;
const todoItemsController = require('../controllers').todoItems;

module.exports = (app) => {
  app.get('/api', (req, res) => res.status(200).send({
    message: 'Welcome to the Todos API!',
  }));

  app.post('/api/todos', todosController.create);
  app.get('/api/todos', todosController.list);
  app.get('/api/todos/:todoId', todosController.retrieve);
  app.put('/api/todos/:todoId', todosController.update);
  app.delete('/api/todos/:todoId', todosController.destroy);

  app.post('/api/todos/:todoId/items', todoItemsController.create);
  app.put('/api/todos/:todoId/items/:todoItemId', todoItemsController.update);
  app.delete(
    '/api/todos/:todoId/items/:todoItemId', todoItemsController.destroy
  );

  // For any other request method on todo items, we're going to return "Method Not Allowed"
  app.all('/api/todos/:todoId/items', (req, res) =>
    res.status(405).send({
      message: 'Method Not Allowed',
  }));
};
Như vậy chúng ta đã hoàn thiện một ứng dụng ExpressJS với pattern MVC hoàn chỉnh.
Các bạn có thể download code tại đây
All rights reserved
