Bắt tay vào làm giao diện kéo thả cùng react-beautiful-dnd
Bài đăng này đã không được cập nhật trong 5 năm
Ở bài trước thì mình đã nói về cách đăng nhập. Về demo này thì mình làm to do list nên chức năng thiết yếu phải có sẽ là kẻo thả. Với việc kết hợp sử dụng thư viện frontend là reactjs thì việc kéo thả không còn quá là phức tạp. Chẹp, nhưng mà làm thủ công thì cũng khá là vất vả mà, nên mình sẽ dùng 1 package là react-beautiful-dnd (repo: https://github.com/atlassian/react-beautiful-dnd). À, và mình sẽ chỉ làm giao diện đơn giản thôi nhé, vì thẩm mỹ không phải thế mạnh nên là các bạn muốn nó đẹp hơn thì tự thêm thắt css nhé 
Để cài đặt package thì các bạn chạy command:
npm install react-beautiful-dnd --save
Một chút về flow của app
Trước khi làm thì cùng phải clear spec chút nhỉ. Về app của mình thì người dùng có thể tạo từng danh mục riêng, và ở trong danh mục đó sẽ tạo ra được các task. Có thể kéo thả các task trong cũng danh mục và từ danh mục này sang danh mục khác. Và các danh mục cũng có thể kéo thả để thay đổi vị trí cho thuận tiện
Danh mục
Model
Danh mục của mình sẽ bao gồm :
- _id
- title
- order (để sắp xếp thứ tự các danh mục)
- created_by
- tasks (vì mình sử dụng mongoDB nên không có khóa ngoại hay relation nên mình cần lưu lại id các tasks của danh mục, chút nữa mình sẽ giải thích rõ hơn phần này)
Khi đã có cấu trúc này thì chúng ta sẽ khởi tạo Schema
models\Category.js
const mongoose = require('mongoose');
const Schema = mongoose.Schema;

const CategorySchema = new Schema({
    _id: Schema.Types.ObjectId,
    title: {
        type: String,
        required: true,
        min: 1,
        max: 255
    },
    order: {
        type: Number,
        required: true
    },
    created_by: {
        type: String,
        required: true,
    },
    tasks: [
        {
            type: Schema.Types.ObjectId,
            ref: 'Task'
        }
    ]
});

module.exports = mongoose.model('Category', CategorySchema);
Ở đây các bạn thấy Tasks mình để value là
[
        {
            type: Schema.Types.ObjectId,
            ref: 'Task'
        }
    ]
có nghĩa là đây sẽ là mảng, có kiểu dữ liệu là id và model liên quan sẽ là Task
Router
const express = require('express');
const mongoose = require('mongoose');
const verifyToken = require('./../middlewares/verifyToken');
const Category = require('./../models/Category');
const Task = require('./../models/Task');
const router = express.Router();

router.get('/', verifyToken, async (request, response) => {
    const userId = request.userID;
    const data = await Category.find({created_by: userId}).populate({
        path: 'tasks',
        model: 'Task',
        options: {sort: 'order'}
    }).sort('order').exec();

    await response.send(data);
});

router.post('/create', verifyToken, async (request, response) => {
    const category = new Category({
        _id: new mongoose.Types.ObjectId(),
        title: request.body.title,
        created_by: request.body.created_by,
        order: request.body.order
    });

    try {
        const newCategory = await category.save();
        await response.send(newCategory);
    } catch (err) {
        response.status(400).send(err);
    }
})

module.exports = router;
Đầu tiên hãy nói qua về router tạo danh mục trước, khá đơn giản, chỉ là truyền những request lên và lưu lại. Còn với router lấy ra các danh mục thì các bạn có thể thấy mình dùng populate. Hiểu nôm na thì đây mà cách mình sẽ lấy dữ liệu tới những bản liên quan, ở đây sẽ là lấy ra thông tin các tasks thuộc danh mục. Mình truyền vào 1 Object gồm path, chính là key mà bạn đã quy định ở trong model Categories, option để quy định thêm những điều kiện như limit, sort,... Nếu không muốn để bất kỳ option gì thì bạn có thể để là populate('tasks').
Đừng quên bổ sung route vào app.js nhé
const categoriesRouter = require('./routes/categories');
app.use('/api/categories', categoriesRouter);
Vậy là xong phần tạo danh mục rồi đó, bạn có thể mở postman là thêm danh mục nhé
Tạo views
Giờ hãy tạo giao diện kéo thả nào. Mình sẽ theo quan điểm chia để trị, do đó mình sẽ cố gắng chia nhỏ các component ra để dễ dàng quản lý hơn
tasks\index.js
import React, { useEffect, useState } from 'react';
import { connect } from 'react-redux';
import { DragDropContext } from 'react-beautiful-dnd';
import propsToJS from '../../shared/prop-to-js';
import { getCategoriesState, fetchCategories, dragAndDrop } from '../../redux/modules/categories';
import Column from './column';
import './tasks.scss';

const Tasks = (props) => {
    const onDragEnd = (result) => {
    }


    return (
        <>
            <div className='tasks'>
                <DragDropContext
                    onDragEnd={onDragEnd}
                >

                </DragDropContext>
            </div>
        </>
    )
};

const mapStateToProps = (state) => {

    return {

    }
};

const mapDispatchToProps = {

};

export default connect(mapStateToProps, mapDispatchToProps)(propsToJS(Tasks));
Chúng ta sẽ sử dụng component <DragDropContext></DragDropContext> bọc ngoài vùng mà chúng ta sẽ kéo thả. Giờ mình cần fetch api để lấy dữ liệu categories
redux\modules\categories.js
import { createAction, handleActions } from 'redux-actions';
import { fromJS } from 'immutable';
import { all, call, takeLatest, put } from 'redux-saga/effects';
import axios from '../../shared/axios';
import handleResponse from '../../shared/handle-response';
import { API_URL } from '../../shared/config';

export const FETCH_CATEGORIES = 'FETCH_CATEGORIES';
export const FETCH_CATEGORIES_SUCCESSFULLY = 'FETCH_CATEGORIES_SUCCESSFULLY';

export const fetchCategories = createAction(FETCH_CATEGORIES);
export const fetchCategoriesSuccessfully = createAction(FETCH_CATEGORIES_SUCCESSFULLY);

const setCategories = (state, action) => state.set('data', fromJS(action.payload));

const categoriesInitialState = fromJS({
    data: []
})

export default handleActions({
    [FETCH_CATEGORIES_SUCCESSFULLY]: setCategories
}, categoriesInitialState);

export const getCategoriesState = state => state.get('categories').get('data');

export function* categoriesSagas() {
    yield all([
        takeLatest(FETCH_CATEGORIES, fetchCategoriesFromApi)
    ]);
}

function* fetchCategoriesFromApi(action) {
    const {payload} = action;
    const response = yield call(apiFetchCategories);

    if (response.status === 200) {
        const {data} = response;
        const {callback} = payload;

        if (callback) {
            callback(data)
        }
        yield put(fetchCategoriesSuccessfully(data));

        return;
    }

    handleResponse(response);
}

export function apiFetchCategories() {
    return axios.get(`${API_URL}/api/categories`)
        .then(response => response)
        .catch(error => error.response);
}
và bên file view sẽ bổ sung thêm
const Tasks = (props) => {
    const { handleFetchCategories, categories, handleDragAndDrop } = props;
    const [categoriesState, setCategoriesState] = useState(categories);

    useEffect(() => {
        handleFetchCategories({
            callback: setCategoriesState
        });
    }, []);

    const onDragEnd = (result) => {
    }

    return (
        <>
            <div className='tasks'>
                <DragDropContext
                    onDragEnd={onDragEnd}
                >
                    {categoriesState.map((category) => {
                        const tasks = category.tasks;

                        return <Column key={category._id} category={category} tasks={tasks} />;
                    })}
                </DragDropContext>
            </div>
        </>
    )
};

const mapStateToProps = (state) => {
    const tasks = {};
    const categories = getCategoriesState(state);

    return {
        tasks,
        categories
    }
};

const mapDispatchToProps = {
    handleFetchCategories: fetchCategories,
    handleDragAndDrop: dragAndDrop
};

export default connect(mapStateToProps, mapDispatchToProps)(propsToJS(Tasks));
Lúc này thì mỗi khi load trang thì api get categories sẽ được gọi và fill dữ liệu vào state. Với mỗi categories chúng ta sẽ trả về 1 <Column> tương ứng.
column\index.js
import React, { useState } from 'react';
import { Collapse, Button, Modal, Form, Input } from 'antd';
import { connect } from 'react-redux';
import { createTask } from '../../../redux/modules/categories';
import { PlusOutlined, EditOutlined, DeleteOutlined } from '@ant-design/icons';
import { Droppable } from 'react-beautiful-dnd';
import propsToJS from '../../../shared/prop-to-js';
import Task from './task';

const { Panel } = Collapse;

const renderExtra = (showModalCreate) => (
    <>
        <Button>
            <PlusOutlined onClick={event => {
                showModalCreate();
                event.stopPropagation();
            }} />
        </Button>
        <Button>
            <EditOutlined onClick={event => {
                event.stopPropagation()
            }} />
        </Button>
        <Button>
            <DeleteOutlined onClick={event => {
                event.stopPropagation()
            }} />
        </Button>
    </>
)
const Column = props => {
    const [visible, setVisible] = useState(false);
    const { category, tasks, handleCreateTask } = props;
    const [form] = Form.useForm();

    const onFinishCreateTask = () => {
        const dataForm = form.getFieldsValue();
        const dataSubmit = {
            title: dataForm.title,
            category: category._id
        }
        handleCreateTask(dataSubmit);
    }

    const showModalCreate = () => {
        setVisible(true);
    };

    const handleCloseModalCreate = () => {
        setVisible(false);
    };

    return (
        <>
            <Collapse
                defaultActiveKey={[category._id]}
            >
                <Panel
                    header={category.title}
                    key={category._id}
                    extra={renderExtra(showModalCreate)}
                    className='tasks__column--panel'
                >
                    <Droppable
                        droppableId={category._id}
                    >
                        {provided => (
                            <div
                                ref={provided.innerRef}
                                {...provided.droppableProps}
                            >
                                {
                                    tasks.map((task, index) => (
                                        <Task key={task._id} task={task} index={index} />
                                    ))
                                }
                                {provided.placeholder}
                            </div>
                        )}
                    </Droppable>
                </Panel>
            </Collapse>

            <Modal
                visible={visible}
                title='Create task'
                onOk={handleCloseModalCreate}
                onCancel={handleCloseModalCreate}
                footer={[
                    <Form.Item>
                        <Button
                            type='primary'
                            onClick={onFinishCreateTask}
                        >
                            Create
                        </Button>
                    </Form.Item>
                ]}
            >
                <Form
                    form={form}
                    name='create_task_form'
                    onFinish={onFinishCreateTask}
                    autoComplete='off'
                >
                    <Form.Item
                        label="Title"
                        name='title'
                        rules={[{ required: true, message: 'Required' }]}
                    >
                        <Input />
                    </Form.Item>
                </Form>
            </Modal>
        </>
    )
}

const mapStateToProps = state => {
    return {};
}

const mapDispatchToProps = {
    handleCreateTask: createTask
}
export default connect(mapStateToProps, mapDispatchToProps)(propsToJS(Column));
Từng danh mục giờ sẽ được nằm trong component <Droppable> nhằm quy định vùng được thả vào, mỗi vùng này sẽ phải có một id khác nhau và id phải là string nhé (https://github.com/atlassian/react-beautiful-dnd/blob/master/docs/guides/identifiers.md). Đừng quên những thuộc tính như là provided.innerRef, provided.droppableProps, {provided.placeholder}
Và cuối cùng sẽ là phần chúng ta có thể kéo, đó chính là các task
task\index.js
import React from 'react';
import { Draggable } from 'react-beautiful-dnd';
import propsToJS from '../../../../shared/prop-to-js';

const Task = props => {
    const { task, index } = props;
    return (
        <>
            <Draggable
                draggableId={task._id}
                index={index}
            >
                {provided => (
                    <div
                        {...provided.draggableProps}
                        {...provided.dragHandleProps}
                        ref={provided.innerRef}
                        className='tasks__column--panel--item'
                    >
                        {task.title}
                    </div>
                )}
            </Draggable>
        </>
    )
}

export default propsToJS(Task);
Với những phần tử kéo được thì chúng ta sẽ sử dụng component <Draggable>. Vậy là chúng ta đã xong được phần giao diện. Có thể kéo được nhưng khi thả thì dữ liệu vẫn giữ nguyên. Do dữ liệu của chúng ta không được render lại. Do đó ta cần thêm một function để set lại dữ liệu. Quay lại file tasks\index.js
const onDragEnd = (result) => {
        const { source, destination, reason } = result;

        if (reason === 'DROP' && destination && source) {
            const currentCategoryId = source.droppableId;
            const dropedCategoryId = destination.droppableId;
            const categoryDestination = categoriesState.find(item => item._id === dropedCategoryId);
            let tasksDestination = categoryDestination.tasks;
            const newIndex = destination.index;
            const taskId = result.draggableId;
            const newCategoriesData = sortTasksWhenDrag(tasksDestination, newIndex, result, dropedCategoryId, currentCategoryId);
            const data = {
                currentCategoryId,
                dropedCategoryId,
                taskId,
                newIndex,
                newCategoriesData
            };
        }
    }

    const reOrderArray = (array) => array.map((item, index) => {
        const newItem = Object.assign({}, item, { order: index });

        return newItem;
    })

    const sortTasksWhenDrag = (tasksDestination, newIndex, result, dropedCategoryId, currentCategoryId) => {
        let newCategoriesData = [...categoriesState];

        if (dropedCategoryId === currentCategoryId) {
            // when drag drop in same category
            let newTasks = tasksDestination.filter(item => item._id !== result.draggableId);
            const task = tasksDestination.find(item => item._id === result.draggableId);
            newTasks.splice(newIndex, 0, task)
            newTasks = reOrderArray(newTasks);

            newCategoriesData = categoriesState.map(item => {
                if (item._id === dropedCategoryId) {
                    const newItem = Object.assign({}, item, { tasks: newTasks.sort(sortTasks) });

                    return newItem
                };

                return item;
            });
        } else {
            // when drag drop in diff category
            const currentCategory = categoriesState.find(item => item._id === currentCategoryId);
            const task = currentCategory.tasks.find(item => item._id === result.draggableId);
            tasksDestination.splice(newIndex, 0, task);

            const newTasksDestination = reOrderArray(tasksDestination);

            newCategoriesData = categoriesState.map(item => {
                if (item._id === dropedCategoryId) {
                    const newItem = Object.assign({}, item, { tasks: newTasksDestination.sort(sortTasks) });

                    return newItem
                };

                if (item._id === currentCategoryId) {
                    let newTasks = item.tasks.filter(value => value._id !== result.draggableId);
                    newTasks = reOrderArray(newTasks);

                    const newItem = Object.assign({}, item, { tasks: newTasks.sort(sortTasks) });

                    return newItem;
                }

                return item;
            });
        }

        setCategoriesState(newCategoriesData);

        return newCategoriesData;

    }
Ở đây thì mình có lấy những thông tin cần thiết khi trigger sự kiện drag and drop. Sau đó mình sẽ chia ra làm 2 phần xử lý riêng biệt: vùng drop vẫn là vùng hiện tại hoặc là vùng drop là vùng mới. Với vùng hiện tại thì mình sẽ xóa phần tử drag khỏi dữ liệu, sau đó push ngược vào theo index mới trả về, sau đó cập nhập lại order theo đúng index của từng phần tử trong mảng. Với trường hợp còn lại thì xử lý cũng gần như tương tự, nhưng là xóa dữ liệu của vùng bị kéo ra, re-order lại. Tới vùng được thả vào thì sẽ push vào theo index mới rồi cũng re-order lại.
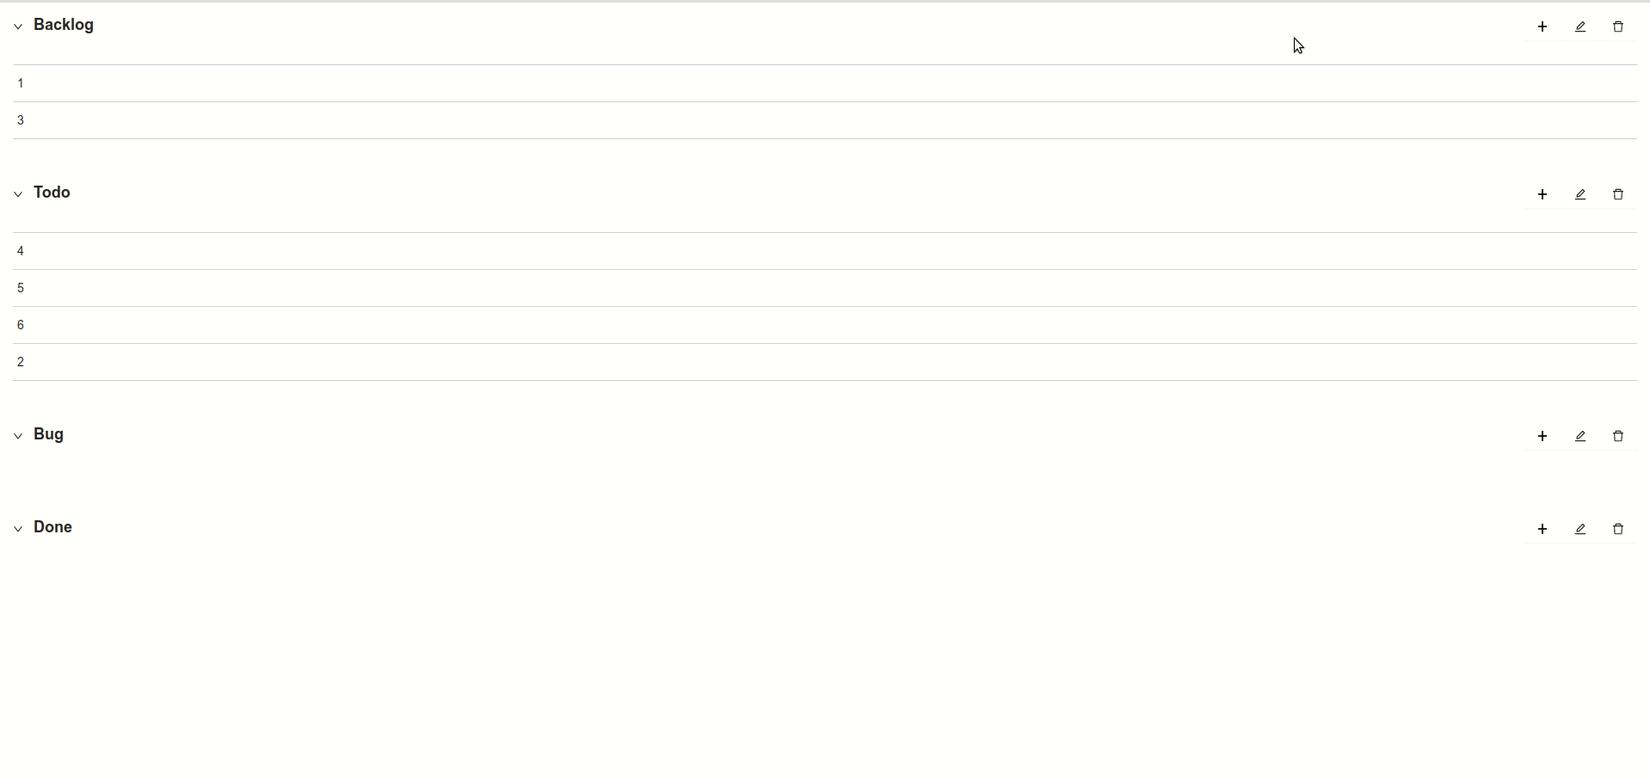
Và đây là kết quả nha:
Bài viết hôm nay tới đây thôi, cảm ơn các bạn đã theo dõi
All rights reserved
