Bắt đầu từ cơ bản: Chức năng đăng ký, đăng nhập
Bài đăng này đã không được cập nhật trong 6 năm
Đây là bài đầu tiên trong series: Hôm nay ăn gì với Laravel, ReactJS, React Hook, Redux Saga. Nếu các bạn chưa rõ mục đích mình tạo series này thì vui lòng ấn vào link và đọc nha.
Thật ra ban đầu mình không định làm chức năng này vì chỉ muốn cho một người sử dụng web thôi. Nhưng rồi mình nghĩ có lẽ nên phân chia quản lý ra nhiều users thì sẽ thiết thực hơn. Hãy cùng đi từ phía backend trước nhé
Backend
Hiện tại laravel đã ra tới bản 7.0, và câu lệnh php artisan make:auth đã không còn sử dụng được nữa. Nhưng đương nhiên không phải là Laravel đã khai tử nó, đơn giản chỉ là chuyển sang 1 cách khác thôi. Đầu tiên bạn hãy chạy command composer require laravel/ui. Sau đó thì sử dụng php artisan ui react --auth, nếu bạn dùng vue thì có thể thay react = vue. Tiếp tới thì các bạn chỉnh sửa file migration sao cho phù hợp rồi chạy migrate là được. Giờ thì bạn có thể sử dụng các chức năng như đăng nhập hay tạo tài khoản, nhưng ở đây mình sử dụng reactjs nên mình cần custom lại chút thì mới có thể sử dụng được. Nếu bạn chưa cách kết hợp reactjs trong laravel thì có thể đọc bài viết Sử dụng ReactJs trong project Laravel của mình nhé.
Giờ mình sẽ tạo AuthController để xử lý việc đăng nhập và đăng ký. Đăng ký thì sẽ khá đơn giản, chỉ là chúng ta tạo ra một người dùng mới trên hệ thống, nếu các bạn có thời gian thì hãy làm cả chức năng xác nhận email nhé. Lưu ý vì chúng ta sử dụng react nên respone trả về phải là json nhé.
    public function register(RegisterRequest $request)
    {
        $data = $request->all();
        $data['password'] = bcrypt($request->password);
        $user = User::create($data);

        return response()->json([
            'user' => $user,
            'message' => 'Đăng ký thành công',
        ], 200);

    }
Còn đối với đăng nhập, ban đầu mình có sử dụng Auth::attempt thì không được, và mình đã vào hẳn trong function của laravel và xem
use App\Http\Requests\Auth\LoginRequest;
use App\Http\Requests\Auth\RegisterRequest;
use App\User;
use Illuminate\Foundation\Auth\AuthenticatesUsers;
use Illuminate\Http\Request;
use Illuminate\Support\Facades\Auth;

class AuthController extends Controller
{
    use AuthenticatesUsers;

    public function login(LoginRequest $request)
    {
        if ($this->attemptLogin($request)) {
            $user = Auth::user();

            return $this->sendLoginResponse($request, $user);
        }

        return $this->sendFailedLoginResponse($request);
    }

    protected function attemptLogin(Request $request)
    {
        return $this->guard()->attempt(
            $this->credentials($request), $request->filled('remember')
        );
    }

    protected function sendLoginResponse(Request $request, $user)
    {
        $request->session()->regenerate();

        $this->clearLoginAttempts($request);

        if ($response = $this->authenticated($request, $this->guard()->user())) {
            return $response;
        }

        return response()->json([
            'data' => $user,
            'message' => 'Đăng nhập thành công',
        ], 200);
    }

    protected function sendFailedLoginResponse()
    {
        return response()->json([
            'message' => 'Email hoặc mật khẩu của bạn không chính xác',
        ], 400);
    }
}
Ở trong file spa-view.blade.php bạn nhớ thêm đoạn này nhé
<script type="text/javascript">window.GLOBALS={"user":{!! json_encode($user) !!}}</script>
<script src="{{ asset('js/app.js') }}"></script>
Frontend
Phân chia thư mục
Vì phải sử dụng thêm Redux Saga nên bước này ban đầu sẽ mất khá lâu để setup. Mình sẽ nói qua về cách mình chia thư mục đã nhé:
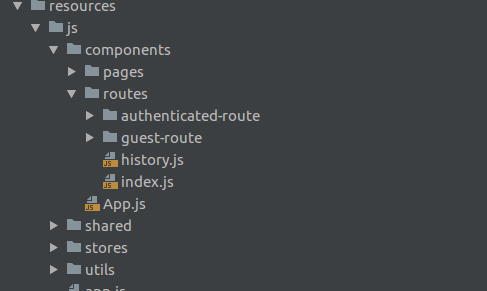
Tất cả source code sẽ được lưu trong resources/js. Mình có chia nhỏ ra thêm thành các thư mục con như sau:
components
Đây sẽ là nơi chứa các components của mình. Mình có phân ra thành 2 loại nhỏ nữa là pages và routes. pages chính là nơi lưu trữ các view mà các bạn có thể truy cập. Còn routes sẽ là nơi chưa guest routes (Route sử dụng cho nhưng user không đăng nhập, ở đây hiện tại sẽ chỉ có view đăng nhập và đăg ký) và authenticated-route (Route sử dụng cho các user đã đăng nhập)
shared
Đây sẽ là nơi mình lưu nhưng config để dùng
stores
Nếu bạn sử dụng Redux Saga thì đã biết răng nó sẽ tạo ra 1 stores chung để lấy dữ liệu, và đây chính là nơi để mình code những chức năng liên quan
utils
Đây là nhưng function mà mình sẽ sử dụng lại ở nhiều nơi
Redux saga
Để sự dụng được redux saga thì chúng ta sẽ phải thay đổi 1 chút ở file App.js. Trước tiên cần tạo 1 file configStore.js trong shared
import 'babel-polyfill'; // Needed for redux-saga es6 generator support
import { createStore, applyMiddleware, compose } from 'redux';
import createSagaMiddleware, { END } from 'redux-saga';
import { fromJS } from 'immutable';

const sagaMiddleware = createSagaMiddleware();

export default function configStore(initialState = {}, history, rootReducer) {
    const middlewares = [
        sagaMiddleware
    ];

    const enhancers = [
        applyMiddleware(...middlewares)
    ];

    /* eslint-disable no-underscore-dangle */
    const composeEnhancers =
        process.env.APP_ENV !== 'production' &&
        typeof window === 'object' &&
        window.__REDUX_DEVTOOLS_EXTENSION_COMPOSE__ ?
            window.__REDUX_DEVTOOLS_EXTENSION_COMPOSE__ : compose;
    /* eslint-enable */

    const store = createStore(
        rootReducer(),
        fromJS(initialState),
        composeEnhancers(...enhancers)
    );

    store.runSaga = sagaMiddleware.run;
    store.close = () => store.dispatch(END);

    return store;
}
Ở phần import là những packet mà mình sử dụng, các bạn nhớ cài đặt nhé. Ở đây mình có sử dụng thư viện immutable. Nếu bạn chưa biết về khái niệm này thì có thể đọc bài này nha: Immutability và Immutable.js trong ReactJs. Xuyên suốt dự án mình sẽ sử dụng nó đó.
Giờ hãy cùng thiết lập store nhé, trong thư mục stores sẽ bao gồm những files và folder sau:

Trong folder modules sẽ là những file tương ứng với từng view. Ví dụ mình làm cho chức năng đăng nhập và đăng ký thì sẽ tạo file authenticate.js. rootReducer là nơi để mình sẽ combine tất cả những reducers lại. Trong rootSaga thì mình sẽ yield tất cả các saga. Nói thì khá khó hình dung với những bạn mới, chút nữa mình sẽ đưa ra code cụ thể có lẽ các bạn sẽ dễ hình dung hơn. Hiện tại chưa có gì nên các file sẽ chỉ như sau:
rootReducer.js:
import { combineReducers } from 'redux-immutable';

export default function rootReducer(asyncReducers) {
}
rootSaga.js:
import { all, fork } from 'redux-saga/effects';

export default function* rootSaga() {
}
Giờ sẽ tới file App.js
import React from 'react';
import ReactDOM from 'react-dom';
import { Provider } from 'react-redux';
import { Router } from 'react-router-dom';
import {createBrowserHistory} from 'history';
import 'antd/dist/antd.css';
import configStore from '../shared/configStore';
import rootReducer from '../stores/rootReducer';
import rootSaga from '../stores/rootSaga';
import Routes from './routes';


const initialState = {};
const history = createBrowserHistory();
const store = configStore(initialState, history, rootReducer);
store.runSaga(rootSaga);

const App = () => (
    <Provider store={store}>
        <Router history={history}>
            <Routes />
        </Router>
    </Provider>
);


ReactDOM.render(<App/>, document.getElementById('app'));
Tạo modules phục vụ
Ở trong folder utils, các bạn hãy tạo 3 file
prop-to-js.js
import React from 'react';
import { Iterable } from 'immutable';
import getDisplayName from 'recompose/getDisplayName';
import { toPairs } from 'lodash';

export default function propsToJS(WrappedComponent) {
    function PropsToJS(wrappedComponentProps) {
        const KEY = 0;
        const VALUE = 1;

        const propsJS = toPairs(wrappedComponentProps)
            .reduce((newProps, wrappedComponentProp) => {
                newProps[wrappedComponentProp[KEY]] = Iterable.isIterable(wrappedComponentProp[VALUE]) // eslint-disable-line
                    ? wrappedComponentProp[VALUE].toJS()
                    : wrappedComponentProp[VALUE];
                return newProps;
            }, {});

        return <WrappedComponent {...propsJS} />;
    }

    PropsToJS.displayName = `PropsToJS${getDisplayName(WrappedComponent)}`;

    return PropsToJS;
}
axios.js:
import axios from 'axios';

const csrfToken = document.head.querySelector('meta[name=csrf-token]').getAttribute('content');

export default axios.create({
    headers: {
        'X-CSRF-TOKEN': csrfToken
    }
});
handle-response.js:
import {toastr} from 'react-redux-toastr';

function handleResponse(response) {
    switch (response.status) {
        case 200:
            toastr.success(response.data.message);
            break;
        case 422:
            const error = response.data[Object.keys(response.data)[1]];
            const message = error[Object.keys(error)[0]][0];
            toastr.error(message);
            break;
        case 400:
            if (typeof response.data.token != 'undefined') {
                window.axios.defaults.headers.common['X-CSRF-TOKEN'] = response.data.token;
            } else {
                toastr.error(typeof response.data == 'string'
                    ? response.data
                    : response.data[Object.keys(response.data)[0]]
                );
            }
            break;
        default:
            toastr.error(response.statusText ? response.statusText : response.data);
            break;
    }
}

export default handleResponse;
Giờ ở trong stores/modules chúng ta sẽ tạo file authenticate.js.
import {createAction, handleActions} from 'redux-actions';
import {put, call, takeLatest} from 'redux-saga/effects';
import {fromJS} from 'immutable';
import axios from '../../utils/axios';
import handleResponse from '../../utils/handle-respone';
import history from '../../components/routes/history';


//Action types
export const REGISTER = 'authenticate/REGISTER';

export const LOGIN = 'authenticate/LOGIN';
export const LOGIN_SUCCESSFULLY = 'authenticate/LOGIN_SUCCESSFULLY';


//Action creators
export const register = createAction(REGISTER);

export const login = createAction(LOGIN);
export const loginSuccessfully = createAction(LOGIN_SUCCESSFULLY);

// Reducer
const authenticateInitialState = fromJS({
    currentUser: window.GLOBALS.user || {},
});

const setLoginUser = (state, action) => state.setIn(['currentUser'], fromJS(action.payload));


export default handleActions({
    [LOGIN_SUCCESSFULLY]: setLoginUser,
}, authenticateInitialState);

// Selectors
export const getAuthenticate = state => state.get('authenticate');
export const getCurrentUser = state => getAuthenticate(state).get('currentUser');

// Sagas
export function* authenticateSagas() {
    yield takeLatest(register, onRegister);
    yield takeLatest(login, onLogin);
}

function* onRegister(action) {
    const response = yield call(onRegisterApi, action.payload);
    handleResponse(response);
}

function* onLogin(action) {
    const response = yield call(onLoginApi, action.payload);

    if (response.status === 200) {
        const {data} = response.data;
        yield put(loginSuccessfully(data));
        handleResponse(response);
        history.push('/');

        return;
    }

    handleResponse(response);
}

// Apis
function onRegisterApi(data) {
    const url = '/api/register';

    return axios.post(url, data)
        .then(response => response)
        .catch(error => error.response);
}

function onLoginApi(data) {
    const url = 'api/login';

    return axios.post(url, data)
        .then(response => response)
        .catch(error => error.response);
}
Cuối cùng là update lại rootReducer và rootSaga
rootReducer.js
import { combineReducers } from 'redux-immutable';
import { reducer as toastrReducer } from 'react-redux-toastr';
import authenticate from './modules/authenticate';

export default function rootReducer(asyncReducers) {
    return combineReducers({
        toastr: toastrReducer,
        authenticate,
        ...asyncReducers
    });
}
rootSaga.js
import { all, fork } from 'redux-saga/effects';
import {authenticateSagas} from './modules/authenticate';

export default function* rootSaga() {
    yield all([
        fork(authenticateSagas)
    ]);
}
Thiết lập routes
Ở trong App.js bạn sẽ thấy có <Routes /> được import từ './routes'. Giờ chúng ta hãy cùng xem trong đó có gì nhé
index.js:
import React from 'react';
import {Switch, Route, withRouter} from 'react-router-dom';
import Authenticate from '../pages/authenticate';
import GuestRoute from '../routes/guest-route/guest-route';
import AuthenticatedRoute from '../routes/authenticated-route';
import {connect} from "react-redux";
import {getCurrentUser} from "../../stores/modules/authenticate";
import propsToJS from "../../utils/prop-to-js";

const Routes = () => (
    <Switch>
        {/* Home page */}
        <AuthenticatedRoute
            exact
            path='/'
            component={() => {
                return (
                    <div>
                        Đây là trang chủ
                    </div>
                )
            }}
        />

        <GuestRoute
            exact
            path='/login'
            component={Authenticate}
        />
    </Switch>
);

const mapStateToProps = state => ({
    currentUser: getCurrentUser(state)
});

export default withRouter(connect(mapStateToProps, null)(propsToJS(Routes)));
Ở đây các bạn sẽ thấy mình có chia ra làm 2 loại routes nư mình nói ở trên
history.js:
import {createBrowserHistory} from 'history';

export default createBrowserHistory();
Giờ mình sẽ tạo AuthenticatedRoute. Trong folder routes/authenticated-route trông sẽ như sau:
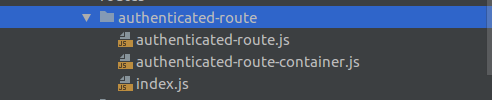
index.js sẽ để export 2 file kia ra nên trông rất đơn giản
export {default} from './authenticated-route-container';
export {default as AuthenticatedRoute} from './authenticated-route';
Ở trong authenticated-route-container.js sẽ chứa phần để xử lý với store, như việc chuyển state sang props và dispatch các action
import { connect } from 'react-redux';
import { withRouter } from 'react-router-dom';
import AuthenticatedRoute from './authenticated-route';
import {getCurrentUser} from '../../../stores/modules/authenticate'
import propsToJS from '../../../utils/prop-to-js';

const mapStateToProps = state => ({
    currentUser: getCurrentUser(state)
});

export default withRouter(connect(mapStateToProps, null)(propsToJS(AuthenticatedRoute)));
Ở authenticated-route.js sẽ chứa code xử lý kiểm tra curentUser trong store
import React from 'react';
import {Route, Redirect} from 'react-router-dom';
import {isEmpty} from 'lodash';

const AuthenticatedRoute = ({component: Component, render: Render, ...rest}) => {
    if (isEmpty(rest.currentUser)) {
        return <Redirect to={{pathname: '/login', state: {from: rest.location}}}/>;
    }

    return <Route {...rest} render={props => <Component {...props} />}/>;
};

export default AuthenticatedRoute;
Với guest-route thì cũng tương tự, chỉ là đổi logic xử lý 1 chút.
Tạo view
Ở trong folder components/pages, mình sẽ tạo 1 folder authenticate có cấu trúc như sau
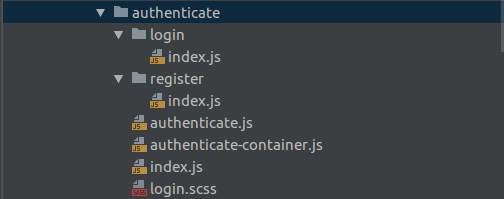
Mình sẽ chỉ đi vào những file quan trọng thôi nhé:
authenticate.js
import React, {useState} from 'react';
import {Row, Col} from 'antd';
import ReduxToastr from 'react-redux-toastr';
import 'react-redux-toastr/lib/css/react-redux-toastr.min.css';
import Login from './login';
import './login.scss';
import Register from "./register";

const Authenticate = (props) => {
    const [isShowRegister, showRegisterForm] = useState(false);
    const {register, login} = props;

    return (
        <div>
            <ReduxToastr
                getState={(state) => state.get('toastr')}
                timeOut={4000}
                transitionIn='fadeIn'
                transitionOut='fadeOut'
                progressBar
                closeOnToastrClick
            />
            <Row type="flex" justify="center" align="middle">
                {
                    isShowRegister ? (
                        <Register
                            showLoginForm={showRegisterForm}
                            register={register}
                        />
                    ) : (
                        <Login
                            showRegisterForm={showRegisterForm}
                            login={login}
                        />
                    )
                }
                <Col span={16} className='login_background'>

                </Col>
            </Row>
        </div>
    )
};

export default Authenticate;
Như các bạn đã thấy ở đây mình đã sử dụng hook để quản lý tate thay vì cách cũ, code đã ngắn đi rất nhiều. Ở đây thì mình sẽ làm view đăng nhập và đăng ký chung 1 địa chỉ đường dẫn. Bạn có thể tách ra hoặc làm giống mình, đó là tùy ở quyết định của bạn.
register/index.js
import React from 'react';
import {Col, Form, Input, Button, Checkbox} from 'antd';

const layout = {
    labelCol: {span: 8},
    wrapperCol: {span: 14},
};


const Register = (props) => {
    const [form] = Form.useForm();

    const showLoginForm = () => {
        props.showLoginForm(false);
    };

    const onFinish = (values) => {
        const {register} = props;
        register(values);
    };

    return (
        <Col span={8} className='register_form'>
            <h3>Đăng ký</h3>
            <div className='register_form--wrap'>
                <Form
                    {...layout}
                    name="basic"
                    onFinish={onFinish}
                >
                    <Form.Item
                        label="Tên"
                        name="name"
                        rules={[
                            {required: true, message: 'Vui lòng nhập tên'},
                            {max: 191, message: 'Vui lòng không nhập quá 191 ký tự'}
                        ]}
                    >
                        <Input/>
                    </Form.Item>
                    <Form.Item
                        label="Email"
                        name="email"
                        rules={[
                            {required: true, message: 'Vui lòng nhập email'},
                            {type: 'email', message: 'Vui lòng nhập đúng định dạng email'},
                            {max: 191, message: 'Vui lòng không nhập quá 191 ký tự'}
                        ]}
                    >
                        <Input/>
                    </Form.Item>

                    <Form.Item
                        label="Mật khẩu"
                        name="password"
                        rules={[
                            {required: true, message: 'Vui lòng nhập mật khẩu'},
                            {max: 16, message: 'Vui lòng không nhập quá 16 kí tự'},
                            {min: 6, message: 'Vui lòng không nhập dưới 6 kí tự'}
                        ]}
                    >
                        <Input.Password/>
                    </Form.Item>
                    <Form.Item
                        label="Nhập lại mật khẩu"
                        name="password_confirmation"
                        dependencies={['password']}
                        rules={[
                            {required: true, message: 'Vui lòng nhập đúng mật khẩu'},
                            ({getFieldValue}) => ({
                                validator(rule, value) {
                                    if (!value || getFieldValue('password') === value) {
                                        return Promise.resolve();
                                    }
                                    return Promise.reject('Mật khẩu nhập lại không khớp');
                                },
                            }),
                        ]}
                    >
                        <Input.Password/>
                    </Form.Item>

                    <Form.Item>
                        <Button type="primary" htmlType="submit">
                            Đăng ký
                        </Button>
                        <Button className='register_form--wrap__register-btn' type="danger" onClick={showLoginForm}>
                            Đăng nhập
                        </Button>
                    </Form.Item>
                </Form>
            </div>
        </Col>
    )
};

export default Register;
Ở onFinish mình đã dispatch action register để gọi tới api thực hiện việc thêm người dùng.
Và View đăng nhập thì cũng làm gần như tương tự nha.
Bài viết này hôm nay sẽ kết thục tại đây, các bạn có gì góp ý thì hãy để lại comment cho mình nhé. Hẹn gặp bạn lại ở bài viết tiếp theo
All rights reserved
