Bạn đã sử dụng core Data? Thử xem nó thế nào!
Bài đăng này đã không được cập nhật trong 7 năm
Giới thiệu
- CoreData là 1 frameworks phổ biến được cung cấp và phát triển vởi Apple cho iOS và macOS Apps.
- CoreData được sử dụng để quản lý các model layer object trong ứng dụng.
- Bạn có thể save, track, modify or filter dữ liệu với app
CoreData không phải là một Database. Lý do tại sao chắc hẹn bạn 1 bài viết chi tiết hơn và việc so sánh nó với SQLite ...vân...vân...mây...mây!
Mục đích bài viết
Chúng ta tạo project demo sử dụng coredata.
Thực hiện 1 số thao tác cơ bản như CRUD (create, update, delete, filter) object.
Thực hiện get data của object trong
relationship one-to-many
Tạo project demo
- Mở xcode -> File -> New > Project -> Single View App
- Đặt
Project namelà gì tuỳ bạn. Trong bài viết tên project sẽ là TestCoreData.
Nhớ tick vào checkbox
Use Core Data nhé.
Sau khi tạo project xong thì chúng ta sẽ có 1 file là
TestCoreData.xcdatamodeldvà 2 func trongAppDelegatedo Xcode tạo sẵn
// MARK: - Core Data stack

    lazy var persistentContainer: NSPersistentContainer = {
        /*
         The persistent container for the application. This implementation
         creates and returns a container, having loaded the store for the
         application to it. This property is optional since there are legitimate
         error conditions that could cause the creation of the store to fail.
        */
        let container = NSPersistentContainer(name: "TestCoreData")
        container.loadPersistentStores(completionHandler: { (storeDescription, error) in
            if let error = error as NSError? {
                // Replace this implementation with code to handle the error appropriately.
                // fatalError() causes the application to generate a crash log and terminate. You should not use this function in a shipping application, although it may be useful during development.

                /*
                 Typical reasons for an error here include:
                 * The parent directory does not exist, cannot be created, or disallows writing.
                 * The persistent store is not accessible, due to permissions or data protection when the device is locked.
                 * The device is out of space.
                 * The store could not be migrated to the current model version.
                 Check the error message to determine what the actual problem was.
                 */
                fatalError("Unresolved error \(error), \(error.userInfo)")
            }
        })
        return container
    }()

    // MARK: - Core Data Saving support

    func saveContext () {
        let context = persistentContainer.viewContext
        if context.hasChanges {
            do {
                try context.save()
            } catch {
                // Replace this implementation with code to handle the error appropriately.
                // fatalError() causes the application to generate a crash log and terminate. You should not use this function in a shipping application, although it may be useful during development.
                let nserror = error as NSError
                fatalError("Unresolved error \(nserror), \(nserror.userInfo)")
            }
        }
    }
Func persistentContainer là func để connect đến coreData của chúng ta.
Func saveContext là func save object khi có thay đổi.
Thường thì chúng ta phải modify lại 2 hàm này nhưng ở bài viết để nhanh nên mình không thực hiện modify lại 2 hàm này.
Tạo các entity core data.
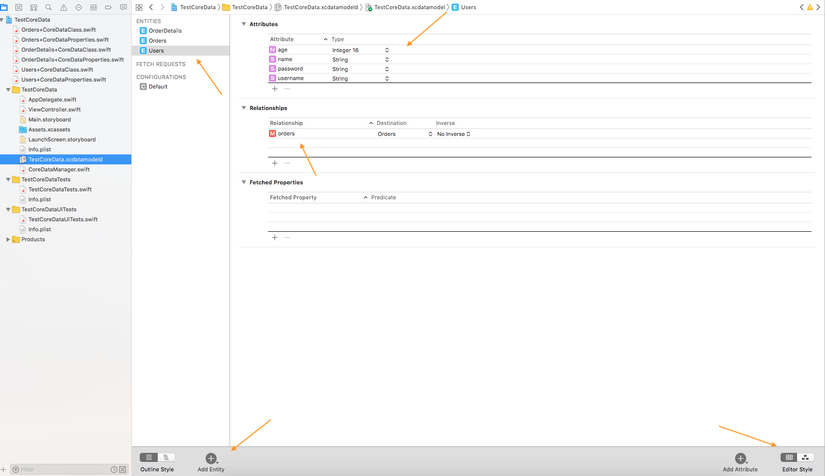
Ở trên hình bạn sẽ thấy. Ở đây mình demo 3 entity là
- Users.
- Orders
- OrderDetails.
User relationship one-to-many với orders. Orders relationship one-to-many với orderDetails.
Entities
Tạo entity users.
- Bạn nhấn vào Add Entity sau đó thêm 1 entity là Users vào.
- Ở mục Attributes bạn có thể thêm bất cứ trường nào và kiểu dữ liệu cho property đó tuỳ ý. Như ở đây mình có thêm là username, password, name kiểu dữ liệu là String và age có kiểu là integer 16.
Tương tự vậy bạn tạo thêm 2 entity nữa nhé.
Tạo relationship Để tạo relationship các bạn chú ý đến mục Relationships
- Các bạn bấm vào dấu + ở dưới và thêm 1 relationship cho 1 entity.
Ví dụ ở đây:
- Bạn click vào entity Users.
- Chọn + vào thêm relationship là orders
- Nhấn vào relationship orders bạn change type thành To Many. Vì User 1-n Orders
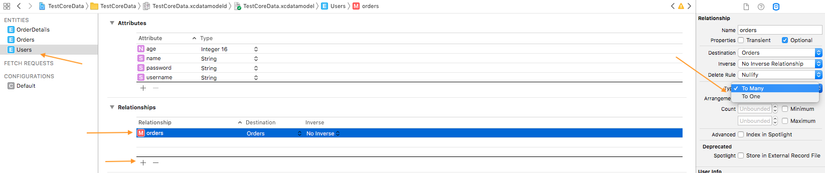
Bạn có thể thay đổi các thuộc tính của relationship phù hợp với các mối quan hệ entities của bạn ví dụ như To Many hay To One, count, index....
Auto tạo code để tạo ra các class với NSManagedObject
- Các bạn vào file TestCoreData.xcdatamodeld. Tích chọn 1 hoặc nhiều entities.
- Sau đó vào Editor > Create NSManagerObject Subclass ... > Thực hiện next next thôi.
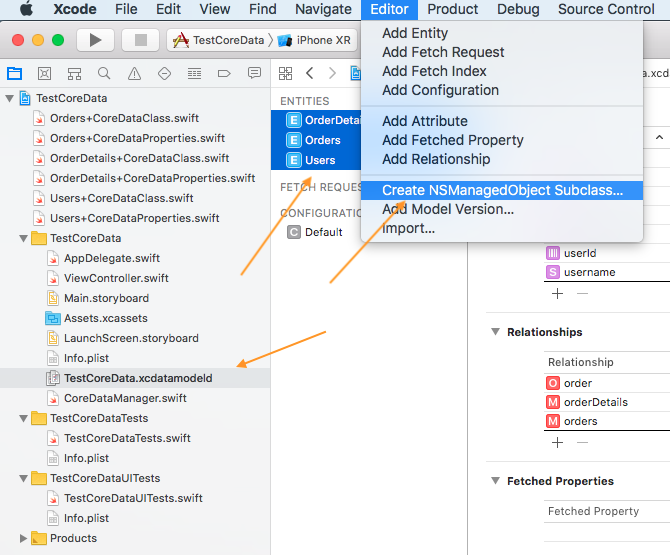
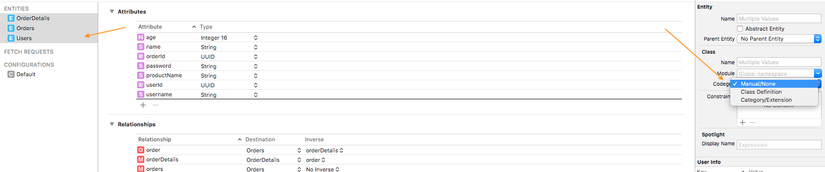
Chú ý: Codegen ở đây mình chọn là Manual/None. Ở đây nó có 3 option với các tính chất khác nhau. Tuy nhiên minh chưa đọc sâu cái này lắm nên chọn tạm là Manual/None. Hehe ^^! Nếu có cơ hội post sau mình sẽ giải thích thêm.
Tạo extension để code trông dễ dàng hơn.
Mình có tạo 1 đoạn extension để có thể thực hiện CRUD các object. Tuy nhiên vẫn còn nhiều thiết xót và chưa xử lý được hết các case nhưng ở ví dụ thì chắc cũng đủ dùng rồi hehe ^^!
import Foundation
import CoreData
import UIKit

extension NSManagedObject {
    class var context: NSManagedObjectContext! {
        let appDelegate = UIApplication.shared.delegate as! AppDelegate
        return appDelegate.persistentContainer.viewContext
    }

    class var request: NSFetchRequest<NSManagedObject> {
        return NSFetchRequest(entityName: String(describing: self))
    }

    func save(success: (() -> Void)?, fail: ((Error) -> Void)?) {
        guard let context = self.managedObjectContext else {
            fail?(NSError(domain: "", code: 1, userInfo: nil))
            return
        }
        if context.hasChanges {
            do {
                try context.save()
                success?()
            } catch {
                fail?(error)
            }
        } else {
            let error = NSError(domain: "Data not change", code: 0, userInfo: nil)
            fail?(error)
        }
    }

    func delete(completed: ((Error?) -> Void)?) {
        self.managedObjectContext?.delete(self)
        self.save(success: {
            completed?(nil)
        }) { (error) in
            completed?(error)
        }
    }

    class func all(predicate: NSPredicate?, success: (([NSManagedObject]) -> Void)?, fail: ((Error) -> Void)?) {
        request.predicate = predicate
        do {
            let result = try context.fetch(request)
            success?(result)
        } catch {
            fail?(error)
        }
    }

    class func findByObjectId(objectId: NSManagedObjectID) -> NSManagedObject? {
        do {
            return try self.context.existingObject(with: objectId)
        } catch {
            return nil
        }
    }

    class func findBy(predicate: NSPredicate?, success: ((NSManagedObject?) -> Void)?, fail: ((Error) -> Void)?) {
        request.predicate = predicate
        do {
            let result = try context.fetch(request)
            success?(result.first)
        } catch {
            fail?(error)
        }
    }
}
Chức năng của đoạn code extension này đơn giản như là save một object vào core data, filter 1 object theo objectId hoặc điều kiện Predicate (giống query SQL thì phải - Cái này mình chưa tìm hiểu sâu hơn.).
Demo.
Ở trong 1 viewController mình tạo 6 button để thực hiện chức năng gồm: Tạo mới user, get tất cả users, update property cửa user, vào xoá user. Ngoài ra còn có add orders với relationship với user và get orders đó ra với user.
import UIKit
import CoreData

class ViewController: UIViewController {

    var appDelegate: AppDelegate!
    var context: NSManagedObjectContext!

    override func viewDidLoad() {
        super.viewDidLoad()
        appDelegate = UIApplication.shared.delegate as! AppDelegate
        context = appDelegate.persistentContainer.viewContext

        let path = NSSearchPathForDirectoriesInDomains(FileManager.SearchPathDirectory.documentDirectory, FileManager.SearchPathDomainMask.allDomainsMask, true)
        print(path.first)
    }

    @IBAction func handleActionButton(_ sender: UIButton) {
        switch sender.tag {
        case 1:
            self.createNewUser()
        case 2:
            self.fetchUser()
        case 3:
            self.updateUser()
        case 4:
            self.deleteUser()
        case 5:
            self.ordersHasManyDemo()
        case 6:
            self.getOrders()
        default:
            break
        }
    }

    func createNewUser() {
        let user = Users(context: context)
        user.update(username: "createNewUser", password: "passwor_3", name: "createNewUser", age: 3)
        user.save(success: {
            print("Create user success")
        }) { (err) in
            print("Create user fail: \(err.localizedDescription)")
        }
    }

    func fetchUser() {
        Users.all(predicate: nil, success: { users in
            guard let users = users as? [Users] else {
                return
            }
            users.forEach { user in
                print("User: \(String(describing: user.username))")
            }
        }) { (err) in
            print("Fetch fail cmnr: \(err)")
        }
    }

    func updateUser() {
        let predicate = NSPredicate(format: "name like %@", "createNewUser")
        Users.findBy(predicate: predicate, success: { user in
            guard let user = user as? Users else { return }

            user.update(username: "update username", password: "update password", name: "update name", age: 100)
            user.save(success: {
                print("Update success")
            }, fail: { (err) in
                print("Fetch fail cmnr: \(err)")
            })
        }) { (err) in
            print("Fetch fail cmnr: \(err)")
        }
    }

    func deleteUser() {
        let predicate = NSPredicate(format: "name LIKE %@", "update name")
        Users.findBy(predicate: predicate, success: { user in
            guard let user = user as? Users else {
                print("Find user empty")
                return
            }
            user.delete(completed: { err in
                if err == nil {
                    print("Delete success")
                } else {
                    print("Delete fail: \(err!.localizedDescription)")
                }
            })

        }) { (err) in
            print("Fetch fail cmnr: \(err)")
        }
    }

    func ordersHasManyDemo() {
        let predicate = NSPredicate(format: "name LIKE %@", "update name")
        Users.findBy(predicate: predicate, success: { user in
            guard let user = user as? Users else {
                print("Find user empty")
                return
            }

            let order = Orders(context: self.context)
            order.update(userId: "order_1")

            user.addToOrders(order)

            user.save(success: {
                print("Add order to user success")
            }, fail: { err in
                print("Add order to user fail: \(err.localizedDescription)")
            })

        }) { (err) in
            print("Fetch fail cmnr: \(err)")
        }
    }

    func getOrders() {
        let predicate = NSPredicate(format: "name LIKE %@", "update name")
        Users.findBy(predicate: predicate, success: { user in
            guard let user = user as? Users else {
                print("Find user empty")
                return
            }

            guard let orders = user.orders?.array as? Array<Orders> else {
                print("Can not cast Orders")
                return
            }

            orders.forEach({ order in
                print("Order: \(order)")
            })

        }) { (err) in
            print("Fetch fail cmnr: \(err)")
        }
    }
}
Kết
Hi vọng với ít code demo nho nhỏ này bạn có thể thực hiện việc implement core data vào project của bạn.
Tài liệu tham khảo định nghĩa
https://medium.com/xcblog/core-data-with-swift-4-for-beginners-1fc067cca707
All rights reserved
