AWS CloudFormation Hands-on 02: Khởi tạo IAM user
Bài đăng này đã không được cập nhật trong 2 năm
Overview
Trong phần này, mình sẽ chia sẻ các bước để khởi tạo và phân quyền cho IAM User trên AWS sử dụng CloudFormation Template.
Hands-on
Bước 1: Tạo template file
Tạo file template.yml với nội dung mô tả ban đầu:
## =================== DESCRIPTION ===================
Description: >-
  AWS CloudFormation sample template
  Create an IAM User and optionally attach it to IAM group(s)
  Optionally embed AWS managed policies, customer managed policies and inline policies in the user
  AWS doc: https://docs.aws.amazon.com/AWSCloudFormation/latest/UserGuide/aws-properties-iam-user.html
Bổ sung các tham số
Parameters:
  paramUserName:
    Description: Unique name for a new user
    Type: String
    AllowedPattern: "^[a-zA-Z][a-zA-Z0-9]{1,64}$"
    ConstraintDescription: User name must be between 1 and 64 alphanumeric characters in length, starting with an uppercase or lowercase character of the alphabet.
  paramUserPassword:
    Description: Account password for a new user
    Type: String
    NoEcho: 'true' # mask the parameter value as asterisks (*****) to prevent it from being displayed in the console, CLI, or API
    AllowedPattern: ^[a-zA-Z][a-zA-Z0-9!@#$%&]{8,32}$
    ConstraintDescription: Password must be between 8 and 32 characters, start with lowercase or uppercase letter, and can be alphanumeric with the following special characters !@#$%&
  paramGroups:
    Description: 'Comma-delimited list of group names  to which you want to add the user (optional)'
    Type: CommaDelimitedList
    Default: ''
  paramManagedPolicy:
    Type: String
    Description: Select predefined Managed Policy that you want to associate with the user
    AllowedValues:
      - DatabaseAdministrator
      - SystemAdministrator
      - DeveloperPowerUser
      - View-Only
      - None
    Default: None
  paramTagValue:
    Description: Tag value that identifies resources as a target for deployments
    Type: String
    Default: CloudFormation IAM
Ở đây, ta định nghĩa các tham số để cấu hình cho user bao gồm:
- paramUserName: username
- paramUserPassword: password
- paramGroups: danh sách các groups cho user
- paramManagedPolicy: policy cần gán cho user khi khởi tạo, đây là các polices được định nghĩa sẵn bởi AWS.
- paramTagValue: thẻ gán cho user
Tạo một đối tượng mapping để lưu trữ ARN (AWS Resource name) cho các policy trong tập giá trị của paramManagedPolicy (bao gồm DatabaseAdministrator, SystemAdministrator, DeveloperPowerUser, View-Only, None).
Mappings:
  # listing managed IAM policies
  # AWS CLI command to get the full list of policies: 'aws iam list-policies'
  mapManagedPolicies: # AWS and customer managed
    DatabaseAdministrator:
      ARN: arn:aws:iam::aws:policy/job-function/DatabaseAdministrator
    SystemAdministrator:
      ARN: arn:aws:iam::aws:policy/job-function/SystemAdministrator
    DeveloperPowerUser:
      ARN: arn:aws:iam::aws:policy/PowerUserAccess
    View-Only:
      ARN: arn:aws:iam::aws:policy/job-function/ViewOnlyAccess
    None:
      ARN: arn:aws:iam::aws:policy/NoAccess
Tạo hai đối tượng điều kiện:
Conditions:
  hasGroups: # check if at list one group was specified as an input parameter
    !Not [!Equals [ !Join ['', !Ref paramGroups], '' ] ]
  hasManagedPolicy: # check if any group was specified as an input parameter
    !Not [!Equals [ !Ref paramManagedPolicy, 'None'] ]
Và cuối cùng là Resources:
Resources:
  myUser:
    Type: 'AWS::IAM::User'
    Properties:
      UserName: !Ref paramUserName # give a name to this user
      LoginProfile: # specify a password for this user
        Password: !Ref paramUserPassword
        PasswordResetRequired: true # make this user to set a new password on next sign-in
      Groups: !If [ hasGroups, !Ref paramGroups, !Ref "AWS::NoValue"] # attach this user to the list of specified groups if any
      ManagedPolicyArns: # list of ARNs of IAM managed policies that you want to attach to the user
        - !If [ hasManagedPolicy, !FindInMap [ mapManagedPolicies, !Ref paramManagedPolicy, ARN], !Ref "AWS::NoValue" ] # find an ARN of specified paramManagedPolicy
        - arn:aws:iam::aws:policy/AWSCloud9Administrator # provides administrator access to AWS Cloud9
      Policies: # list of inline policy documents that are embedded in the user
        - PolicyName: inlineS3ReadOnlyPolicy # give a unique name to this policy
          PolicyDocument: # JSON policy document
            Version: '2012-10-17'
            Statement: # allow read only access to all S3 buckets
              - Effect: Allow
                Action:
                  - 's3:Get*'
                  - 's3:List*'
                Resource: '*'
        - PolicyName: inlineS3CreateBucketOnlyPolicy # give a unique name to this policy
          PolicyDocument: # JSON policy document
            Version: '2012-10-17'
            Statement: # allow create S3 bucket only access
              - Effect: Allow
                Action:
                  - 's3:CreateBucket*'
                Resource: '*'
      Tags:
        - Key: Name
          Value: !Ref paramTagValue
Ở đây ta gán cho user hai nhóm policy tương ứng với hai mục trong properties của Resources:
- ManagedPolicyArns: danh sách các policy được định nghĩa sẵn bởi AWS, ta chỉ việc truyền vào ARN tương ứng
- Policies: danh sách các inline policy được người dùng định nghĩa và gán trực tiếp cho user.
Vậy là hoàn tất, bạn có thể tham khảo file template hoàn chỉnh tại đây.
Chi tiết về cú pháp sử dụng trong Template file, bạn có thể tham khảo tại bài viết Sơ lược về CloudFormation.
Bước 2: Khởi tạo stack
Chạy lệnh sau để khởi tạo stack trên AWS
aws cloudformation create-stack
--capabilities CAPABILITY_NAMED_IAM
--stack-name iam-stack
--template-body file://template.yml
--parameters ParameterKey=paramUserName,ParameterValue=johndev ParameterKey=paramUserPassword,ParameterValue=johnPass@123 ParameterKey=paramManagedPolicy,ParameterValue=DeveloperPowerUser
Note: thay đổi giá trị của các parameter theo ý của bạn
Truy cập giao diện website CloudFormation để kiểm tra trạng thái của stack vừa tạo.
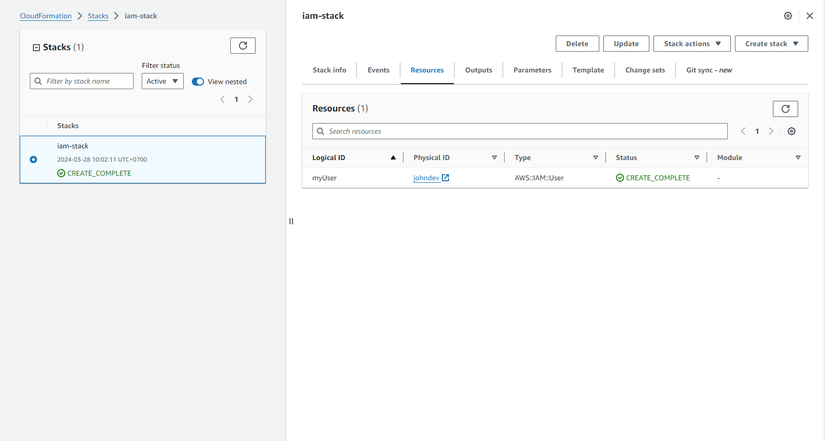
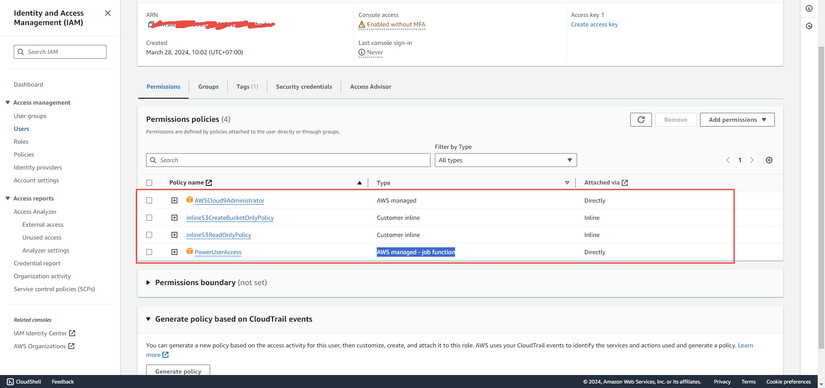
Trong tab Resources của stack, click chọn user. Trong tab Permissions của user vừa tạo, ta sẽ thấy các policies được gán
Bước 3: Cập nhật stack
Trong bước này, ta sẽ User permission bằng cách thay đổi giá trị tham số paramManagedPolicy.
Khởi tạo change-set
aws cloudformation create-change-set --change-set-name update-managed-policy\
  --capabilities CAPABILITY_NAMED_IAM \
  --stack-name iam-stack \
  --use-previous-template \
  --parameters ParameterKey=paramUserName,ParameterValue=johndev ParameterKey=paramUserPassword,ParameterValue=johnPass@123 ParameterKey=paramManagedPolicy,ParameterValue=View-Only
Apply change-set với câu lệnh:
aws cloudformation execute-change-set \
    --change-set-name update-managed-policy \
    --stack-name iam-stack
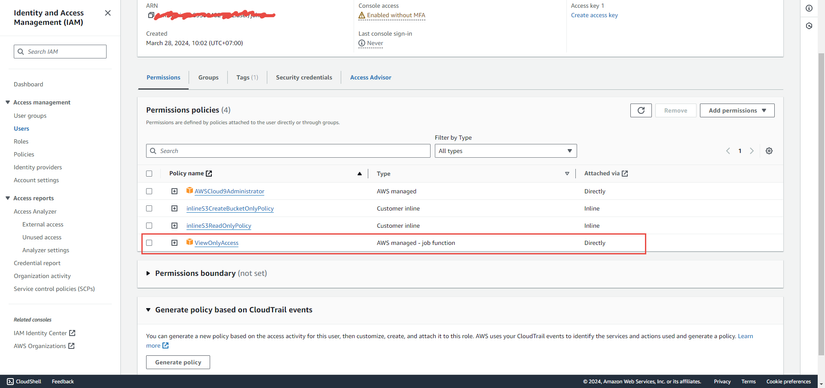
Sau khi việc cập nhật stack hoàn tất, kiểm tra permission của User, ta sẽ thấy policy PowerUserAccess trong phần trước đã được update thành ViewOnlyAccess.
Bước 4: Xóa stack
Để xóa các resources vừa khởi tạo trong stack, chạy câu lệnh
aws cloudformation delete-stack --stack-name iam-stack
Lời kết
Trong bài viết này, mình đã chia sẻ chi tiết các bước để khởi tạo và phân quyền cho User sử dụng CloudFormation template. Hi vọng bài viết này có ích cho bạn. Trân trọng!
All rights reserved
