Authentication in Laravel 4
Bài đăng này đã không được cập nhật trong 4 năm
Authentication là chức năng cần thiết với hầu hết website. Trong bài này, Mình sẽ tìm hiểu về authentication & tạo ra một ứng dụng đăng ký & đăng nhập nhỏ sử dụng Laravel 4.
Link tham khảo: Authentication in laravel
Các bài viết trước:
ELOQUENT ORM IN LARAVEL, EXAMPLE
BLADE TEMPLATING , MIGRATIONS AND SEEDING IN LARAVEL
SESSION ,FORM, VALIDATION IN LARAVEL
File cấu hình tại đường dẫn
app/config/auth.php
Lưu trữ password
$password = Hash::make('secret');
Kiểm tra password đã được mã hóa
if (Hash::check('secret', $hashedPassword))
{
    // The passwords match...
}
Kiểm tra nếu mật khẩu cần được mã hóa lại
if (Hash::needsRehash($hashed))
{
    $hashed = Hash::make('secret');
}
Authenticating Users
Để người dùng đăng nhập được vào ứng dụng ta sử dụng phương thức.
Auth::attempt
if (Auth::attempt(array('email' => $email, 'password' => $password)))
{
    return Redirect::intended('dashboard');
}
Note: Email không phải là lựa chọn cần thiết, bạn có thể dùng username trong CSDL thay thế cho email.
Redirect::intended sẽ chuyển hướng người dùng đến URL mà họ đang cố gắng truy cập.
Khi phương thức attempt được gọi thì sự kiện auth.attempt sẽ được thực thi. Nếu chứng thực thành công thì người dùng được logged, nếu không thì sự kiện auth.login thực hiện.
Kiểm tra xem user đã login hay chưa
if (Auth::check())
{
    // The user is logged in...
}
Chứng thực người dùng và "Remembering"
Nếu bạn muốn sử dụng chức năng “remember me” trong ứng dụng của bạn. Bạn phải truyền đối số thứ 2 true vào phương thức
attempt, nó sẽ giử cho user chứng thực vô thời hạn, (hay cho tới khi bạn đăng xuất logout ra). Tất nhiên trong bảng user, bạn cần có trường remember_token, để lưu token “remember me”.
if (Auth::attempt(array('email' => $email, 'password' => $password), true))
{
    // The user is being remembered...
}
Note: Nếu phương thức trả về true thì người dung coi như đã được đăng nhập vào ứng dụng.
Kiểm tra user đã chứng thực qua remember
if (Auth::viaRemember())
{
    //
}
Chứng thực user với những điều kiện
if (Auth::attempt(array('email' => $email, 'password' => $password, 'active' => 1)))
{
    // The user is active, not suspended, and exists.
}
Truy cập user đã loggin
$email = Auth::user()->email;
Truy vấn tới ID user đã chứng thực
$id = Auth::id();
Logged vào ứng dụng sử dụng ID
Auth::loginUsingId(1);
Kiểm tra điều kiện trước khi login
if (Auth::validate($credentials))
{
    //
}
Login user cho một lần request
Bạn truy cập vào ứng dụng với 1 lần request, không cần khởi tạo session hay cookie
if (Auth::once($credentials))
{
    //
}
Logout ra khởi ứng dụng
Auth::logout();
Nếu bạn muốn login với một user đã có trong ứng dụng, bạn có thể sử dụng phương thức login
$user = User::find(1);
Auth::login($user);
Protecting Routes
Route filters được sử dụng cho việc ngăn cản route của người truy nhập, buộc người dùng cần chứng thực trước khi truy nhập
Route::get('profile', array('before' => 'auth', function()
{
    // Only authenticated users may enter...
}));
Laravel cung cấp phương thức đơn giản để bảo vệ ứng dụng của bạn không bị tấn công CSRF
Trong form cần có token CSRF
<input type="hidden" name="_token" value="<?php echo csrf_token(); ?>">
Trước khi submit cần kiểm tra CSRF token
Route::post('register', array('before' => 'csrf', function()
{
    return 'You gave a valid CSRF token!';
}));
VD: Xây dựng ứng dụng đăng ký đăng nhập
ở bài trước mình đã hướng dẫn ghép giao diện sử dụng bootstrap, và cách tạo table user.
BLADE TEMPLATING , MIGRATIONS AND SEEDING IN LARAVEL
bài này mình sẽ sử dụng nó và xây dựng ứng dụng demo.
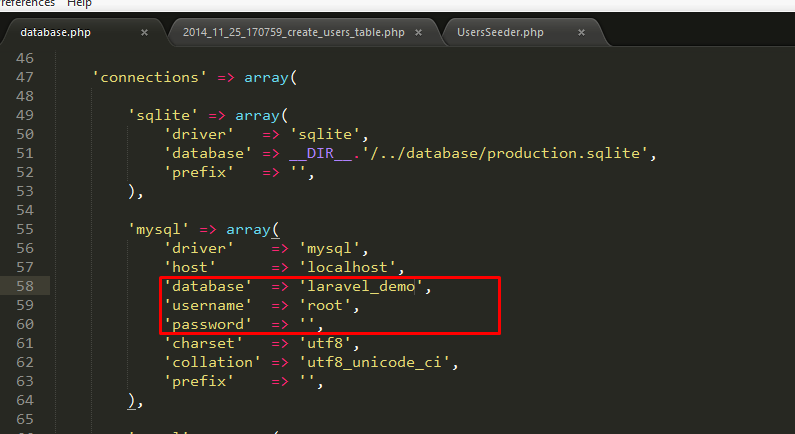
B1: Kết nối cơ sở dữ liệu
B2. Create table users
Để tạo 1 migration chúng ta sử dụng câu lệnh migrate:make trong command line
php artisan migrate:make create_users_table
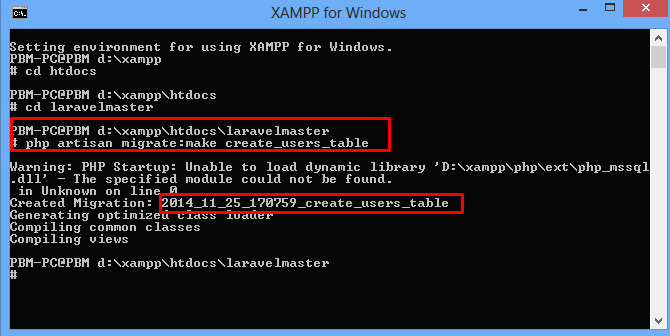
created Migration: 2014_11_25_170759_create_users_table là: của tên file là thời gian hiện tại tạo ra file.
ta vào folder app/database/migrations/ sẽ thấy file 2014_11_25_170759_create_users_table.php được tạo ra.
mở file
2014_11_25_170759_create_users_table.php thêm vào phương thức Up() như sau:
<?php

use Illuminate\Database\Schema\Blueprint;
use Illuminate\Database\Migrations\Migration;

class CreateUsersTable extends Migration {

 /**
 * Run the migrations.
 *
 * @return void
 */
 public function up()
 {
       Schema::table('users', function(Blueprint $table)
       {
          $table->create(); // creates the table.
          $table->increments('id');
          $table->string('username',50);
          $table->string('email',100);
       });
 }

 /**
 * Reverse the migrations.
 *
 * @return void
 */
 public function down()
 {
 //
 }

}
B3: thực thi câu lệnh
php artisan migrate
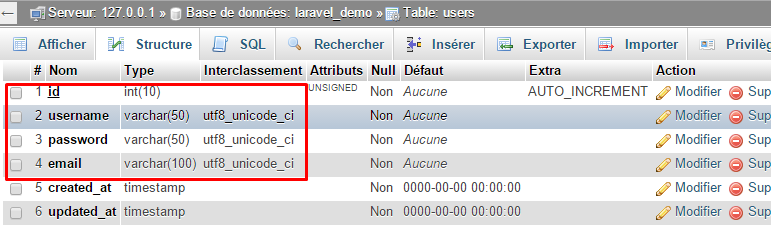
kết quả trong database
Tạo trang đăng ký
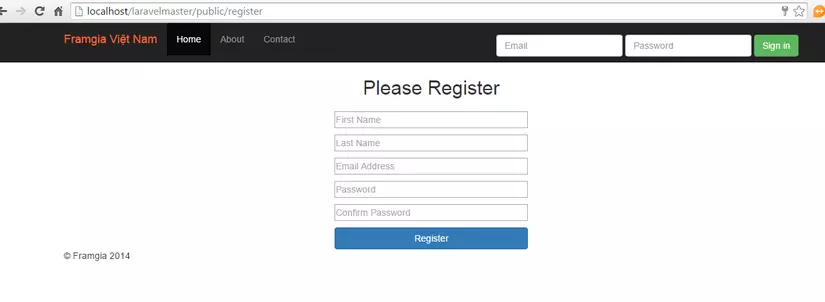
Tạo Register View
Trong app/views tạo một file mới tên register.blade.php và đặt đoạn code sau trong đó:
@extends('layouts.default')
@section('content')
<style type="text/css">
form{
  margin: 50px 0px 0px 0px;
  width: 300px;

  }
  form input{
      margin: 10px 0px 0px 0px;
      width: 300px
  }
  form .btn {margin: 10px  0px 0px 0px; }
  </style>
  <center>
{{ Form::open(array('url'=>'user/create', 'class'=>'form-signup')) }}
    <h2 class="form-signup-heading">Please Register</h2>

    <ul>
    @foreach($errors->all() as $error)
        <li>{{ $error }}</li>
    @endforeach
    </ul>

   {{ Form::text('firstname', null, array('class'=>'input-block-level', 'placeholder'=>'First Name')) }}<br>
   {{ Form::text('lastname', null, array('class'=>'input-block-level', 'placeholder'=>'Last Name')) }}<br>
   {{ Form::text('email', null, array('class'=>'input-block-level', 'placeholder'=>'Email Address')) }}<br>
   {{ Form::password('password', array('class'=>'input-block-level', 'placeholder'=>'Password')) }}<br>
   {{ Form::password('password_confirmation', array('class'=>'input-block-level', 'placeholder'=>'Confirm Password')) }}

    {{ Form::submit('Register', array('class'=>'btn btn-large btn-primary btn-block'))}}
{{ Form::close() }}
</center>

 @stop
UserController
Tạo UserController mới trong thư mục app/controllers và trong đó, chúng ta định nghĩa lớp UsersController:
<?php

class UserController extends BaseController{

	//Thiết lập csrf để tránh các cuộc hack Cross domain
	public function __construct() {
	    $this->beforeFilter('csrf', array('on'=>'post'));
	}

	public function showUser()
	{
		$users = User::get();
		return View::make('user', array('users' => $users ) );
	}

	public function getRegister() {

		return View::make('register');

	}
	public function getLogin() {

		return View::make('login');

	}
	public function postCreate() {
		//Method passes() kiểm tra tính đúng đắn của dữ liệu và return true nếu hợp lệ, false nếu không hợp lệ. Nếu hợp lệ thực hiện việc tạo mới user và thông báo message cho người dùng.
		$rules = array(
		    'firstname'=>'required|alpha|min:2',
		    'lastname'=>'required|alpha|min:2',
		    'email'=>'required|email|unique:users',
		    'password'=>'required|alpha_num|between:6,12|confirmed',
		    'password_confirmation'=>'required|alpha_num|between:6,12'
		);
         if(!Validator::make(Input::all(),$rules)->fails()){
		    $user = new User;
		    $user->firstname = Input::get('firstname');
		    $user->lastname = Input::get('lastname');
		    $user->email = Input::get('email');
		    $user->password = Hash::make(Input::get('password'));
		    $user->save();

		    Session::put("register_success",Input::get('username')." đã đăng ký thành công");
			return Redirect::to("login");
		} else {
		    // validation has failed, display error messages

		    return View::make('register', array('errors' => "Please input data" ) );
		}
	}

}
All rights reserved
