API Testing with Rest Assured
Bài đăng này đã không được cập nhật trong 6 năm
Rest Assured là một thư viện Java, một trong số những thư viện phổ biến test RESTful Web Services. Nó cung cấp một cấu trúc giống như BDD để viết code, đó là một trong những lợi thế rất dễ sử dụng. Trong bài viết này tôi sẽ hướng dẫn cách test GET và POST request
I. How to make a GET Request using Rest Assured
Thông tin của Restful Web service :
| Endpoint | http://restapi.demoqa.com/utilities/weather/city/<City> |
|---|---|
| HTTP method type | GET |
| -------- | -------- |
| Comments | <City>: thành phố muốn lấy dữ liệu thời tiết. VD:muốn lấy điều kiện thời tiết của Hyderabad, chỉ cần thay <City> thành Hyderabad. URL: http://restapi.demoqa.com/utilities/weather/city/Hyderaba |
| -------- | -------- |
| Response | { |
“City”: “Hyderabad”, “Temperature”: “31.49 Degree celsius”, “Humidity”: “62 Percent”, “Weather Description”: “scattered clouds”, “Wind Speed”: “3.6 Km per hour”, “Wind Direction degree”: “270 Degree” } |
Để lấy được dữ liệu trên sử dụng RestAssured cần theo các bước sau:
- Sử dụng RestAssured class để tạo ra một RequestSpecification của URL: http://restapi.demoqa.com/utilities/weather/city/Hyder\
- Xác định loại HTTP Method
- Gửi Request đến Server
- Lấy Response từ server
- In ra body của response
import org.testng.annotations.Test;
import io.restassured.RestAssured;
import io.restassured.http.Method;
import io.restassured.response.Response;
import io.restassured.specification.RequestSpecification;

public class SimpleGetTest {

	@Test
	public void GetWeatherDetails()
	{
		// Specify the base URL to the RESTful web service
		RestAssured.baseURI = "http://restapi.demoqa.com/utilities/weather/city";

		// Get the RequestSpecification of the request that you want to sent
		// to the server. The server is specified by the BaseURI that we have
		// specified in the above step.
		RequestSpecification httpRequest = RestAssured.given();

		// Make a request to the server by specifying the method Type and the method URL.
		// This will return the Response from the server. Store the response in a variable.
		Response response = httpRequest.request(Method.GET, "/Hyderabad");

		// Now let us print the body of the message to see what response
		// we have recieved from the server
		String responseBody = response.getBody().asString();
		System.out.println("Response Body is =>  " + responseBody);

	}

}
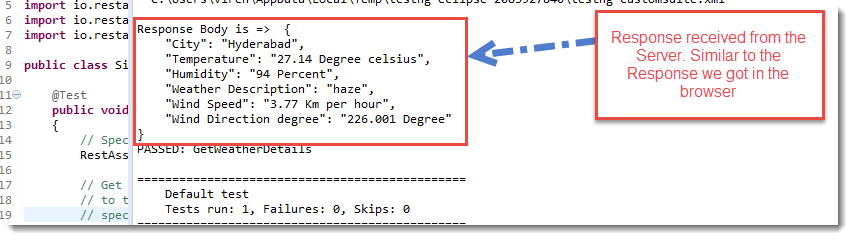
Response được in ra tại console window của Eclipse
II. How to make a POST Request sử dụng Rest Assured
Để tạo JSON objects chúng ta cần thêm thư viện Simple JSON. Các bạn có thể download Simple JSON từ maven theo link https://mvnrepository.com/artifact/com.googlecode.json-simple/json-simple.
-
Tạo Request trỏ đến Server Endpoint
RestAssured.baseURI ="http://restapi.demoqa.com/customer"; RequestSpecification request = RestAssured.given(); -
Tạo JSON request chứa tất cả các fields
// JSONObject is a class that represents a Simple JSON.
// We can add Key - Value pairs using the put method
JSONObject requestParams = new JSONObject();
requestParams.put("FirstName", "Virender");
requestParams.put("LastName", "Singh");

requestParams.put("UserName", "simpleuser001");
requestParams.put("Password", "password1");
requestParams.put("Email",  "someuser@gmail.com");
JSONObject là một class có trong gói org.json.simple. Bạn sẽ thấy rằng Request JSON có nhiều nodes, mỗi node có thể được add sử dụng JSONObject.put(String, String) method
- Thêm JSON body vào request và gửi request `
// Add a header stating the Request body is a JSON
request.header("Content-Type", "application/json");

// Add the Json to the body of the request
request.body(requestParams.toJSONString());

// Post the request and check the response
Response response = request.post("/register");`
- Validate Response
`int statusCode = response.getStatusCode();
Assert.assertEquals(statusCode, "201");
String successCode = response.jsonPath().get("SuccessCode");
Assert.assertEquals( "Correct Success code was returned", successCode, "OPERATION_SUCCESS");`
Kết luận
Hi vọng bài viết của mình có thể giúp ích cho các bạn
All rights reserved
