API REST trong Laravel sử dụng xác thực Passport
Bài đăng này đã không được cập nhật trong 7 năm
Ngày nay API còn được gọi là dịch vụ Web. Dịch vụ Web rất quan trọng khi bạn tạo web và phát triển ứng dụng di động. Bạn cần tạo API cho nhà phát triển ứng dụng di động của bạn. Như chúng ta đã biết laravel hiện nay phổ biến hơn vì có thể tạo được API. Nhưng nếu bạn là người mới bắt đầu và bạn không biết API và dịch vụ web là gì thì chúng ta hãy cùng tìm hiểu cơ bản như trong bài này nhé.
1. Passport
API thường sử dụng mã để xác thực người dùng và không duy trì trạng thái session giữa các yêu cầu. Laravel giúp xác thực API dễ dàng bằng cách sử dụng Laravel Passport, cung cấp triển khai máy chủ OAuth2 đầy đủ cho ứng dụng Laravel trong vài phút.
Và bạn chỉ cần làm theo vài bước để có được các dịch vụ web như sau:
1) API đăng nhập
2) API đăng ký
3) API chi tiết
Bước 1: Cài đặt Laravel
Trong bước đầu tiên, chúng ta tạo mới một ứng dụng bằng Laravel bằng cách sử dụng lệnh bên dưới trên command line của bạn:
composer create-project --prefer-dist laravel/laravel blog
Bước 2: Cài đặt Package
composer require laravel/passport
Sau khi cài đặt thành công, mở file config/app.php và thêm service provider:
config/app.php
'providers' => [
    Laravel\Passport\PassportServiceProvider::class,
],
Bước 3: Chạy Migration và Install
Sau khi đăng ký nhà cung cấp dịch vụ Passport, chúng ta cần sử dụng command để migration, sau khi chạy migrate, bạn sẽ nhận được một số bảng mới trong cơ sở dữ liệu. ta sử dụng lệnh:
php artisan migrate
Tiếp theo, chúng ta cần cài đặt passport bằng command,
Sử dụng lệnh: passport:install, nó sẽ tạo các khóa mã thông báo để bảo mật.
php artisan passport:install
Bước 4: Cấu hình Passport
Trong bước này, chúng ta phải thực hiện cấu hìnhtrong 3 nơi: model, service provider và file cấu hình auth. Vì vậy, bạn chỉ cần theo dõi thay đổi trên tập tin đó.
Trong model, chúng ta đã thêm class HasApiTokens của Passport
Trong AuthServiceProvider, chúng ta đã thêm vào Passport::routes()
Trong auth.php, chúng ta đã thêm cấu hình API auth.
app/User.php
<?php
namespace App;
use Laravel\Passport\HasApiTokens;
use Illuminate\Notifications\Notifiable;
use Illuminate\Foundation\Auth\User as Authenticatable;
class User extends Authenticatable
{
  use HasApiTokens, Notifiable;
/**
* The attributes that are mass assignable.
*
* @var array
*/
protected $fillable = [
'name', 'email', 'password',
];
/**
* The attributes that should be hidden for arrays.
*
* @var array
*/
protected $hidden = [
'password', 'remember_token',
];
}
app/Providers/AuthServiceProvider.php
<?php
namespace App\Providers;
use Laravel\Passport\Passport;
use Illuminate\Support\Facades\Gate;
use Illuminate\Foundation\Support\Providers\AuthServiceProvider as ServiceProvider;
class AuthServiceProvider extends ServiceProvider
{
    /**
     * The policy mappings for the application.
     *
     * @var array
     */
    protected $policies = [
        'App\Model' => 'App\Policies\ModelPolicy',
    ];
/**
     * Register any authentication / authorization services.
     *
     * @return void
     */
    public function boot()
    {
        $this->registerPolicies();
        Passport::routes();
    }
}
config/auth.php
<?php
return [
'guards' => [
        'web' => [
            'driver' => 'session',
            'provider' => 'users',
        ],
        'api' => [
            'driver' => 'passport',
            'provider' => 'users',
        ],
    ],
Bước 5: Tạo API Route
Trong bước này, chúng ta sẽ tạo routes API. Laravel cung cấp file api.php để ghi route các dịch vụ web. Vì vậy, hãy viết thêm một route mới trong file đó.
routes/api.php
<?php
/*
|--------------------------------------------------------------------------
| API Routes
|--------------------------------------------------------------------------
|
| Here is where you can register API routes for your application. These
| routes are loaded by the RouteServiceProvider within a group which
| is assigned the "api" middleware group. Enjoy building your API!
|
*/
Route::post('login', 'API\UserController@login');
Route::post('register', 'API\UserController@register');
Route::group(['middleware' => 'auth:api'], function() {
Route::post('details', 'API\UserController@details');
});
Bước 6: Tạo Controller
Ở bước cuối cùng, chúng ta phải tạo Controller mới và ba method API, vì vậy trước tiên hãy tạo thư mục mới API trong folder Controller. Vì vậy, ta tạo UserController và nội dung như dưới đây:
<?php
namespace App\Http\Controllers\API;
use Illuminate\Http\Request;
use App\Http\Controllers\Controller;
use App\User;
use Illuminate\Support\Facades\Auth;
use Validator;
class UserController extends Controller
{
public $successStatus = 200;
/**
     * login api
     *
     * @return \Illuminate\Http\Response
     */
    public function login(){
        if(Auth::attempt(['email' => request('email'), 'password' => request('password')])){
            $user = Auth::user();
            $success['token'] =  $user->createToken('MyApp')-> accessToken;
            return response()->json(['success' => $success], $this-> successStatus);
        }
        else{
            return response()->json(['error'=>'Unauthorised'], 401);
        }
    }
/**
     * Register api
     *
     * @return \Illuminate\Http\Response
     */
    public function register(Request $request)
    {
        $validator = Validator::make($request->all(), [
            'name' => 'required',
            'email' => 'required|email',
            'password' => 'required',
            'c_password' => 'required|same:password',
        ]);
if ($validator->fails()) {
            return response()->json(['error'=>$validator->errors()], 401);
        }
$input = $request->all();
        $input['password'] = bcrypt($input['password']);
        $user = User::create($input);
        $success['token'] =  $user->createToken('MyApp')-> accessToken;
        $success['name'] =  $user->name;
return response()->json(['success'=>$success], $this-> successStatus);
    }
/**
     * details api
     *
     * @return \Illuminate\Http\Response
     */
    public function details()
    {
        $user = Auth::user();
        return response()->json(['success' => $user], $this-> successStatus);
    }
}
Bây giờ chúng ta đã sẵn sàng để chạy ví dụ của chính mình ta có thể sử dụng lệnh dưới:
php artisan serve
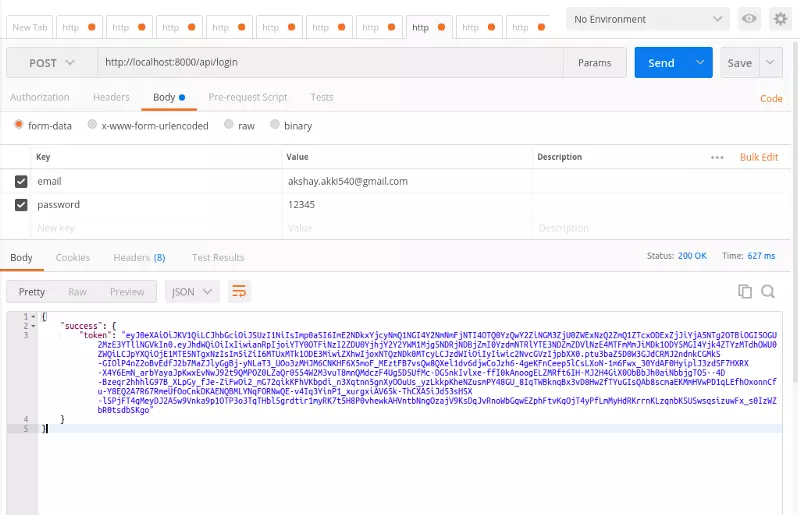
Login API
Bây giờ, chúng ta có thể kiểm tra đơn giản bằng các tool client, vì vậy ta test những gì ta vừa tạo và bạn có thể thấy ảnh chụp màn hình bên dưới cho API đăng nhập.
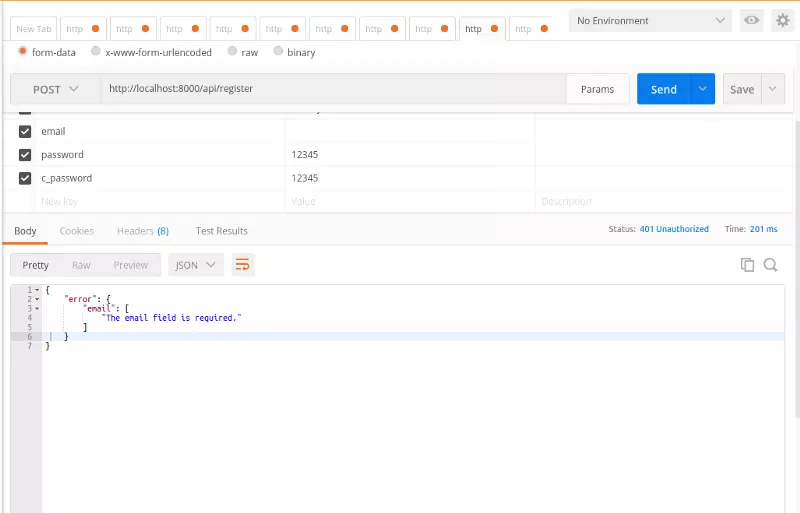
Validation of Register API:
Xác thực là khía cạnh quan trọng nhất trong khi thiết kế một ứng dụng. Nó xác thực dữ liệu đầu vào. Theo mặc định, các lớp base controller sử dụng ValidatesRequests để cung cấp một phương thức thuận tiện để xác thực các yêu cầu HTTP với nhiều quy tắc xác thực cao.
Laravel Cung cấp lớp base controller rất mạnh khi bạn xây dựng API bằng laravel sau đó sử dụng đặc điểm của ValidatesRequests để xác thực yêu cầu của bạn. Ta định nghĩa lớp Validator trong hàm register
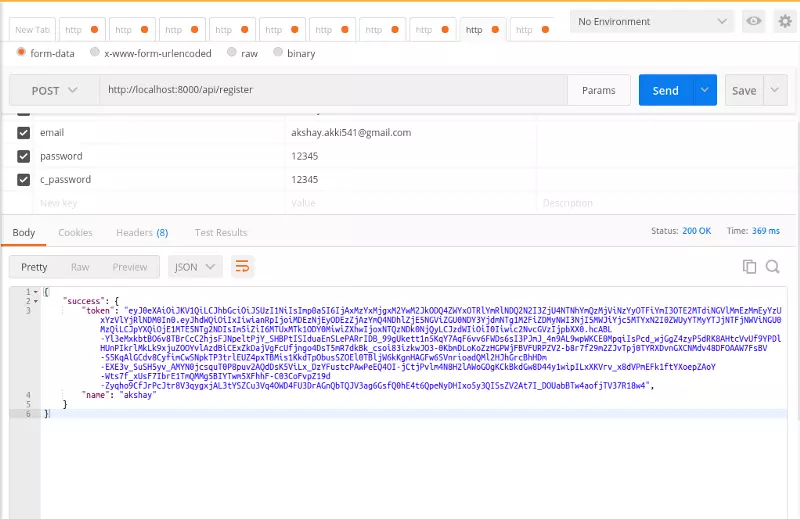
Register API:
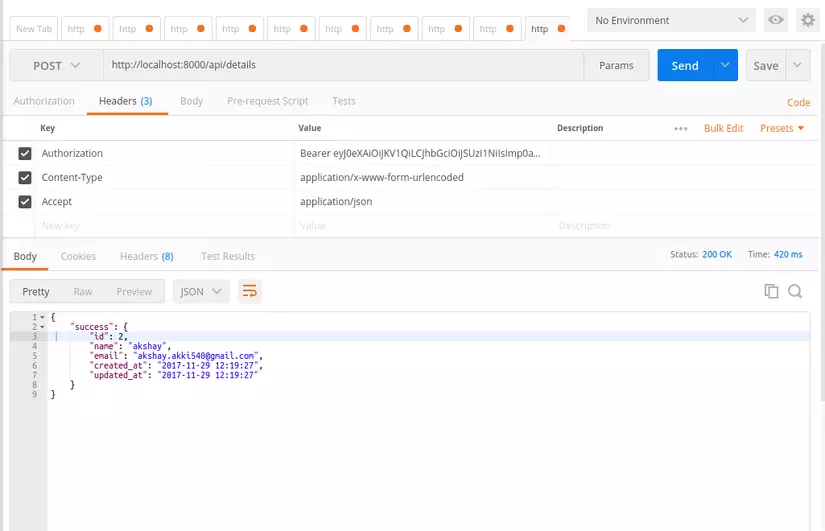
Bây giờ, chúng ta sẽ kiểm tra chi tiết API, Trong api này, bạn phải đặt hai tiêu đề như được liệt kê bên dưới:
'headers' => [
    'Accept' => 'application/json',
    'Authorization' => 'Bearer ' . $accessToken,
]
Hãy chắc chắn rằng header ở trên, nếu không, bạn không thể lấy thông tin người dùng.
Details API:
Vậy là đến đây ta có thể hoàn thành được ví dụ đơn giản về API trong Laravel với xác thực bằng Passport.
Và thông qua Laravel Application Development, Chúng ta có thể tự phát triển ứng dụng web của mình để thiết kế thân thiện hơn, an toàn, có thể mở rộng và giàu tính năng có thể đáp ứng yêu cầu của dự án.
Trên đây là một bài cơ bản về tính năng này, bài viết có sử dụng các nguồn từ các trang:
https://tutsforweb.com/laravel-passport-create-rest-api-with-authentication/
All rights reserved
