[Angular 2] - Template-driven forms
Bài đăng này đã không được cập nhật trong 4 năm
Trong các ứng dụng web thì form là thành phần không thể thiếu. Form giúp cho end-user nhập liệu vào database Và tất nhiên Ng2 cũng không thể thiếu được thành phần này. Còn chờ gì nữa mà không triển nào!! Ng2 cung cấp cho ta 2 loại form
Reactive Form. Đã có 1 bài viết khá chi tiết rồi. Các bạn có thể tham khảo tại đâyTemplate-driven forms: Đây sẽ là loại form mà ta sẽ tìm hiểu trong bài này. Chúng ta sẽ làm 1 form user-info
Bài viết sẽ sử dụng angular-cli, bạn có thể tham khảo tại đây
1. Tạo model cho user
User-info của chúng ta sẽ có các thông tin cơ bản sau : fullname, age, usertype. Ta tạo file user-info.ts trong thư mục app
export class User {
    listType = ['Admin', 'Mod', 'Member'];

    constructor(
        public fullname?: string,
        public age?: number,
        public type?: string,
    ) {
    }
}
?là optional, field đó không require khi khởi tạo 1 instance User
2. Tạo Component
Chạy command
ng g component user-infođể tạo ra 1 component mới. Khi chạy lệnh này thì trong fileapp.module.tsđã tự động import component & khai báo vàodeclarations
Vào file app/user-info/user-info.component.ts xem thử ta có gì nào
@Component({
  selector: 'app-user-info',
  templateUrl: './user-info.component.html',
  styleUrls: ['./user-info.component.css']
})
selectorlà tag của component này. Để sử dụng & gọi component thì ta chỉ cần import vào file app.component.ts và sử dụng cú phápapp-user-info.templateUrl: là đường dẫn đến file template HTML của component. Template của 1 component thường sẽ rất dài, ta nên viết ra 1 file .html riêng để dễ quản lí../là đang trỏ đến chính folder hiện tại chứa file component. Để trỏ ra ngoài 1 cấp, ta dùng../như PHP thôistyleUrls: là đường dẫn đến file style. Cũng giống như file template HTML, 1 component cũng cần phải có 1 style riêng cho nó. Ta có thể thấy nó được khai báo trong 1 mảng => nạp được nhiều file style cho 1 component
Thử paste
<app-user-info></app-user-info>vào fileapp.component.htmlrồi chạyng servethử xem nhé
3. Code nào
<div class="container">
<h3>User Info</h3>
<form #userInfo="ngForm">
<div class="form-group">
<label for="fullname">Full Name</label>
<input [(ngModel)]="userMode.fullname" #fullname="ngModel" name="fullname" type="text" class="form-control" id="fullname" required>
</div>
<div class="form-group">
<label for="age">Age</label>
<input [(ngModel)]="userMode.age" #age="ngModel" name="age" type="text" class="form-control" id="age" required>
</div>
<div class="form-group">
<label for="level">User Type</label>
<select [(ngModel)]="userMode.level" #level="ngModel" name="level" id="level" class="form-control" required>
<option *ngFor="let lvl of userMode.listType" [value]="lvl" >{{ lvl }}</option>
</select>
</div>
<button type="submit" class="btn btn-success">Submit</button>
</form>
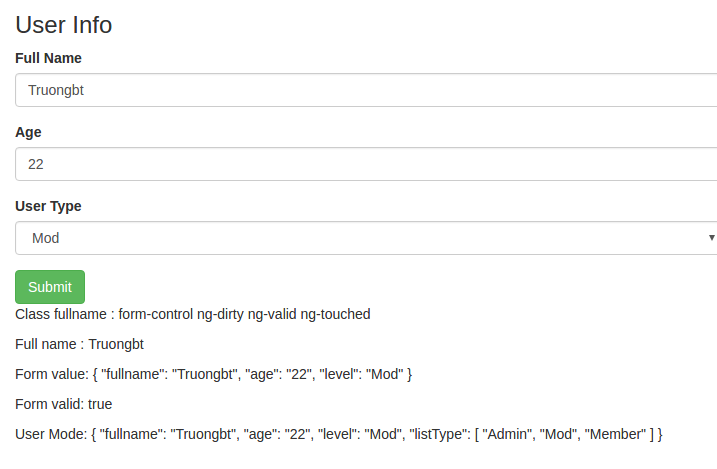
<p>Class fullname : {{fullname.className}}</p>
<p>Full name : {{fullname.value}}</p>
<p>Form value: {{userInfo.value | json}}</p>
<p>Form valid: {{userInfo.valid | json}}</p>
<p>User Mode: {{userMode | json}}</p>
</div>
Mình dùng những class của bootstrap. nên các bạn có thể nạp file style của bootstrap vào trong index.html nhé
Đây sẽ là form của chúng ta. Có vài thứ lạ lạ phải không. Để mình giải thích chút nhé
<form #userInfo="ngForm">
Biến userInfo sẽ phản ánh toàn bộ form. Ta có thể truy xuất value, valid.. của form
<input [(ngModel)]="userMode.fullname" #fullname name="fullname" type="text" class="form-control" id="fullname" required>
[(ngModel)]="userMode.fullname" đây là kiểu two-way data binding, ai đã ngó qua ng1 thì không còn lạ gì nữa phải không
<option *ngFor="let lvl of userMode.listType" [value]="lvl" >{{ lvl }}</option>
ngFor sẽ lặp thẻ option với đầu vào là listType mà ta đã khai báo trong Model, với lvl là một phần tử được lặp
[value]: trong ng2, ta có cách khác để set thuộc tính cho 1 thẻ html bằng cú pháp : [property]="value"
{{userInfo.value | json}}
Như mình đã nói ở trên, biến userInfo giờ có thể truy xuất đến value, class... của form. Ở đây mình hiển thị ra giá trị các input của form dưới định dạng json cho các bạn dễ nhìn
Và đây là thành quả bước đầu của ta
4. Validator
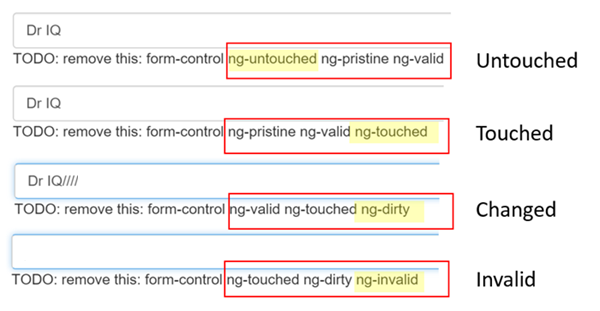
Bạn có thể để í đến dòng Class fullname ngay dưới button Submit khi ta nhập vào ô fullname không. Đó chính là class của input đó, những class này phản ánh những trạng thái của input. Cùng xem bảng sau để rõ hơn
| Trạng thái | Class if true | Class if false |
|---|---|---|
| Input đã được click | ng-touched | ng-untouched |
| Giá trị của Input được thay đổi | ng-dirty | ng-pristine |
| Input hợp lệ | ng-valid | ng-invalid |
Những class này ta sẽ dùng để validate đấy. Xem tiếp đoạn code sau
/* file user-info.component.css*/
.ng-valid[required], .ng-valid.required  {
    border-left: 5px solid #42A948; /* green */
}
.ng-invalid:not(form)  {
    border-left: 5px solid #a94442; /* red */
}
// add thêm vào file user-info.component.html. Sau input fullname nhé
<div [hidden]="fullname.valid || fullname.pristine" class="alert alert-danger"> FullName is required</div>
Đoạn message error sẽ hiển thị khi mà input đã được nhập và nó invalid
5. Submit form thôi
Sau khi đã input form hợp lệ rồi thì submit để lấy dữ liệu thôi nhỉ
<form #userInfo="ngForm" (ngSubmit)="onSubmit()">
Form sẽ được submit đến hàm onSubmit mà ta sẽ khai báo ở trong file compnent ngay sau đây
onSubmit() {
        console.log(this.userMode);
    }
Ở đây mình log ra thông tin của user mà ta vừa nhập khi nãy. Thật đơn giản phải không nào
6. Kết luận & tài liệu tham khảo
Bạn có thể thấy angular form cũng rất đơn giản phải không nào, ng2 support ta rất nhiều những directive & api để tạo ra những form phức tạp Các bạn có thể tham khảo tài liệu sau để hiểu thêm nhé https://angular.io/docs/ts/latest/guide/forms.html http://learnangular2.com/forms/ https://scotch.io/tutorials/using-angular-2s-model-driven-forms-with-formgroup-and-formcontrol
Lưu ý : Để dùng được form của ng2 thì các bạn cần phải import
FormsModuletrong file app.module.ts nhé
All rights reserved
