Angular 2 căn bản - Phần 3: Component thứ hai và data binding
Bài đăng này đã không được cập nhật trong 4 năm
Ở phần trước, chúng ta đã tìm hiểu về component và service trong angular, và trong bài viết này chúng ta sẽ luyện tập một chút bằng cách tạo một component thứ hai. Bên cạnh đó chúng ta cũng sẽ tìm hiểu thế nào là data binding.
Chúng ta đã có một component là PeopleList, hiển thị ra một danh sách các person, component tiếp theo chúng ta sẽ show ra chi tiết của từng person đó mỗi khi click vào person tương ứng. Để thực hiện việc này chúng ta sử dụng click event binding của angular.
@Component({
  selector: 'app-people-list',
  template: `
    <ul>
      <li *ngFor="let person of people">
      <a href="#" (click)="selectPerson(person)">
        {{person.name}}
      </a>
      </li>
    </ul>
  `,
  styleUrls: ['./people-list.component.scss']
})
Việc gán sự kiện (click)="selectPerson(person)" sẽ yêu cầu Angular gọi đến hàm selectPerson trong component mỗi khi người dùng click vào thẻ a.
Chúng ta định nghĩa hàm selectPerson ở bên dưới như sau:
export class PeopleListComponent implements OnInit {
  people: Person[];
  selectedPerson: Person;

  constructor(private peopleService: PeopleService) {
    this.people = peopleService.getAll();
  }

  ngOnInit() {}

  selectPerson(person){
    this.selectedPerson = person;
  }
}
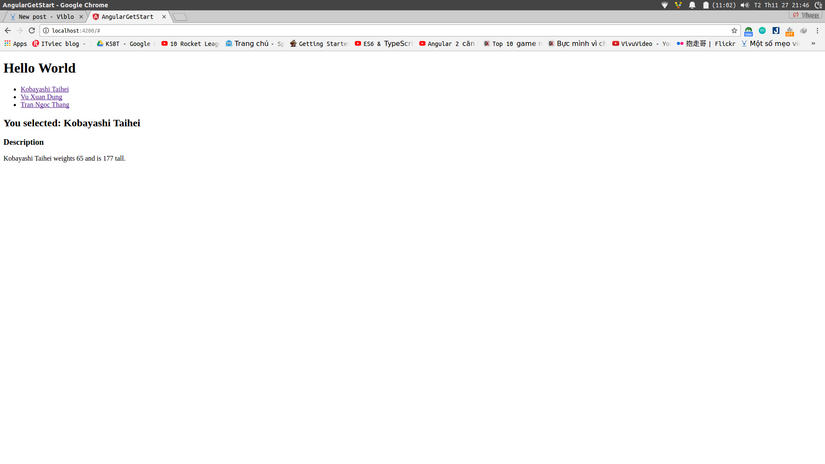
Từ giờ mỗi khi người dùng ấn vào một cái tên bất kỳ trong list, Angular 2 sẽ gọi đến hàm selectPerson và sẽ update thuộc tính selectedPerson trong component PeopleList. Và như vậy ta đã giải quyết được bước đầu trong việc hiển thị thông tin của từng Person.
<section *ngIf="selectedPerson">
    <h2>You selected:  {{selectedPerson.name}}</h2>
    <h3>Description</h3>
    <p>
       {{selectedPerson.name}} weights  {{selectedPerson.weight}} and is  {{selectedPerson.height}} tall.
    </p>
  </section>
Bạn có thể chú ý thấy rằng ở đây ta sử dụng cú pháp *ngIf, nó cũng tương tự như *ngFor. Ở đây nó sẽ hiển thị ra thông tin của một person chỉ khi person đó được chọn
 File hoàn thiện của chúng ta như sau:
import { Component, OnInit } from '@angular/core';
import { Person } from '../person';
import { PeopleService } from "../people.service";

@Component({
  selector: 'app-people-list',
  template: `
    <ul>
      <li *ngFor="let person of people">
      <a href="#" (click)="selectPerson(person)">
        {{person.name}}
      </a>
      </li>
    </ul>
    <section *ngIf="selectedPerson">
    <h2>You selected:  {{selectedPerson.name}}</h2>
    <h3>Description</h3>
    <p>
       {{selectedPerson.name}} weights  {{selectedPerson.weight}} and is  {{selectedPerson.height}} tall.
    </p>
  </section>
  `,
  styleUrls: ['./people-list.component.scss']
})
export class PeopleListComponent implements OnInit {
  people: Person[];
  selectedPerson: Person;

  constructor(private peopleService: PeopleService) {
    this.people = peopleService.getAll();
  }

  ngOnInit() {}

  selectPerson(person){
    this.selectedPerson = person;
  }
}
Ok, vậy là chúng ta đã đi được nửa chặng đường rồi. Trong phần tiếp theo của bài viết chúng ta sẽ tìm hiểu về data binding của angular 2. Angular 2 data binding làm việc khác một chút so với AngularJS.
Angular 2 có nhiều tùy chọn binding. Bạn đã thấy interpolation binding liên kết dữ liệu một chiều từ component tới template để hiển thị dữ liệu. Và bây giờ, chúng ta đã học về event binding liên kết dữ liệu theo chiều ngược lại từ template tới component.
Event binding giúp bạn liên kết các phương thức của component trực tiếp với các event của DOM. Không cần custom Angular binding như ng-click, ng-change, ... bạn chỉ cần (click), (change), hoặc bất kỳ event nào bạn muốn.
Bây giờ nhìn vào PeopleListComponent ta sẽ thấy rằng nó có vẻ hơi phức tạp. Lúc này việc tạo một component show chi tiết của từng person là hợp lý. Ta sẽ tạo một component mới là PersonDetails
ng g c -it -is person-details
# ng generate component --inline-template --inline-style person-details
Nội dung file như sau:
import { Component, OnInit } from '@angular/core';
import { Person } from "../person";

@Component({
  selector: 'app-person-details',
  template: `

  <!-- we moved the details template here -->
  <section *ngIf="person">
    <h2>You selected: {{person.name}}</h2>
    <h3>Description</h3>
    <p>
       {{person.name}} weights {{person.weight}} and is {{person.height}} tall.
    </p>
  </section>

  `,
  styles: []
})
export class PersonDetailsComponent implements OnInit {
  person: Person;

  constructor() {}
  ngOnInit() {}
}
Chúng ta đã có component thể hiện chi tiết của từng person. Chúng ta có thể tái sử dụng và kết hợp với các component khác. Tuy nhiên vấn đề đặt ra ở đây là làm thế nào để có thể gửi dữ liệu vào thuộc tính person để show ra?
Cách xử lý ở đây là chúng ta sẽ sử dụng Input decorator của Angular 2
// include this on top of person-details.component.ts
import { Component, Input } from '@angular/core';

export class PersonDetailsComponent {
  // update PersonDetailsComponent
  // to decorate the person property with @Input()
  @Input() person : Person;
}
File hoàn chỉnh của ta sẽ như thế này:
import { Component, OnInit, Input } from '@angular/core';
import { Person } from "../person";

@Component({
  selector: 'app-person-details',
  template: `
  <section *ngIf="person">
    <h2>You selected: {{person.name}}</h2>
    <h3>Description</h3>
    <p>
       {{person.name}} weights {{person.weight}} and is {{person.height}} tall.
    </p>
  </section>
  `,
  styles: []
})
export class PersonDetailsComponent implements OnInit {
  @Input() person : Person;

  constructor() {}

  ngOnInit() {}
}
Điều này sẽ đánh dấu thuộc tính person như một đầu vào của PersonDetailsComponent và sẽ cho phép các component khác gửi dữ liệu tới component này. Bằng cách nào? Bằng cách sử dụng Angular 2 property binding giống như thế này:
<app-person-details [person]="selectedPerson"></app-person-details>
Bây giờ chúng ta sẽ cập nhật PeopleListComponent để sử dụng component mới này. Nhớ là, chúng ta cần thêm component mới tới app.module.ts để ứng dụng của chúng ta biết nó. Chúng bắt đầu bằng cách import component từ module của nó:
import { PersonDetailsComponent } from './person-details/person-details.component';
Sau đó thêm thuộc tính declarations của decorator NgModule trong app.modules.ts:
@NgModule({
  declarations: [
    AppComponent,
    PeopleListComponent,
    PersonDetailsComponent // Here is our new component!
  ],
  imports: [
    BrowserModule,
    FormsModule,
    HttpModule
  ],
  providers: [PeopleService],
  bootstrap: [AppComponent]
})
export class AppModule {}
Và sau đó, chúng ta có thể sử dụng nó trong template của PeopleListComponent:
<!-- this is the new syntax for ng-repeat -->
<ul>
  <li *ngFor="let person of people">
    <a href="#" (click)="selectPerson(person)">
      {{person.name}}
    </a>
  </li>
</ul>
<app-person-details [person]="selectedPerson"></app-person-details>
Và file hoàn chỉnh của chúng sẽ như này:
import { Component, OnInit } from '@angular/core';
import { Person } from '../person';
import { PeopleService } from "../people.service";

@Component({
  selector: 'app-people-list',
  template: `

  <!-- this is the new syntax for ng-repeat -->
  <ul>
    <li *ngFor="let person of people">
      <a href="#" (click)="selectPerson(person)">
      {{person.name}}
      </a>
    </li>
  </ul>
  <app-person-details [person]="selectedPerson"></app-person-details>
  `,
  styleUrls: ['./people-list.component.scss']
})
export class PeopleListComponent implements OnInit {
  selectedPerson: Person;
  people: Person[];

  constructor(private peopleService: PeopleService) { }

  ngOnInit() {
    this.people = this.peopleService.getAll();
  }

  selectPerson(person:Person){
    this.selectedPerson = person;
  }
}
Cảm ơn các bạn đã theo dõi bài viết Nguồn: https://www.barbarianmeetscoding.com/blog/2016/03/27/getting-started-with-angular-2-step-by-step-3-your-second-component-and-angular-2-data-binding/
All rights reserved
