Active Recort Pattern và Tất tần tật về Active Record trong Rails
Bài đăng này đã không được cập nhật trong 3 năm
Active record Pattern
The active record pattern is an approach to accessing data in a database. A database table or view is wrapped into a class. The wrapper class implements accessor methods or properties for each column in the table or view. theo wikipedia
(Tạm dịch) Active record Pattern là một cách tiếp cận để ta có thể truy cập dữ liệu từ database mà ở đó 1 table hoặc view sẽ được bao bọc thành 1 wapper class. Từ đó 1 instance của class sẽ tương ứng với 1 row trong database table. Wapper class đó sẽ impliment các accessor method hoặc các thuộc tính cho mỗi cột trong table hoặc view đó.
- Patern này thường được dùng trong ORM
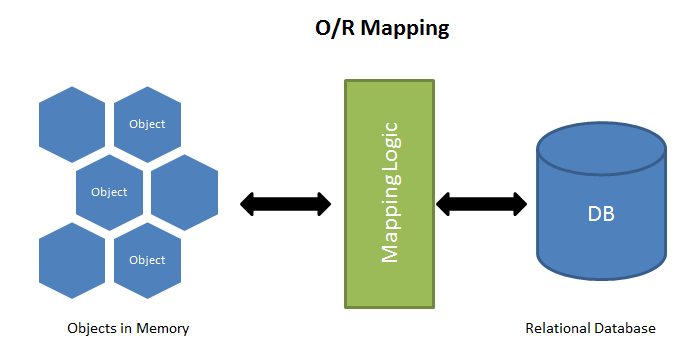
ORM IN A NUTSHELL
- ORM là viết tắt của cụm từ Object Relational Mapping
- Là một kỹ thuật/cơ chế lập trình theo wikipedia
- Có chức năng ánh xạ các bảng dữ liệu sang các đối tượng trong các ngôn ngữ lập trình => không cần viết truy vấn của DB mà sử dụng query interface cung cấp bởi ngôn ngữ đó để thao tác với DB
![]()
- Giải quyết vấn đề tương thích giữa các framework với các loại cơ sở dữ liệu quan hệ.
- Tham khảo thêm nếu thấy hứng thú. Bài viết về ORM mà cá nhân mình thấy chất lượng trên Viblo (Không phải là mấy bài copy patse từ google dịch🤌🤌 cho nên rất đáng để đọc 👌nếu muốn đào sâu hơn 1 tẹo về ORM!)
Active record In Rails
Active record trong Rails là một implimentation của Active Record pattern hay cũng có thể coi như là 1 ORM. Tóm gọn như vậy thôi  )
)
Conventions
- Naming Conventions:
| Class | Database Table |
|---|---|
| Book | books |
| LineItem | line_items |
- Schema Conventions:
- Foreign keys: Nên đặt tên theo kiểu singularized_table_name_id- tên bảng theo số ít (Ví dụ: item_id, order_id )
- Primary keys: Mặc định Active Record sẽ sử dụng một cột số nguyên có tên id làm khóa chính của bảng
Khởi tạo Active Record Models
	$ rails g model Product
    class Product < ApplicationRecord
	end
Overriding the Naming Conventions
Overide tên bảng
ApplicationRecord kế thừa từ ActiveRecord :: Base, định nghĩa một số phương thức hữu ích. Bạn có thể sử dụng phương thức ActiveRecord :: Base.table_name = để chỉ định tên bảng sẽ được sử dụng:
# chỉ định tên bảng là my_products sẽ được sử dụng.
class Product < ApplicationRecord
  self.table_name = "my_products"
end
Overide tên khóa chính
# chỉ định tên khóa chính là product_id.
class Product < ApplicationRecord
  self.primary_key = "product_id"
end
CRUD cơ bản
Create
Ví dụ tạo và ghi 1 record vào database:
user = User.create(name: "David", occupation: "Code Artist")
Ví dụ tạo và ghi 1 object vào database:
    user = User.new
    user.name = "David"
    user.occupation = "Code Artist"
    # muốn lưu object này vào database thì ta cần gọi user.save
    user.save
    # method này sẽ commit 1 record vào database.
💁♂️Sẽ có 2 loại Active Record Ọbject
- ✅Đã trở thành 1 record trong database. (Ví dụ 1)
- ❎Chưa trở thành 1 record trong database. (Ví dụ 2 khi chưa call save method)
Active Record sử dụng new_record? (instance method) để xác định xem một đối tượng đã có trong cơ sở dữ liệu hay chưa.
Tương đương với thực thi câu lệnh SQL sau:
    CREATE TABLE products (
      id int(11) NOT NULL auto_increment,
      name varchar(255),
      PRIMARY KEY  (id)
    );
Read
Active Record cung rất nhiều các Query Interface thao tác với cơ sở dũ liệu. Dưới đây là một vài ví dụ về các phương pháp truy cập dữ liệu khác nhau do Active Record cung cấp.
# return một collection với tất cả user
users = User.all
# return user đầu tiên
user = User.first
# return user đầu tiên có tên là David
david = User.find_by(name: 'David')
# tìm tất cả người dùng có tên David có occupation là Code Artist và sắp xếp theo create_at thời gian khởi tạo theo chiều giảm dần
users = User.where(name: 'David', occupation: 'Code Artist').order(created_at: :desc)
Update
Khi mà một object được truy cập thì các thuộc tính của nó có thể bị sửa đổi.
# Tìm kiếm người dùng đầu tiên có tên là David  và cập nhật lại tên của đối tượng thành Dave.
 user = User.find_by(name: 'David')
user.name = 'Dave'
user.save
# shorthand
user.update(name: 'Dave')
# update nhiều record 1 lúc
User.update_all "max_login_attempts = 3, must_change_password = 'true'"
hoặc
User.update(:all, max_login_attempts: 3, must_change_password: true)
Delete
Tương tự như cập nhật thì khi đối tượng được truy cập thì nó cũng có thể bị xóa.
# Tìm kiếm user có tên là David và xóa record khỏi database.
 user = User.find_by(name: 'David')
user.destroy
# Tìm và xóa tất cả user có tên là David.
User.destroy_by(name: 'David')
# Xóa tất cả user.
User.destroy_all
Active record Validations
1. Tại sao cần xác thực?
Xác thực là một vấn đề rất quan trọng cần xem xét khi thao tác với cơ sở dữ liệu. Để duy trì tính nhất quán và toàn vẹn dữ liệu khi thực hiện 1 transaction thì phải tuân thủ ACID(4 điều kiện của 1 RDBMS). Thì việc validation dữ liệu trước và sau khi thao tác với cơ sở dữ liệu rất quan trọng. Thông thường theo mình biết sẽ có vài loại validations như sau:
- Native database constraints - Những dàng buộc về kiểu dữ liệu,unique, độ dài, ký tự,...
- Client-side validations - Xác thực các dạng dữ liệu hợp lệ, encrypt dữ liệu trước khi gửi lên sever ,...
- Controller-level validations - Xác thực dữ liệu tại các controller trước khi được ghi vào database.
It's the opinion of the Rails team that model-level validations are the most appropriate in most circumstances.
Ở Rails thì họ quyết định thực hiện validation ở Model-level là phù hợp nhất trong hầu hết các trường hợp.
2. Khi nào validation nên sảy nhỉ ?
Cùng tìm hiểu thông qua ví dụ này nhé:
p = Person.new(name: "John Doe")
 #<Person id: nil, name: "John Doe", created_at: nil, updated_at: nil>
p.new_record?
# => true
p.save
# => true
p.new_record?
# => false
Creat và save 1 Active Record Objject sẽ gửi 1 SQL INSERT operation đến database. Validation thường được chạy trước khi các lệnh này được gửi đến cơ sở dữ liệu. Nếu bất kỳ xác thực nào không thành công, đối tượng sẽ được đánh dấu là không hợp lệ và Active Record sẽ không thực hiện thao tác CHÈN hoặc CẬP NHẬT. Điều này tránh việc lưu trữ một đối tượng không hợp lệ trong cơ sở dữ liệu. Các phương thức sau sẽ kích hoạt xác thực và sẽ chỉ lưu đối tượng vào database nếu đối tượng hợp lệ:
createcreate!savesave!updateupdate!
Các phương thức sau bỏ qua xác thực và sẽ lưu đối tượng vào database ⛔bất kể tính hợp lệ của nó⛔. Sử dụng một cách thận trọng nhé .
decrement!decrement_counterincrement!increment_counterinsertinsert!insert_allinsert_all!toggle!touchtouch_allupdate_allupdate_attributeupdate_columnupdate_columnsupdate_countersupsertupsert_all
💁♂️ Có thể sử dụng 2 method .valid? .invalid? để chủ động validate các cái Active Record Oject nhé.
    class Person < ApplicationRecord
      validates :name, presence: true
    end

    Person.create(name: "John Doe").valid?
    => true
    Person.create(name: nil).valid?
    => false
💁♂️Sau khi chạy validate có thể sử dụng .errors để trả về 1 collection of errors và errors[:attribute] để trả về array message lỗi của 1 thuộc tính bất kỳ
class Person < ApplicationRecord
validates :name, presence: true
end

p = Person.new
=> #<Person id: nil, name: nil>
irb> p.errors.size
=> 0
irb> p = Person.create
=> #<Person id: nil, name: nil>
irb> p.errors.objects.first.full_message
=> "Name can't be blank"


irb> p.save
=> false
irb> p.save!
ActiveRecord::RecordInvalid: Validation failed: Name can't be blank

irb> Person.create!
ActiveRecord::RecordInvalid: Validation failed: Name can't be blank
===========================================
irb> Person.new.errors[:name].any?
=> false
irb> Person.create.errors[:name].any?
=> true
3. Một số Validation Helpers
🥵 Tự đọc docs xem cách dùng vậy nhớ🧐
4. Một số validation options phổ biến
5. Strict Validations
Khi sử dụng 2 method .valid? .invalid? để kiểm tra validation của Active Record Object. Nếu không sử dụng option strict thì 2 method trên sẽ trả về false nhưng nếu thêm option strict thì 1 Exception sẽ được "bắn" ra:
 class Person < ApplicationRecord
   validates :name, presence: { strict: true }
 end

 irb> Person.new.valid?
 ActiveModel::StrictValidationFailed: Name can't be blank

 # custom 1 exception cho strict validations
 class Person < ApplicationRecord
   validates :token, presence: true, uniqueness: true, strict: TokenGenerationException
 end
 irb> Person.new.valid?
 TokenGenerationException: Token can't be blank
6. Custom Validations
Có 2 cách để tạo ra 1 custom valitdation.
- Tạo ra 1 class kế thừa
ActiveModel::Validatorvà cần phải implimentvalidatemethod nhận vào 1 agrument là record. Để mà có thể sử dụng được cái custom validation trên thì ta cần gọi nó bằng methodvalidates_with
class MyValidator < ActiveModel::Validator
        def validate(record)
          unless record.name.start_with? 'X'
             record.errors.add :name, "Need a name starting with X please!"
              end
         end
 end

 class Person
   include ActiveModel::Validations
   validates_with MyValidator
 end
- Tạo ra 1 class kế thừa
ActiveModel::EachValidatortrong trường hợp này thì class này phải impliment methodvalidate_eachnhận vào 3 tham số record, attribute, và value chúng tương ứng là instance, attribute cần xác thực và value của thuộc tính đó của instance cần validate.
   class EmailValidator < ActiveModel::EachValidator
           def validate_each(record, attribute, value)
               unless value =~ /\A([^@\s]+)@((?:[-a-z0-9]+\.)+[a-z]{2,})\z/i
               record.errors.add attribute, (options[:message] || "is not an email")
               end
           end
   end
   class Person < ApplicationRecord
     validates :email, presence: true, email: true
   end
7. Deepdive với Validation Errors
2 method .valid? .invalid? chỉ cung cấp 1 cái nhìn tổng quát về validation error. Tuy nhiên, bạn có thể tìm hiểu sâu hơn về từng validation error riêng lẻ bằng cách sử dụng các method khác nhau từ collection error.
8. Hiển thị Validation Errors lên View
Giả sử chúng ta có một instance là @article thì ta có thể hiển thị validation error lên view bằng cách sử dụng @article.errors
<% if @article.errors.any? %>
     <div id="error_explanation">
       <h2><%= pluralize(@article.errors.count, "error") %> prohibited this article from being saved:</h2>
       <ul>
         <% @article.errors.each do |error| %>
           <li><%= error.full_message %></li>
         <% end %>
       </ul>
     </div>
<% end %>
nếu bạn sử form helper của Rails để tạo form thì khi lỗi xác thực xảy ra trên một field, nó sẽ tạo thêm một <div> xung quanh các trường đó và ta có thể style cho cái div đó =)). Thật hữu ích 🐥
        <div class="field_with_errors">
           <input id="article_title" name="article[title]" size="30" type="text" value="">
		</div>
            # style
		.field_with_errors {
		  padding: 2px;
		  background-color: red;
		  display: table;
		}
Active record CallBacks
Trong quá trình hoạt động bình thường của ứng dụng Rails, các đối tượng có thể có các state như là create, update hoặc destroyed. Active Record cung cấp các hooks để ta có thể kiểm soát vòng đời của nó.Thì Callbacks là những method được gọi trong vòng đời của 1 object cho phép ta có thể thực hiện 1 đoạn logic trước hoặc sau sự thay đổi state của object đó. Để sử dụng được callback thì ta cần đăng ký chúng.
1. Callback Registration
Khai báo callback như 1 method bình thường:
class User < ApplicationRecord
  validates :login, :email, presence: true

  before_validation :ensure_login_has_a_value

  private
    def ensure_login_has_a_value
      if login.nil?
        self.login = email unless email.blank?
      end
    end
end
Khai báo kiểu macro
class User < ApplicationRecord
  validates :login, :email, presence: true

  before_create do
    self.name = login.capitalize if name.blank?
  end
end
2. Các build in Callbacks
- Callbacks gọi khi tạo Object
* -
before_validation - Callbacks gọi khi update Object
- Callbacks gọi khi destroy Object
💁 after_save sẽ được gọi khi update và create và luôn luôn chạy sau after_create và after_update bất kể thứ tự mà các lệnh được gọi.
💁♂️ Để tránh những side effect không mong muốn thì chúng ta cần tránh update hay save các attribute trong 1 callback ví dụ như thực thi update(attribute: "value") bên trong callback.
💁♂️ before_destroy callback nên được đặt trước dependent: :destroy hoặc ta có thể thêm option prepend: true để đảm bảo nó sẽ chạy trước khi mà record bị xóa bởi dependent: :destroy.
3. Running Callbacks
Các method sau sẽ trigger các callback:
- create
- create!
- destroy
- destroy!
- destroy_all
- destroy_by
- save
- save!
- save(validate: false)
- toggle!
- touch
- update_attribute
- update
- update!
- valid?
callback after_find sẽ bị gọi bởi các method sau:
- all
- first
- find
- find_by
- find_by_*
- find_by_*!
- find_by_sql
- last
after_initialize thì được gọi mỗi khi mmàcos object mới đươc khởi tạo.
💁♂️ find_by_* và find_by_*! là những được gọi là các dynamic finder. Chúng được tạo tự động cho mỗi attribute.
4. Skipping Callbacks
Cũng giống như validation, ta cũng có thể bỏ qua các callback lại bằng cách sử dụng các phương pháp sau:
- decrement!
- decrement_counter
- delete
- delete_all
- delete_by
- increment!
- increment_counter
- insert
- insert!
- insert_all
- insert_all!
- touch_all
- update_column
- update_columns
- update_all
- update_counters
- upsert
- upsert_all
5. Ngừng Execute Callback
Khi ta khai báo hay đăng ký 1 callback cho model thì chúng sẽ được đẩy vào Queue để chờ được execute. Queue này chứa tất cả các validation của model, các callback đã được đăng ký trước đó, và cả các phép thực thi database.
Toàn bộ callback chain (chuỗi callback) sẽ được bao bọc trong 1 transaction. Nếu có bất kỳ exeception nào được trả ra từ 1 callback thì việc thực thi của cả chuỗi callbakc sẽ bị ngừng lại và được rollback. Ta có thể chủ động bắn ra 1 execption từ callback để ngừng chuỗi callback bằng cách sử dụng:
throw :abort
💁♂️
Active record Migrations
Active record Query Interface
All rights reserved
