Active Admin Custom Gem
Bài đăng này đã không được cập nhật trong 4 năm
Active Admin Custom Gem
With article, I want to show you guy about active admin gem, It most power gem to control interface admin. However I will show the tutorial how to set up it ? how to use it and custom it. By other way, You can use Active Admin to add an administration interface to your current project, or you can even use it to create a complete web application from scratch - quickly and easily. You can use Active Admin to add an administration interface to your current project, or you can even use it to create a complete web application from scratch - quickly and easily.
Set up active admin
I’m going to assume you have some previous Ruby on Rails knowledge, especially involving model validations, since the rest of the application interface is going to be taken care of by Active Admin. Create the application we’ll be working on, by running the following command in your Terminal:
rails new active_admin_custom_learning
Next, open your Gemfile and add the following lines:
gem 'activeadmin'
gem 'devise'
Note: activeadmin need to work with devise, so you need to install gem devise with activeadmin
, then run the bundle install command to install the gems. After that we need to install our active admin by run command:
rails generate active_admin:install
This will generate all needed initializers and migrations for Active Admin to work. It will also create an AdminUser model for authentication,
rake db:create
rake db:migrate
rake db:seed
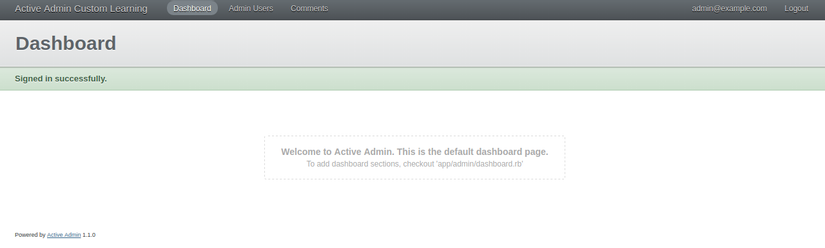
Once that’s done, run rails server and point your browser to http://localhost:3000/admin. You’ll be greeted with a nice login form. Just type “admin@example.com” as the email and “password” as the password, and hit “Login”. You should now see a nice administration interface.
Add User Model
As you can see from the webpage you just generated, there’s not much you can do, yet. We’re going to need a way to edit our users, and we can do that using Active Admin Resources map models to administration panels. You need to generate them using a command in your terminal, so Active Admin can know their existence, so go ahead and run:
rails generate active_admin:resource AdminUser
if you see that message:
conflict app/admin/admin_user.rb
Don't worry about that, please types Yes to continue.
Add other model
With this tutorial we will add more 2 model: Project and Task , with our spec Project has many Task,
rails generate model Project title:string
rails generate model Task project_id:integer title:string is_done:boolean due_date:date
rake db:migrate
This creates a task model that we can associate with projects. The idea is that a task is assigned to someone and belongs to a project. We need to set those relations and validations in the model:
app/models/task.rb
class Task < ApplicationRecord
  belongs_to :project

  validates :title, :project_id, :presence => true
  validates :is_done, :inclusion => { :in => [true, false] }
end
app/models/project.rb
class Project < ApplicationRecord
  has_many :tasks
end
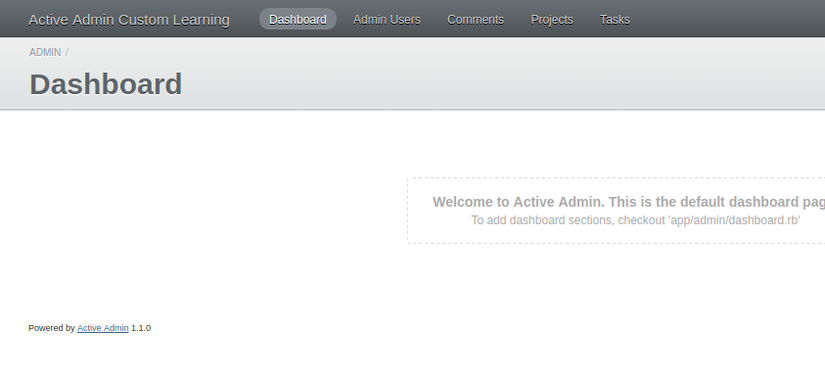
Now you need to register our model with active admin:
rails generate active_admin:resource Project
rails generate active_admin:resource Task
After that we restart our server rails server and reload page again we will see on our page admin look like this:
 Now we need to add record into project and tasks, now we go to
 rails console
 project = Project.create! title: "Project"
 (1..10).each do |i|
 project.tasks.create! title: "task #{i}", is_done: false, due_date: Time.zone.now + 2.days
 end
Custom view columns
With active admin we can custom columns view of that model display but the easy way:
app/admin/task.rb
ActiveAdmin.register Task do
  index do
    column :title
    column :project
    column :is_done
    column :due_date
  end
end
Withe code above we will remove column created_at and updated_at from view of Tasks model.
Custom filter view columns
With active admin allow us to custom filter of our model, now let's start to that:
app/models/task.rb
  scope :due_this_week, -> {where('due_date > ? and due_date < ?', Time.now, 1.week.from_now)}
  scope :late, ->{where('due_date < ?', Time.now)}
and we go to our app/admin/task.rb add more code as below:
filter :due_date, as: :check_boxes, collection: proc { Task.due_this_week }
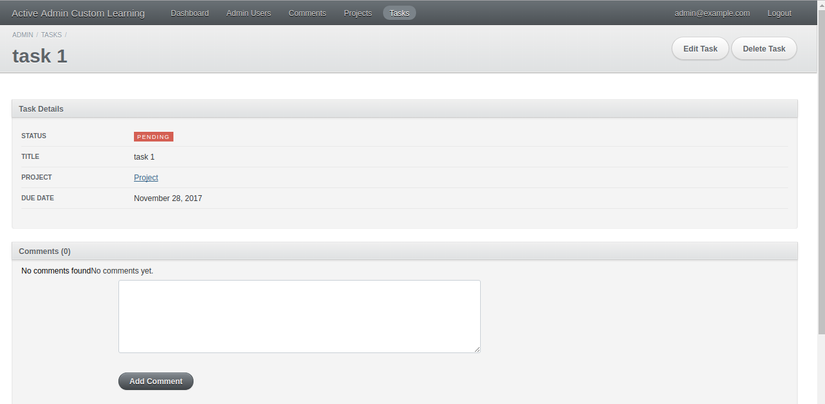
Custom show view
With active admin allow us to custom show of our model, now let's start to that:
app/admin/task.rb
  show do
    panel "Task Details" do
      attributes_table_for task do
        row("Status") { status_tag (task.is_done ? "Done" : "Pending"), (task.is_done ? :ok : :error) }
        row("Title") { task.title }
        row("Project") { link_to task.project.title, admin_project_path(task.project) }
        row("Due Date") { task.due_date? ? l(task.due_date, :format => :long) : '-' }
      end
    end
    active_admin_comments
  end
Custom controller for view
With active admin allow us to custom controller of our model, now let's start to that:
  controller do
    def index
     @tasks = Task.late
    end
  end
Conclusion
However with this article is just the basic of active admin custom, and hope you guy can understand or set up it . If you want to know more about activeadmin, please read more links below:
- https://activeadmin.info/documentation.html
- https://github.com/activeadmin/activeadmin
- https://github.com/samnangcattor/active_admin_custom_learning (My project leanring will update new version with other custom follow by branch)
All rights reserved
