2 Cách để Triển Khai MVVM Trong Dự Án IOS
Bài đăng này đã không được cập nhật trong 5 năm
MVVM không nhất thiết phải bind cùng RxSwift, nhưng nó sẽ tốt hơn, vậy tại sao ?
 Đối với những dev mobile, MVVM là modern kiến trúc. Nó thực hiện phân tách mối quan tâm tốt hơn để làm cho code sạch hơn. Như chúng ta đã thảo luận trong phần trước, MVVM đã cải thiện giao tiếp giữa logic nghiệp vụ và View bằng cách ràng buộc các biến trong ViewModel với các phần tử ViewController. Bài viết này sẽ giới thiệu hai cách để thực hiện MVVM.
MVVM Cùng Swift
Để thực hiện hai cách ràng buộc mà không phụ thuộc, chúng ta cần tạo Observable của riêng chúng ta. Đây là đoạn code :
class Observable<T> {

    var bind :(T) -> () = { _ in }

    var value :T? {
        didSet {
            bind(value!)
        }
    }

    init(_ v :T) {
        value = v
    }

}
Observable<T> là một lớp tùy chỉnh có thể giữ giá trị kiểu T. Nếu giá trị thay đổi thì chúng ta kích hoạt didSet, gọi hàm liên kết, chuyển giá trị trở lại trình gọi. Để biết một ví dụ cụ thể, hãy kiểm tra code tại đây:
import UIKit
import RxSwift
import RxCocoa

class ArticleListViewController: UIViewController, UIScrollViewDelegate {
    private var articlesViewModel = ArticleViewModel(rankingType: .email)
    private let rankingFactor: ArticlesRankingType
    private let disposeBag = DisposeBag()
    private weak var tableView: UITableView!

    override func loadView() {
        super.loadView()
        let tableView = UITableView(frame: .zero)
        tableView.translatesAutoresizingMaskIntoConstraints = false
        tableView.rowHeight = UITableView.automaticDimension
        tableView.estimatedRowHeight = 600
        self.view.addSubview(tableView)
        NSLayoutConstraint.activate([
            self.view.safeAreaLayoutGuide.topAnchor.constraint(equalTo: tableView.topAnchor),
            self.view.safeAreaLayoutGuide.bottomAnchor.constraint(equalTo: tableView.bottomAnchor),
            self.view.safeAreaLayoutGuide.leadingAnchor.constraint(equalTo: tableView.leadingAnchor),
            self.view.safeAreaLayoutGuide.trailingAnchor.constraint(equalTo: tableView.trailingAnchor),
        ])
        self.tableView = tableView
    }

    init(rankingFactor: ArticlesRankingType) {
        self.rankingFactor = rankingFactor
        super.init(nibName: nil, bundle: nil)
    }

    required init?(coder: NSCoder) {
        fatalError("init(coder:) has not been implemented")
    }

    override func viewDidLoad() {
        super.viewDidLoad()
        self.view.backgroundColor = .white
        self.view.addSubview(tableView)
        articlesViewModel = ArticleViewModel(rankingType: rankingFactor)

        tableView.register(ArticlesCell.self, forCellReuseIdentifier: "aCell")
        setupBinding()
        setupErrorBinding()
        self.articlesViewModel.input.reload.accept(())
    }

    private func setupBinding(){
        articlesViewModel.output
            .articles.asDriver(onErrorJustReturn: [])
            .drive(tableView.rx.items(cellIdentifier: "aCell", cellType: ArticlesCell.self)) {  (row,article,cell) in
                cell.titleLabel.text = article.title
                cell.sectionLabel.text = article.section
                cell.abstrctLabel.text = article.abstract
                cell.titleImageView.downloaded(from: article.imageURL, contentMode: .scaleAspectFit)
        }.disposed(by: disposeBag)

        tableView.rx.itemSelected.subscribe(onNext: { [weak self] indexPath in
            guard let self = self else {
                return
            }
            self.tableView.deselectRow(at: indexPath, animated: true)
            let article: ArticleResult = try! self.tableView.rx.model(at: indexPath)
            let vc = ArticleDetailViewController(urlString: article.imageURL)
            self.navigationController?.pushViewController(vc, animated: true)

        }).disposed(by: disposeBag)
    }

    private func setupErrorBinding() {
        articlesViewModel
            .output
            .error.asDriver(onErrorJustReturn: "")
            .drive(onNext: { [weak self] error in
                guard let self = self else {
                    return
                }
                self.showAlert(alertMessage: error.description)
            })
            .disposed(by: disposeBag)
    }

    private func showAlert(alertMessage:String) {
        let alert = UIAlertController(title: "Alert", message: alertMessage, preferredStyle: .alert)
        alert.addAction( UIAlertAction(title: "Ok", style: .cancel, handler: nil))
        self.present(alert, animated: true, completion: nil)
    }
}
Nếu chúng ta tập trung vào phần 1, chúng ta có cellViewModels ràng buộc reloadTableViewClosure, isLoading liên kết tới updateLoadingStatus và alertMessage liên kết tới showAlertClosure. trong ViewController, chúng tôi liên kết các đóng với các phần tử giao diện người dùng, sau đó chúng ta có thể kích hoạt bất kỳ yêu cầu không đồng bộ hóa nào trong ViewModel. Trong đoạn code trên, nó là số 3** initFetch().** Nó yêu cầu API và nếu xảy ra lỗi, nó sẽ cập nhật biến alertMessage , nếu yêu cầu thành công, nó sẽ cập nhật biến cellViewModels . Cả hai thay đổi biến sẽ cập nhật giao diện người dùng trong ViewController. Ở đó chúng ta có ràng buộc hai chiều.
MVVM with RxSwift
Với RxSwift, việc ràng buộc hai chiều trở nên dễ dàng hơn:
//
//  ArticlesViewModel.swift
//  NYT-Articles
//
//  Created by 李祺 on 19/06/2020.
//  Copyright © 2020 Lee. All rights reserved.
//
import Foundation
import RxSwift
import RxCocoa

protocol ViewModelType {
    associatedtype Input
    associatedtype Output

    var input: Input { get }
    var output: Output { get }
}


struct ArticleViewModel: ViewModelType {
    let input: Input
    let output: Output

    private let disposeable = DisposeBag()
    private let apiClient: ArticleFetchingObservable
    let rankingType: ArticlesRankingType

    struct Input {
        let reload: PublishRelay<Void>
    }

    struct Output {
        let articles: Driver<[ArticleResult]>
        let error: Driver<String>
    }


    init(apiClient: ArticleFetchingObservable = APIManager.shared, rankingType: ArticlesRankingType) {
        self.apiClient = apiClient
        self.rankingType = rankingType
        let errorRelay = PublishRelay<String>()
        let reloadRelay = PublishRelay<Void>()

        let articles = reloadRelay
            .asObservable()
            .flatMapLatest({ apiClient.requestData(type: rankingType) })
            .map({ $0.results })
            .asDriver { (error) -> Driver<[ArticleResult]> in
                errorRelay.accept((error as? ErrorResult)?.localizedDescription ?? error.localizedDescription)
                return Driver.just([])
        }
        self.input = Input(reload: reloadRelay)
        self.output = Output(articles: articles, error: errorRelay.asDriver(onErrorJustReturn: "error happened"))
    }
}
Trong đoạn mã trên, chúng ta có thể dễ dàng xác định Đầu vào giữ biến quan sát để chấp nhận sự kiện từ ViewController và Đầu ra với biến quan sát để ràng buộc các phần tử UI trong ViewController. Hàm init tiêu diệt các phụ thuộc và xử lý dữ liệu từ API và khởi tạo Input và Output. Here is the ViewController code:
import UIKit
import RxSwift
import RxCocoa

class ArticleListViewController: UIViewController, UIScrollViewDelegate {
    private var articlesViewModel = ArticleViewModel(rankingType: .email)
    private let rankingFactor: ArticlesRankingType
    private let disposeBag = DisposeBag()
    private weak var tableView: UITableView!

    override func loadView() {
        super.loadView()
        let tableView = UITableView(frame: .zero)
        tableView.translatesAutoresizingMaskIntoConstraints = false
        tableView.rowHeight = UITableView.automaticDimension
        tableView.estimatedRowHeight = 600
        self.view.addSubview(tableView)
        NSLayoutConstraint.activate([
            self.view.safeAreaLayoutGuide.topAnchor.constraint(equalTo: tableView.topAnchor),
            self.view.safeAreaLayoutGuide.bottomAnchor.constraint(equalTo: tableView.bottomAnchor),
            self.view.safeAreaLayoutGuide.leadingAnchor.constraint(equalTo: tableView.leadingAnchor),
            self.view.safeAreaLayoutGuide.trailingAnchor.constraint(equalTo: tableView.trailingAnchor),
        ])
        self.tableView = tableView
    }

    init(rankingFactor: ArticlesRankingType) {
        self.rankingFactor = rankingFactor
        super.init(nibName: nil, bundle: nil)
    }

    required init?(coder: NSCoder) {
        fatalError("init(coder:) has not been implemented")
    }

    override func viewDidLoad() {
        super.viewDidLoad()
        self.view.backgroundColor = .white
        self.view.addSubview(tableView)
        articlesViewModel = ArticleViewModel(rankingType: rankingFactor)

        tableView.register(ArticlesCell.self, forCellReuseIdentifier: "aCell")
        setupBinding()
        setupErrorBinding()
        self.articlesViewModel.input.reload.accept(())
    }

    private func setupBinding(){
        articlesViewModel.output
            .articles.asDriver(onErrorJustReturn: [])
            .drive(tableView.rx.items(cellIdentifier: "aCell", cellType: ArticlesCell.self)) {  (row,article,cell) in
                cell.titleLabel.text = article.title
                cell.sectionLabel.text = article.section
                cell.abstrctLabel.text = article.abstract
                cell.titleImageView.downloaded(from: article.imageURL, contentMode: .scaleAspectFit)
        }.disposed(by: disposeBag)

        tableView.rx.itemSelected.subscribe(onNext: { [weak self] indexPath in
            guard let self = self else {
                return
            }
            self.tableView.deselectRow(at: indexPath, animated: true)
            let article: ArticleResult = try! self.tableView.rx.model(at: indexPath)
            let vc = ArticleDetailViewController(urlString: article.imageURL)
            self.navigationController?.pushViewController(vc, animated: true)

        }).disposed(by: disposeBag)
    }

    private func setupErrorBinding() {
        articlesViewModel
            .output
            .error.asDriver(onErrorJustReturn: "")
            .drive(onNext: { [weak self] error in
                guard let self = self else {
                    return
                }
                self.showAlert(alertMessage: error.description)
            })
            .disposed(by: disposeBag)
    }

    private func showAlert(alertMessage:String) {
        let alert = UIAlertController(title: "Alert", message: alertMessage, preferredStyle: .alert)
        alert.addAction( UIAlertAction(title: "Ok", style: .cancel, handler: nil))
        self.present(alert, animated: true, completion: nil)
    }
}
Trong ViewDidLoad(), chúng ta có setupBinding() và setupErrorBinding() để liên kết các phần tử giao diện người dùng với các phần tử có thể quan sát trong ViewModel. Khi tất cả các ràng buộc đã sẵn sàng, chúng ta có self.articleViewModel.input.reload.accept(()) để kéo trình kích hoạt luồng dữ liệu. Sau đó, chúng ta có dữ liệu không đồng bộ từ Api có thể tự động phản ánh trên ViewController..
Lời kết
 Trước khi yêu cầu dữ liệu, các phần tử UI phải ràng buộc Đầu ra và Đầu vào trong ViewModel trước. Nó giống như đường hầm được xây dựng lên.
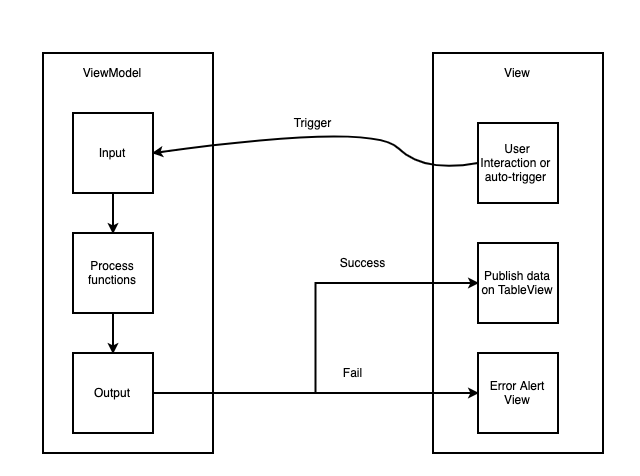
Sau đó, chúng ta có thể kích hoạt luồng dữ liệu, đây là biểu đồ. ViewController có thể có nhiều phần tử giao diện người dùng liên kết với nhiều đầu vào và đầu ra. Với luồng dữ liệu này, mã sẽ dễ đọc và ngắn gọn hơn.
Trước khi yêu cầu dữ liệu, các phần tử UI phải ràng buộc Đầu ra và Đầu vào trong ViewModel trước. Nó giống như đường hầm được xây dựng lên.
Sau đó, chúng ta có thể kích hoạt luồng dữ liệu, đây là biểu đồ. ViewController có thể có nhiều phần tử giao diện người dùng liên kết với nhiều đầu vào và đầu ra. Với luồng dữ liệu này, mã sẽ dễ đọc và ngắn gọn hơn.
MVVM với Rxswift không hoàn hảo, Dưới đây là những nhược điểm khiến Rxswift không trở thành lựa chọn tốt nhất.
- Đường cong học tập: Đường cong học tập dốc khiến việc đưa các nhà phát triển mới vào dự án trở nên khó khăn (và về cuối dự án, hoàn toàn không thực tế). Đây là lý do số 1 mà chúng tôi nên xem xét tránh RxSwift: khi đến thời điểm ra mắt, chúng tôi sẽ không thể thêm các nhà phát triển vào dự án trừ khi họ đã là những người kỳ cựu của Rx.
- Gỡ lỗi các phép biến đổi dữ liệu Rx thật kinh khủng. Khi Rx đang hoạt động như dự định, nó sẽ trở nên kỳ diệu. Khi nó gặp sự cố, quá trình gỡ lỗi sẽ khó khăn hơn đáng kể. Bất kỳ điểm ngắt nào bạn nhấn trong luồng dữ liệu sẽ hiển thị hơn 40 ngăn xếp backtrace mục nhập với hàng chục phương thức Rx nội bộ khó hiểu, tách biệt và che khuất mã chúng ta thực sự đã viết.
- RxSwift có thể không cắt giảm đáng kể thời gian phát triển nói chung. Nó chỉ chuyển đổi các vấn đề thành một số vấn đề mới. Nếu nhóm chưa sẵn sàng cho Rx và thực sự khó tìm thấy các nhà phát triển RxSwift trên thị trường, thì Rx có thể không phải là lựa chọn tốt nhất. Cá nhân tôi luôn sử dụng MVP trộn với MVVM và Rxswift. Tôi tin rằng Rxswift có thể giải quyết các vấn đề không đồng bộ hóa một cách suôn sẻ nhưng chúng tôi có rất nhiều trường hợp không có yêu cầu đồng bộ hóa. Trong trường hợp này, MVP hoàn toàn ổn.
Hy vọng bài viết này đã truyền cảm hứng cho bạn về kiến trúc ứng dụng của riêng bạn. Bạn được hoan nghênh để lại bất kỳ ý kiến về bài viết này. Tôi đánh giá cao bất kỳ đề nghị. Link Tham khảo: https://levelup.gitconnected.com/2-ways-to-execute-mvvm-ios-5c47d60ebcd0
All rights reserved
