13 câu hỏi thường gặp với React Native
Bài đăng này đã không được cập nhật trong 5 năm
React Native là một framework do Facebook tạo ra dùng để xây dựng các ứng dụng đa nền tảng và sử dụng thư viện React. Đây là một open source với cộng đồng hỗ trợ đông đảo, dưới đây là 13 câu hỏi thường gặp nhất khi nói về React Native.
1. Sự khác biệt giữa React Native và ReactJS là gì?
Trả lời:
ReactJS là một thư viện JavaScript dùng để xây dựng giao diện người dùng chạy trên ứng dụng web. React Native là một mobile framework dùng để xây dựng các ứng dụng mobile bao gồm Android và iOS cũng sử dụng ngôn ngữ JavaScript. Cả hai đều sử dụng cấu trúc của React và JSX.
2. Sự khác biệt giữa việc sử dụng constructor và getInitialState trong React / React Native là gì?
Trả lời:
Hai cách tiếp cận này không thể thay thế cho nhau. Bạn nên khởi tạo state trong constructor nếu sử dụng ES6 class và sử dụng getInitialState khi sử dụng React.createClass. Xem thêm tài liệu React document.
class MyComponent extends React.Component {
  constructor(props) {
    super(props);
    this.state = { /* initial state */ };
  }
}
var MyComponent = React.createClass({
  getInitialState() {
    return { /* initial state */ };
  },
});
3. Làm thế nào để fix lỗi chạy ứng dụng iOS từ terminal?
Trả lời:
Bạn có thế xem qua issue trên Github này.Mở Xcode lên, chọn menu Xcode, chọn Preferences, và click vào tab Location. Chọn phiên bản Xcode của bạn ở dropdown rồi thoát Xcode.
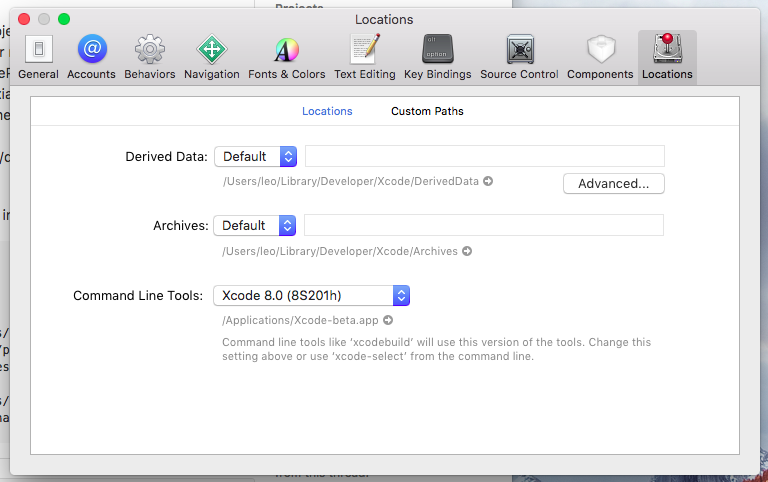
Bạn có thể cài đặt và cài location cho Xcode Command Line Tools. Nếu đã cài Xcode thì hãy chạy lệnh sau
sudo xcode-select -s /Applications/Xcode.app
Nếu command line tool chưa được cài thì chạy lệnh trước
xcode-select --install
Có thể bạn sẽ cần đồng ý các license của Xcode trước khi cài đặt command line tool
sudo xcodebuild -license accept
4. Làm thế nào để sửa lỗi "Unable to load script from assets index.android.bundle" trên Windows?
Trả lời:
Issue này là câu trả lời. Hãy làm theo bước sau:
mkdir android/app/src/main/assets
react-native bundle --platform android --dev false --entry-file index.js --bundle-output android/app/src/main/assets/index.android.bundle --assets-dest android/app/src/main/res
react-native run-android
Có thể tự động hóa các bước trên khi thêm script này vào file package.json
"android-linux": "react-native bundle --platform android --dev false --entry-file index.js --bundle-output android/app/src/main/assets/index.android.bundle --assets-dest android/app/src/main/res && react-native run-android"
Sau đó chỉ việc chạy npm run android-linux ở terminal.
Nếu bạn chạy trên thiết bị thật thì có thể gặp lỗi này:
unable to load script from assets index.android.bundle
Khi đó thì hãy thử dùng lệnh
adb reverse tcp:8081 tcp:8081
5. Làm sao để sửa lỗi "React Native android build failed. SDK location not found" ?
Trả lời:
- Đi đến thư muc android/ của project
- Tạo file local.properties với dòng sau
sdk.dir = /Users/USERNAME/Library/Android/sdk
USERNAME chính là username máy Mac của bạn
Đầy đủ hơn thì:
- Tới thư mục android/
- Tạo file local.properties
- Mở file
- Paste đường dẫn Android SDK của máy bạn vào:
- Với window:
sdk.dir = C:\\Users\\USERNAME\\AppData\\Local\\Android\\sdk - Với macOS:
sdk.dir = /Users/USERNAME/Library/Android/sdk - Với Linux
sdk.dir = /home/USERNAME/Android/Sdk
- Với window:
Thay thế USERNAME bằng user name máy của bạn rồi chạy react-native run-android
6. Làm sao để dismiss (ẩn) keyboard khi tap bên ngoài TextInput trong React Native?
Trả lời:
Vấn đề này trên bàn phím sẽ khó khăn hơn nếu ở đinh dạng keyboardType = 'numeric', vì không có cách nào để loại bỏ nó.
Nếu bạn đang dùng
<View style={{flex: 1}}>
    <TextInput keyboardType='numeric'/>
</View>
thì hãy chuyển sang
<ScrollView contentContainerStyle={{flexGrow: 1}}
  keyboardShouldPersistTaps='handled'
>
  <TextInput keyboardType='numeric'/>
</ScrollView>
hoặc là
import {Keyboard} from 'react-native'

<TouchableWithoutFeedback onPress={Keyboard.dismiss} accessible={false}>
    <View style={{flex: 1}}>
        <TextInput keyboardType='numeric'/>
    </View>
</TouchableWithoutFeedback>
Bạn cũng có thể tạo một Higher Order Component để xử lý vấn đề này:
import React from 'react';
import { TouchableWithoutFeedback, Keyboard, View } from 'react-native';

const DismissKeyboardHOC = (Comp) => {
  return ({ children, ...props }) => (
    <TouchableWithoutFeedback onPress={Keyboard.dismiss} accessible={false}>
      <Comp {...props}>
        {children}
      </Comp>
    </TouchableWithoutFeedback>
  );
};
const DismissKeyboardView = DismissKeyboardHOC(View)
Cách dùng thì chỉ cần như thế này thôi
...
render() {
    <DismissKeyboardView>
        <TextInput keyboardType='numeric'/>
    </DismissKeyboardView>
}
Cái này không còn là trick ẩn nữa mà đã được ghi lại document của React Native. Xem tại đây.
https://github.com/facebook/react-native/pull/9925
7. Làm thế nào để sửa lỗi "Application has not been registered"?
Trả lời:
Nguyên nhân là tên project không khớp với tên registered component của bạn. Ví dụ khi bạn init một project với tên
react-native init AwesomeApp
Nhưng trong file index.js lại khởi tạo AppRegistry.registerComponent('Bananas', () => Bananas);
Như vậy sẽ gây ra lỗi trên, cách sửa lại đơn giản là
AppRegistry.registerComponent('AwesomeApp', () => Bananas);
Hoặc cũng có thể do nguyên nhân khác gây ra lỗi này. Tham khảo tại đây
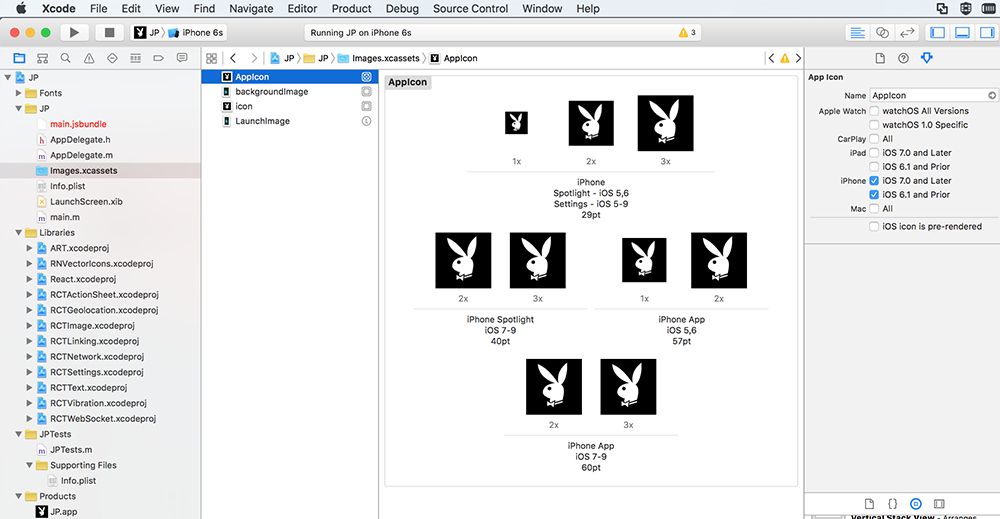
8. Làm thế nào để thêm icon vào ứng dụng React Native?
Trả lời:
iOS Icons
- Set AppIcon trong Images.xcassets.
- Thêm 9 size icon khác nhau:
- 29pt
- 29pt*2
- 29pt*3
- 40pt*2
- 40pt*3
- 57pt
- 57pt*2
- 60pt*2
- 60pt*3.
Thư mục Images.xcassets
Android Icons
Thêm ic_launcher.png vào trong [ProjectDirectory]/android/app/src/main/res/mipmap-/.*
- 72*72 ic_launcher.png in mipmap-hdpi.
- 48*48 ic_launcher.png in mipmap-mdpi.
- 96*96 ic_launcher.png in mipmap-xhdpi.
- 144*144 ic_launcher.png in mipmap-xxhdpi.
- 192*192 ic_launcher.png in mipmap-xxxhdpi.
Ở những phiên bản mới nhất React Native đã hỗ trợ round icon. Có hai lựa chọn
- Thêm round icon: Trong mỗi thư mục mipmap thêm ic_launcher.png và ic_launcher_round.png với cùng một size.
- Bỏ round icon: Trong file yourProjectFolder/android/app/src/main/AndroidManifest.xml xóa dòng android:roundIcon="@mipmap/ic_launcher_round" rồi save lại.
9. Làm thế nào để kết hợp nhiều inline style?
Trả lời:
Cách dùng mảng:
<View style={[styles.base, styles.background]} />
Cách dùng spread operator:
<button style={{...styles.panel.button,...styles.panel.backButton}}>Back</button>
10. Làm thế nào để thay đổi iOS simulator mặc định?
Trả lời:
Khi run react-native run-ios thì thêm flag --simulator
react-native run-ios --simulator="iPhone 7"
react-native run-ios --simulator="iPhone 11 Pro Max"
Liệt kê các iOS device hiện có
xcrun simctl list devices
Bạn cũng có thể sử dụng npm để thêm script trong file package.json trước khi chạy. Ví dụ:
"launch-ios": "react-native run-ios --simulator \"iPad Air 2\""
11. Làm thế nào để logging trong React Native?
Trả lời:
Dùng console.log như bình thường. Trong iOS simulator ấn ⌘+D để mở develop menu, ấn Remote JS Debugging. Trên Chrome sẽ tự động mở http://localhost:8081/debugger-ui.
Hoặc có thể dùng những command đơn giản như:
$ react-native log-ios
$ react-native log-android
12. Làm thế nào để break line trong component <Text> ?
Trả lời:
Chỉ cần thêm
<Text>
Hi~{"\n"}
this is a test message.
</Text>
Hoặc là dùng template string
<Text>{`
Hi~
this is a test message.
`}</Text>
13. Sự khác biệt giữa react-native-firebase và react-redux-firebase là gì?
Trả lời:
Sự khác biệt chính:
- react-redux-firebase dùng Firebase với Redux.
- react-native-firebase dùng Firebase JS API với React Native.
react-native-firebase cung cấp một Firebase JS API trong khi sử dụng các Native module. Xem ví dụ dưới đây:
import { compose, createStore } from 'redux';
import RNFirebase from 'react-native-firebase';
import { getFirebase, reactReduxFirebase } from 'react-redux-firebase';
import thunk from 'redux-thunk';
import makeRootReducer from './reducers';

const reactNativeFirebaseConfig = {
  debug: true
};

const reduxFirebaseConfig = {
  userProfile: 'users', // save users profiles to 'users' collection
};

export default (initialState = { firebase: {} }) => {
  // initialize firebase
  const firebase = RNFirebase.initializeApp(reactNativeFirebaseConfig);

  const store = createStore(
    makeRootReducer(),
    initialState,
    compose(
      reactReduxFirebase(firebase, reduxFirebaseConfig), // pass initialized react-native-firebase app instance
     // applyMiddleware can be placed here
    )
  );

  return store;
};
Có thể xem thêm những cài đặt này tại đây
Tham khảo: The Dev Post
All rights reserved
