04. Repository Pattern và Unit of Work trong .NET
Trong bài viết này chúng ta sẽ tìm hiểu những kiến thức cơ bản về Repository Pattern, Generic Repository Patterns và Unit of Work.
Repository Pattern là gì?
- Một Repository Pattern là một design pattern có thể hiểu đơn giản là nó làm trung gian giữa tầng Domain và Data Access (như Dapper hoặc Entity Framework).
- Mọi thứ liên quan đến ORM được xử lý ở bên trong repository layer, nó giúp rõ ràng project hơn theo nguyên lý SEPARATION OF CONCERNS (chia để trị), mẫu thiết kế được sử dụng nhiều để xây dựng solution một cách clean hơn.
Lợi ích của RP?
- Giảm những truy vấn trùng lặp: hãy tưởng tượng rằng bạn có một đoạn code lấy dữ liệu từ phía database, không lý tưởng lắm nếu đoạn code truy vấn này được dùng lặp lại quá nhiều nơi trong ứng dụng. Việc cần làm bây giờ là viết đoạn code đó trong Repository và sử dụng nó ở những nơi như Controllers / Libraries trong ứng dụng, sau này có sửa thì sẽ chỉ cần sửa ở 1 nơi.
- Giảm sự phụ thuộc của ứng dụng vào tầng Data Access: có khá nhiều ORM có sẵn cho ASP.NET Core, hiện tại phổ biến nhất là Entity Framework Core và Dapper. Nhưng với sự thay đổi cũng như phát triển của công nghệ trong nhiều năm tới, việc chuyển đổi công nghệ ở tầng DataAccess mà không ảnh hưởng nhiều đến source code của bạn là điều cần thiết. RP giúp chúng ta đạt được điều này bằng cách tạo Abstration trên Lớp DataAccess, lúc đó sẽ không còn phải phụ thuộc vào EFCore hoặc bất kỳ ORM nào khác cho ứng dụng. EFCore trở thành một trong những lựa chọn của bạn chứ không phải là lựa chọn duy nhất để truy cập dữ liệu.
- Test đơn giản hơn: việc sử dụng RP cũng giúp tách biệt và cũng cấp khả năng tốt hơn cho việc Test ứng dụng.
- Chúng ta có thể hình dung mẫu thiết kế theo hình ảnh sau:
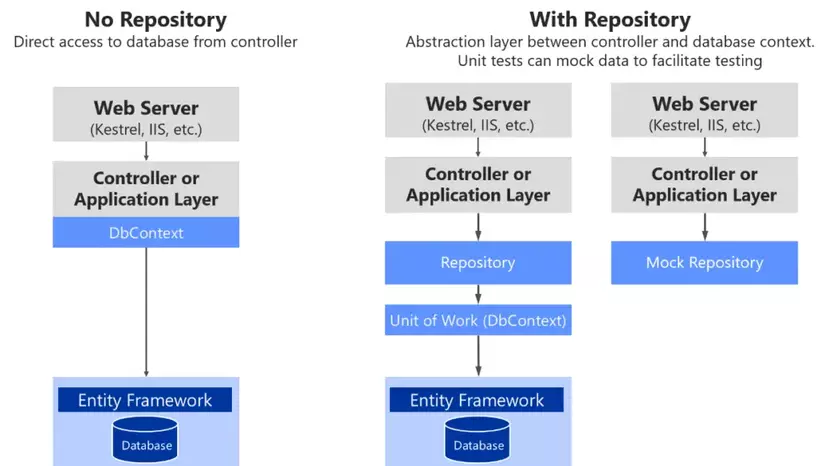
Triển khai mẫu kho lưu trữ trong ASP.NET Core
Sau đây chúng ta sẽ bắt tay đi vào triển khai một project sử dụng RP.
Đầu tiên sẽ tạo một Solution mới, chúng ta đặt tên solution là RepositoryPattern, và có một project đầu tiên là Api.
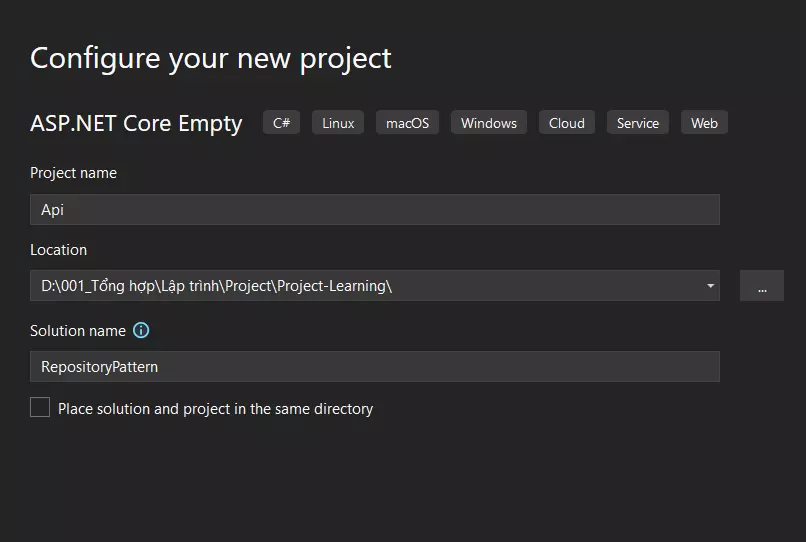 Tiếp theo thêm 2 .NET Core Class Library vào bên trong Solution là DataAccess.EFCore và Domain.
Mỗi project sẽ đảm nhiệm những nhiệm vụ như sau:
- Domain: chứa Entites và Interface, nó không phụ thuộc vào bất kỳ project nào khác.
- DataAccess,EFCore: đây là một project độc lập chứa mọi thứ liên quan đến EFCore, chúng ta tạo một project riêng để chứa nó, nếu sử dụng Dapper thì cũng tạo một project riêng để chứa những thứ liên quan đến Dapper, việc này tận dụng sức mạnh của DI.
- Api: nơi cung cấp đầu vào, các endpoints để xác định công việc của một phần mềm, nó điều hướng đến project liên quan để hoàn thành công việc. Nó sẽ phụ thuộc vào hai project còn lại.
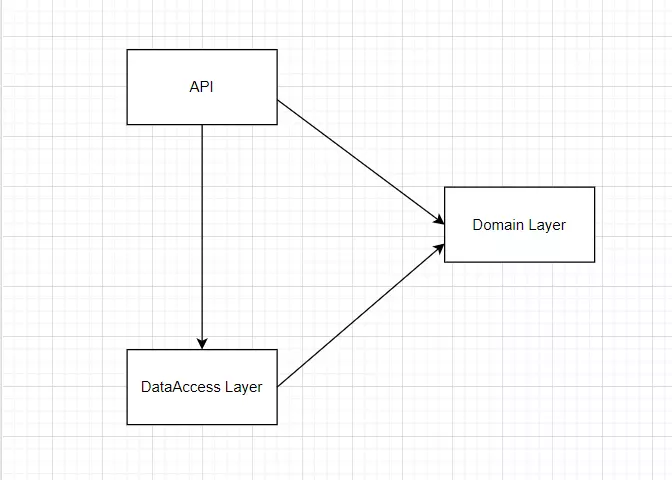 Solution sẽ như sau:

Bây giờ, ta sẽ thêm những Entity cần thiết. Tạo mới một folder tên là Entities ở trong project Domain. Tạo hai class đơn giản là Developer và Project như sau ở trong folder Entities:
Developer
public class Developer
{
    public int Id { get; set; }
    public string Name { get; set; }
    public int Followers { get; set; }
}
Project
public class Project
{
    public int Id { get; set; }
    public string Name { get; set; }
}
Tiếp theo, cùng setup cấu hình cho EFCore sử dụng MySQL, chúng ta sẽ cài package:
MySql.EntityFrameworkCore
ở trong project DataAccess.EFCore, đây cũng là nơi chứa DbContect và các implement tương ứng của Repositories. Ta sẽ thêm một project reference đến project Domain, và tạo một class tên là ApplicationContext.
public class ApplicationContext : DbContext
{
    public ApplicationContext(DbContextOptions<ApplicationContext> options) : base(options)
    {
    }
    public DbSet<Developer> Developers { get; set; }
    public DbSet<Project> Projects { get; set; }
}
Ok, việc setup những class đủ để thao tác với ứng dụng từ tầng DataAccess và Domain đã xong, bây giờ chúng ta sẽ qua đến project Api để đăng ký EFCore, và thao tác với dữ liệu trong database. Đầu tiên cài package
Install-Package Microsoft.EntityFrameworkCore.Tools
package này cho phép thao tác với EFCore thông qua CLI.
Tiếp theo, tạo reference đến project DataAccess.EFCore, ở trong file Program.cs (phiên bản .Net 6), chúng ta sẽ cấu hình connection đến database và đăng ký ApplicationContext tại đây:
// connect to mysql with connection string from app settings
var connectionString = builder.Configuration.GetConnectionString("DefaultConnection");

if(connectionString != null)
{
    builder.Services.AddDbContext<ApplicationContext>(options =>
     options.UseMySQL(connectionString));
}

var app = builder.Build();

// CreateDbIfNotExists
using (var scope = app.Services.CreateScope())
{
    var services = scope.ServiceProvider;
    try
    {
        var context = services.GetRequiredService<ApplicationContext>();
        context.Database.EnsureCreated();
    }
    catch (Exception ex)
    {
        var logger = services.GetRequiredService<ILogger<Program>>();
        logger.LogError(ex, "An error occurred creating the DB.");
    }
}
Sau đó mở file appsettings.Development và thêm connection string:
"ConnectionStrings": {
  "DefaultConnection": "<your connection string>",
},
Sau đó chạy project, database sẽ tự tạo theo cấu hình của connectionstring.
Xây dựng một Generic Repository
Đầu tiên, thêm folder Interfaces ở trong project Domain. Chúng ta sẽ định nghĩa những Interface ở đây, nhưng Implement chúng ở bên ngoài project Domain để đảo ngược sự phụ thuộc. Trong trường hợp này Implement sẽ được định nghĩa ở DataAccess.EFCore Project. Vì vậy, domain sẽ không phụ thuộc vào bất cứ điều gì, hay nói cách khách là các layer khác sẽ phụ thuộc vào định nghĩa của những Interface trong project Domain. Đây là việc tận dụng đơn giản của nguyên tắc DI.
Bây giờ ta thêm file Interfaces/IGenericRepository.cs:
public interface IGenericRepository<T> where T : class
{
    T GetById(int id);
    IEnumerable<T> GetAll();
    IEnumerable<T> Find(Expression<Func<T, bool>> expression);
    void Add(T entity);
    void AddRange(IEnumerable<T> entities);
    void Remove(T entity);
    void RemoveRange(IEnumerable<T> entities);
}
Chúng ta đã tạo xong một GenericRepository, tạo ra một contract với những method có đủ những chức năng CRUD của ứng dụng. Nó có thể sử dụng cho cả lớp Developer và lớp Project.
Tiếp theo, tạo một lớp GenericRepository (Repositories/GenericRepository) trong project DataAccess.EFCore để implement interface IGenericRepository.
public class GenericRepository<T> : IGenericRepository<T> where T : class
{
    protected readonly ApplicationContext _context;
    public GenericRepository(ApplicationContext context)
    {
        _context = context;
    }

    public void Add(T entity)
    {
        _context.Set<T>().Add(entity);
    }

    public void AddRange(IEnumerable<T> entities)
    {
        _context.Set<T>().AddRange(entities);
    }

    public IEnumerable<T> Find(Expression<Func<T, bool>> expression)
    {
        return _context.Set<T>().Where(expression);
    }

    public IEnumerable<T> GetAll()
    {
        return _context.Set<T>().ToList();
    }

    public T GetById(int id)
    {
        return _context.Set<T>().Find(id);
    }

    public void Remove(T entity)
    {
        _context.Set<T>().Remove(entity);
    }

    public void RemoveRange(IEnumerable<T> entities)
    {
        _context.Set<T>().RemoveRange(entities);
    }
}
Chúng ta cũng inject ApplicationContext , đây là các ẩn tất cả những action liên quan đến DbContext ở bên trong Repository Classes bằng cách gọi thông qua những method của được định nghĩa trong đó. Lưu ý rằng những hành động liên quan đến thêm và xóa chúng ta chỉ gọi thông qua những phương thức của dbContext nhưng chưa commiting/updating/saving sự thay đổi lên cơ sở dữ liệu. Đây không phải là việc cần làm bên trong Repository Class. Việc commiting dữ liệu vào database thì chúng ta sẽ cần sử dụng Unit of Work, ta sẽ bàn luận ở phần sau.
Kế thừa và mở rộng Generic Repository Trong project Domain/Interfaces thêm một interface tên là IDeveloperRepository:
public interface IDeveloperRepository : IGenericRepository<Developer>
{
    IEnumerable<Developer> GetPopularDevelopers(int count);
}
Ở đây nó sẽ kế thừa tất cả những phương thức của Generic Repository, và thêm một method mới tên là GetPopularDevelopers. Bây giờ ta đi implement IDeveloperRepostory, vào thư mục Repositories của project DataAccess, thêm một lớp mới tên là: DeveloperRepository.
public class DeveloperRepository : GenericRepository<Developer>, IDeveloperRepository
{
    public DeveloperRepository(ApplicationContext context):base(context)
    {
    }
    public IEnumerable<Developer> GetPopularDevelopers(int count)
    {
        return _context.Developers.OrderByDescending(d => d.Followers).Take(count).ToList();
    }
}
Bạn không cần implement 7 phương thức thông dụng ở đây, nó đã được implement sẵn từ Generic Repository, việc kế thừa và tái sử dụng được tận dụng tối đa phải ko?
Tương tự, tạo interface và implement cho ProjectRepository:
public interface IProjectRepository : IGenericRepository<Project>
{
}
public class ProjectRepository : GenericRepository<Project>, IProjectRepository
{
    public ProjectRepository(ApplicationContext context): base(context)
    {
    }
}
Cuối cùng, ta đăng ký chúng vào ServiceCollection, vào file Program.cs và đăng ký chúng:
builder.Services.AddTransient(typeof(IGenericRepository<>), typeof(GenericRepository<>));
builder.Services.AddTransient<IDeveloperRepository, DeveloperRepository>();
builder.Services.AddTransient<IProjectRepository, ProjectRepository>();
Unit Of Work Pattern
Unit of Work Pattern là một design pattern, nơi mà nó sẽ expose ra những repository trong ứng dụng.
Tới đến thời điểm này, chúng ta đã tạo một số Repository, thông thường để sử dụng chúng thì chúng ta chỉ cần inject vào contructor mà một lớp nào đó cần dùng, nhưng điều gì xảy ra khi lớp đó cần sử dụng nhiều repository, mỗi lần sử dụng lại inject 1 repository vào class, điều này có vẻ không lý tưởng lắm. Vì vậy, để gói tất cả Repositories vào một object duy nhất, chúng ta sử dụng Unit Of Work.
Unit of Work chịu trách nhiệm expose ra những Repositories có sẵn và Commit những thay đổi vào Database đảm bảo transaction nhất quán và không bị mất dữ liệu.
Ưu điểm chính khác là nhiều đối tượng Repository sẽ có các phiên bản dbcontext khác nhau bên trong chúng. Điều này có thể dẫn đến rò rỉ dữ liệu trong các trường hợp phức tạp.
Giả sử bạn cần thêm 1 Developer mới và 1 Project mới trong cùng một transaction. Điều gì xảy ra khi bản ghi Developer được thêm, nhưng bản ghi Project bị fails bởi vì một số lý do nào đó. Trong thực tế, điều này khá là nguy hiểm vì có thể dẫn đến sai sót dữ liệu. Chúng ta cần phải đảm bảo việc Repo của Developer và Project đều hoạt động tốt, không xảy ra lỗi gì trước khi Commit Transaction vào Database. Đó là lý do ở mỗi method trong Repo, chúng ta không gọi bất kì phương thức SaveChanges nào, thay vào đó phương thức SaveChanges sẽ được gọi ở Unit Of Work class.
Ok, chúng ta sẽ đi đến việc tạo một interface IUnitOfWork trong project Domain/Interfaces:
public interface IUnitOfWork : IDisposable
{
    IDeveloperRepository Developers { get; }
    IProjectRepository Projects { get; }
    int Complete();
}
Bạn có thể thấy danh sách những Repo cần thiết ở trong UOW interface, và một phương thức Complete để Commit dữ liệu vào database. Để implement interface này, tạo một implement UnitOfWork/UnitOfWork.cs trong project DataAccess:
    public class UnitOfWork : IUnitOfWork
    {
        private readonly ApplicationContext _context;
        public IDeveloperRepository Developers { get; private set; }
        public IProjectRepository Projects { get; private set; }


        public UnitOfWork(ApplicationContext context)
        {
            _context = context;
            Developers = new DeveloperRepository(_context);
            Projects = new ProjectRepository(_context);
        }

        public int Complete()
        {
            return _context.SaveChanges();
        }
        public void Dispose()
        {
            _context.Dispose();
        }
    }
Tiếp theo đăng ký service:
builder.Services.AddTransient<IUnitOfWork, UnitOfWork>();
Sử dụng ở API Controller
Tạo một folder Controllers ở project API, tạo một Empty Controller tên là DeveloperController như sau:
[Route("api/[controller]")]
[ApiController]
public class DeveloperController : ControllerBase
{
    private readonly IUnitOfWork _unitOfWork;
    public DeveloperController(IUnitOfWork unitOfWork)
    {
        _unitOfWork = unitOfWork;
    }
}
Ở đây ta chỉ cần inject duy nhất IUnitOfWork, nó tránh việc viết nhiều dòng inject vào controller của bạn. Chúng ta sẽ tạo ra 2 api để test luồng nhé. API đầu tiên là lưu một Developer và 1 Project vào trong database:
[HttpPost]
public IActionResult AddDeveloperAndProject()
{
       var developer = new Developer
       {
                Followers = 35,
                Name = "Developer"
       };

       var project = new Project
       {
                Name = "Repository Pattern"
       };

       _unitOfWork.Developers.Add(developer);
       _unitOfWork.Projects.Add(project);
       _unitOfWork.Complete();

       return Ok();
}
API thứ nhất là lấy ra danh sách Developer có nhiều người follow nhất:
[HttpGet]
public IActionResult GetPopularDevelopers([FromQuery] int count)
{
    var popularDevelopers = _unitOfWork.Developers.GetPopularDevelopers(count);
    return Ok(popularDevelopers);
}
Call API Testing
Vào swagger gọi phương thức lưu dữ liệu Developer và Project:
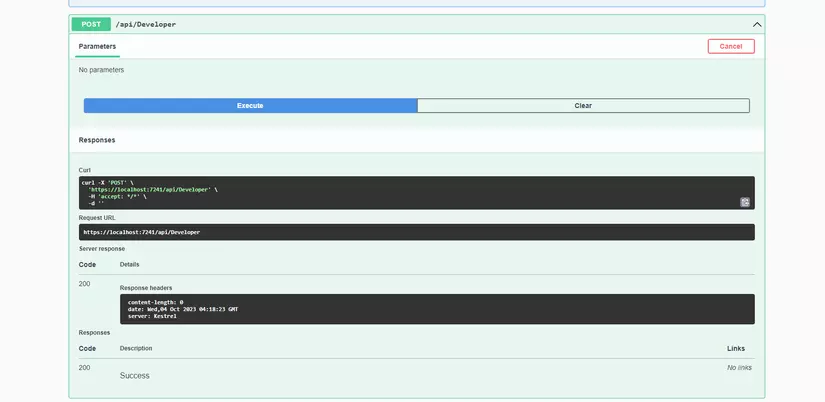
Bản ghi đã được lưu thành công:
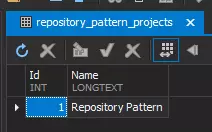
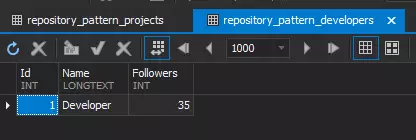
Lấy danh sách developer có nhiều người theo dõi nhất:
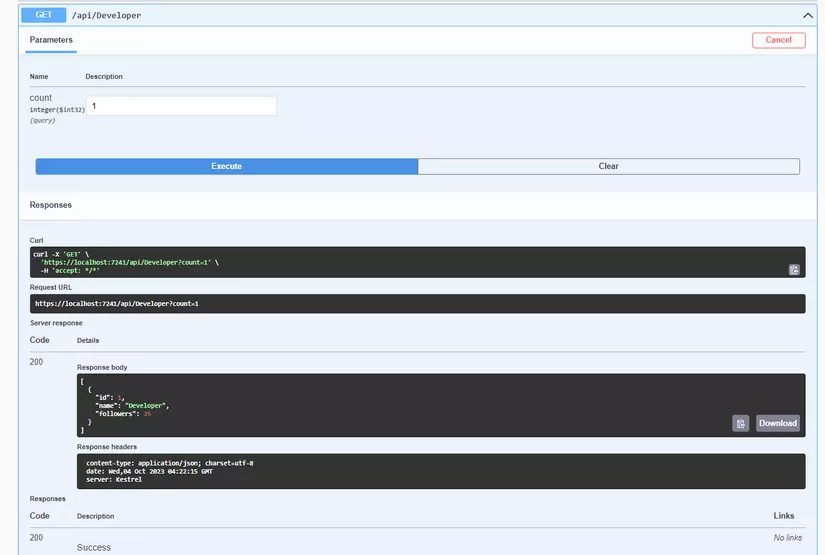
Ok, đã thành công.
Tổng kết
Chúng ta đã học cơ bản về Repository Pattern trong ASP.NETphiên bản 6, và Generic Repositories, Unit Of Works, và cách chia các layer để build nên một ứng dụng. Từ đó nắm được những khái niệm cơ bản để tìm hiểu sâu hơn về các pattern. Source code tại đây: Source Code
Tham khảo:
https://codewithmukesh.com/blog/repository-pattern-in-aspnet-core/
All rights reserved