Human Reaction, Animal Reaction or React.Js
Bài đăng này đã không được cập nhật trong 4 năm
Introduction
Creating an dynamic web application always involved working with
- Backend development
- Frontend development
In the backend we need programming language such as PHP, Ruby, Python, Perl ...etc. That can run on server in order to generate webpage and send back to client.
As for the frontend we need HTML to display and structure webpage, CSS to style and make it look nice and JavaScript to create interactive user interface and enhance users experience.
Creating interactive user interface while using native JavaScript can be hard and error prone. But the good new is that there are a lot of JavaScript framework that can make this task much more easier and one of them is React and this will be our topic for today.
React is a declarative, efficient, and flexible JavaScript library for building user interfaces developed by Facebook.
Getting Started
Today we will be creating a simple web application call AniAlbum for displaying anime album with title along with its image. In this application we will be using Ruby on Rails as a backend to provide data in JSON format and using that data to create user interface with React. Source code of the project is available on Github.
Human Reaction
First lets create a new project using command (if you are new to rails checkout this Getting Started Guide)
rails new ani_album -T
Next lets setup some basic controllers, routing and view
rails g controller Home index --no-assets --no-helper
rails g controller Albums --no-assets --no-helper
Next create a model name Album
rails g model Album title:string image:string
rake db:migrate
app/controllers/home_controller.rb

class HomeController < ApplicationController
  def index
  end
end

app/controllers/albums_controller.rb

class AlbumsController < ApplicationController
  def index
    render json: Album.all
  end
end
config/routes.rb

Rails.application.routes.draw do
 root "home#index"
 resources :albums, only: :index
end
<div id="main"></div>
Ok, that's enough coding now lets talk about what we've done so far. First we create a new project call ani_album after that we create two controllers one name Home and another one name Albums. Next we setup some basic route to Home controller index action that will be our entry point to our application and route to Album controller index action that responsible for returning all data related to anime album in JSON format.
Animal Reaction
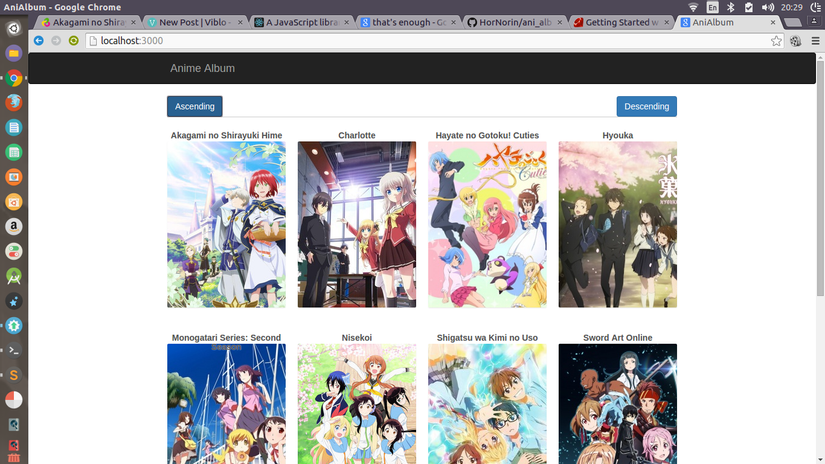
After some basic routing and controller in place, next we apply some style sheet to make our page look nice as in the following picture (this is what our final home page will be looks like)
@import "bootstrap";

#header, #home {
    width: 864px;
    margin: 0 auto;
  }

  #control {
    margin: 10px;
    margin-bottom: 30px;
    border-bottom: 1px solid #ccc;
  }

  .card {
    width: 196px;
    height: 275px;
    margin: 10px;
    margin-bottom: 50px;
    float: left;
    position: relative;
    border-radius: 2px;
    background-color: white;
    box-shadow: rgba(0,0,0,0.1) 0px 1px 1px;
  }

  .card h3 {
    margin: -17px;
    color: #555;
    font-size: 14px;
    font-weight: bold;
    text-align: center;
    text-shadow: 0 0 1px #eee;
  }

  @media screen and (max-width: 864px) {
    #header, #home {
      width: 648px;
    }
  }

  @media screen and (max-width: 648px) {
    #header, #home {
      width: 432px;
    }
  }

  @media screen and (max-width: 432px) {
    #header, #home {
      width: 216px;
    }
  }
React.Js
Now lets get to our main topic for today. In order to build user interface that will look like the one in the picture above we first need to think about how to structure our data. As the basic principle, React thinking this in term of component so I've broken this down to 4 components.
- AlbumBox: This the top level component that contains others components.
- Control: This is the the two buttons that used to sort albums in ascending or descending order compare with title.
- CardList: This component to use contains other component call Card that will expain bellow.
- Card: The box that contains anime album (image and its title)
React component, entry point and JSX transformer
As we have these components in place lets start of by creating AlbumBox.
app/assets/javascripts/app.js.jsx

var AlbumBox = React.createClass({
    render: function() {
      return (
        <div id="home">
          <Control albums={ this.state.albums }
           onSorted={ this.handleSorted } />
          <CardList albums={ this.state.albums } />
        </div>
      );
    }
});

React.render(<AlbumBox url="/albums" />, document.getElementById("main"));
In order to create component, React has provide us a factory method called React.createClass(). This factory method takes an object as an argument and that object need to has render method, as this method will get called when we try to mount component into the DOM using React.render(). React.render() takes three arguments, first is React component second one is DOM object that the component will mount into and last one is an optional callback function.
We use property to pass data to component in this case url then we can access this property within component using this.props.url.
You may be wondering what is this.state.albums and this.handleSorted. I'll be explaining what these mean as we follow along.
Another thing to notice is that we use xml syntax style to create
a div container. This can be achieved because React provide a transformer that converted this into JavaScript acceptable code.
Just include a script tag that link to JSXTransformer.js. This file come bundle with ReactJs archive that you download or you can link it online from cdnjs.
After you've linked to transformer just place the above code in <script type="text/jsx"></script> block.
But for simplicity I use a gem call react-rails this allow us use jsx syntax by name our javascript file with extension .jsx
Next is Control
app/assets/javascripts/app.js.jsx

var Control = React.createClass({
    sortAlbums: function(order) {
      this.props.albums.sort(function(x, y) {
        if (x.title < y.title) {
          return -1 * order;
        } else if(x.title > y.title) {
          return 1 * order;
        }

        return 0;
      });

      this.props.onSorted(this.props.albums);
    },
    render: function() {
      return (
        <div id="control">
          <button className="btn btn-primary"
            onClick={ this.sortAlbums.bind(null, 1) }>
            Ascending
          </button>
          <button className="btn btn-primary pull-right"
            onClick={ this.sortAlbums.bind(null, -1) }>
            Descending
          </button>
        </div>
      );
    }
});
This will create two button that will call sortAlbums method on click to handle sorting album.
In sortAlbums method we handle all the sorting logic that will sort albums that passed in through property in asceding or descending order depending on order parameter that passed in (1 mean asc -1 mean desc). The point to note in this method is the called to this.props.onSorted. Because this is the handler that passed in through property by AlbumBox as a mean to signal back when the sorting has been completed so that AlbumBox can update.
In the code that created AlbumBox above we see that we assign handleSorted to onSorted so lets implement this method.
app/assets/javascripts/app.js.jsx

handleSorted: function(newAlbums) {
  if (!this.isMounted()) return;

  this.setState({ albums: newAlbums });
}
When does React Reacts?
So what does this code has to do with AlbumBox updating itself?
Well as it turn out that there are two ways to make React component update.
- First is the call to
this.setState - Second is the call to
this.forceUpdate.
But what is state? And where does it come from? To answer these questions we have to explore what is the different between props and state? and component lifecycle.
Props VS State
After doing some online research and read documentation on ReactJs official site. I came to conclusion that
- Props is immutable data that passed to component using declarative style this means that we use props as an initial data. But in contrast.
- State is mutable data that means to use internally by component for interaction.
Component lifecycle
React provide the ability to opt in our code before or after component get created or mounted with something call Lifecycle Methods.
I only going to show you some of these that we will be using in our project so if you want a complete list of these methods checkout this Link
- getInitialState: This method got invoked before the component mounted. The return value must be an object with property and value. This object property will be used as state for example
{name: "Jonh", age: 21}will becomethis.state.namewith valueJonhandthis.state.agewith value21. So this is the place we initial our state data. - componentDidMount: This method got invoked once after component successfully mounted so it is a good place to perform ajax request or other techniques to get data and assign it to component state.
Now that we have discussed component lifecycle lets modify AlbumBox to get data from our rails server and feed it to our state for interaction and rendering. Our AlbumBox now look like follow
app/assets/javascripts/app.js.jsx

var AlbumBox = React.createClass({
    handleSorted: function(newAlbums) {
      if (!this.isMounted()) return;

      this.setState({ albums: newAlbums });
    },
    getInitialState: function() {
      return { albums: [] }
    },
    componentDidMount: function() {
      $.ajax({
        url: this.props.url,
        dataType: "json",
        success: function(data) {
          this.setState({ albums: data });
        }.bind(this),
        error: function(xhr, status, err) {
          console.error(this.props.url, status, err.toString());
        }.bind(this)
      });
    },
    render: function() {
      return (
        <div id="home">
          <Control albums={ this.state.albums }
           onSorted={ this.handleSorted } />
          <CardList albums={ this.state.albums } />
        </div>
      );
    }
});
Now for CardList
app/assets/javascripts/app.js.jsx

var CardList = React.createClass({
    render: function() {
      var cardNodes = this.props.albums.map(function(album) {
        return <Card album={ album } />;
      });

      return (<div id="card-container">{ cardNodes }</div>);
    }
});
CardList is straightforward first we create a list Card from albums property that passed in by AlbumBox and nested it with a div.
And the last but not least is Card
app/assets/javascripts/app.js.jsx

var Card = React.createClass({
    render: function() {
      var style = { background: "url(" + this.props.album.image + ")" };
      return (
        <div className="card" style={ style }>
          <h3>{ this.props.album.title }</h3>
        </div>
      );
    }
});
And here is our complete code
var ready = function() {
  var AlbumBox = React.createClass({
    handleSorted: function(newAlbums) {
      if (!this.isMounted()) return;

      this.setState({ albums: newAlbums });
    },
    getInitialState: function() {
      return { albums: [] }
    },
    componentDidMount: function() {
      $.ajax({
        url: this.props.url,
        dataType: "json",
        success: function(data) {
          this.setState({ albums: data });
        }.bind(this),
        error: function(xhr, status, err) {
          console.error(this.props.url, status, err.toString());
        }.bind(this)
      });
    },
    render: function() {
      return (
        <div id="home">
          <Control albums={ this.state.albums }
           onSorted={ this.handleSorted } />
          <CardList albums={ this.state.albums } />
        </div>
      );
    }
  });

  var Control = React.createClass({
    sortAlbums: function(order) {
      this.props.albums.sort(function(x, y) {
        if (x.title < y.title) {
          return -1 * order;
        } else if(x.title > y.title) {
          return 1 * order;
        }

        return 0;
      });

      this.props.onSorted(this.props.albums);
    },
    render: function() {
      return (
        <div id="control">
          <button className="btn btn-primary"
            onClick={ this.sortAlbums.bind(null, 1) }>
            Ascending
          </button>
          <button className="btn btn-primary pull-right"
            onClick={ this.sortAlbums.bind(null, -1) }>
            Descending
          </button>
        </div>
      );
    }
  });

  var CardList = React.createClass({
    render: function() {
      var cardNodes = this.props.albums.map(function(album) {
        return <Card album={ album } />;
      });

      return (<div id="card-container">{ cardNodes }</div>);
    }
  });

  var Card = React.createClass({
    render: function() {
      var style = { background: "url(" + this.props.album.image + ")" };
      return (
        <div className="card" style={ style }>
          <h3>{ this.props.album.title }</h3>
        </div>
      );
    }
  });

  React.render(<AlbumBox url="/albums" />, document.getElementById("main"));
}
Conclusion
After travel a long jurney we've reached our destination.
And the things that we've learned in this post are
- How to think in React break document structure into component
- Different between Props and State
- Component Lifecycle
- How to pass data to component
- How React component update itself
All rights reserved
