HTTP2 with NginX
Bài đăng này đã không được cập nhật trong 3 năm
Trên đây cũng có khá nhiều bài viết giới thiệu về những điểm mạnh và những đặc tính hay ho của HTTP2. Hôm nay chúng ta cùng thử cài đặt HTTP2 nhé. Do có nhiều bài viết giới thiệu rồi nên chúng ta không đi vào những vấn đề đấy nữa mà đi thẳng vào cách cài đặt HTTP2 luôn. Và hôm nay mình sẽ sử dụng web server NginX để làm demo này.
NginX hỗ trợ HTTP2 từ phiên bản 1.9.5 trở đi. Nhưng muốn sử dụng nó, chúng ta phải build NginX với OpenSSL từ 1.0.2 trở lên. Vì vậy, chúng ta phải compile NginX từ source (do mình đã thử cài bản mới nhất của NginX 1.15.7 từ APT thì nó vẫn build với OpenSSL bản 1.0.1f). Và để thử HTTP2 thì chúng ta phải có HTTPS. Các bạn có thể tham khảo cách làm sao để có HTTPS xanh lét từ bài viết này. Để thực hiện test, mình sẽ dùng Docker để đỡ gây ảnh hưởng đến hệ thống thật. Mặc định mọi người đã cài đặt và biết sử dụng Docker ở mức cơ bản nhất nhé. Bắt đầu nào!
HTTP2 with NginX
Đầu tiên, chúng ta tạo một thư mục để chứa SSL cho HTTPS và source code để test ở host:
mkdir -p ~/http2-demo
Sau đó, tạo Docker container và mount thư mục đó vào container:
sudo docker run --name http2_demo -v ~/http2-demo:/http2 -it ubuntu:14.04 /bin/bash
Và bây giờ, chúng ta đang ở trong Docker container rồi. Thực hiện cài đặt các package cần thiết trước khi cài đặt NginX nhé.
apt-get update && apt-get install -y vim curl wget apt-transport-https software-properties-common python-software-properties make build-essential libpcre3 libpcre3-dev zlibc zlib1g zlib1g-dev
Sau khi cài đặt các package cần thiết, chúng ta thực hiện cài đặt NginX phiên bản mới nhất từ APT (1.15.7). Đầu tiên, thêm signing key:
wget -O - http://nginx.org/keys/nginx_signing.key | sudo apt-key add -
Thêm NginX vào APT source list:
echo "deb http://nginx.org/packages/mainline/ubuntu/ trusty nginx" | sudo tee -a /etc/apt/sources.list && echo "deb-src http://nginx.org/packages/mainline/ubuntu/ trusty nginx" | sudo tee -a /etc/apt/sources.list
Update APT source cache:
apt-get update
Cài đặt NginX:
apt-get install nginx
Kiểm tra phiên bản NginX:
$ nginx -V
nginx version: nginx/1.15.7
built by gcc 4.8.4 (Ubuntu 4.8.4-2ubuntu1~14.04.4)
built with OpenSSL 1.0.1f 6 Jan 2014
TLS SNI support enabled
configure arguments: --prefix=/etc/nginx --sbin-path=/usr/sbin/nginx --modules-path=/usr/lib/nginx/modules --conf-path=/etc/nginx/nginx.conf --error-log-path=/var/log/nginx/error.log --http-log-path=/var/log/nginx/access.log --pid-path=/var/run/nginx.pid --lock-path=/var/run/nginx.lock --http-client-body-temp-path=/var/cache/nginx/client_temp --http-proxy-temp-path=/var/cache/nginx/proxy_temp --http-fastcgi-temp-path=/var/cache/nginx/fastcgi_temp --http-uwsgi-temp-path=/var/cache/nginx/uwsgi_temp --http-scgi-temp-path=/var/cache/nginx/scgi_temp --user=nginx --group=nginx --with-compat --with-file-aio --with-threads --with-http_addition_module --with-http_auth_request_module --with-http_dav_module --with-http_flv_module --with-http_gunzip_module --with-http_gzip_static_module --with-http_mp4_module --with-http_random_index_module --with-http_realip_module --with-http_secure_link_module --with-http_slice_module --with-http_ssl_module --with-http_stub_status_module --with-http_sub_module --with-http_v2_module --with-mail --with-mail_ssl_module --with-stream --with-stream_realip_module --with-stream_ssl_module --with-stream_ssl_preread_module --with-cc-opt='-g -O2 -fstack-protector --param=ssp-buffer-size=4 -Wformat -Werror=format-security -Wp,-D_FORTIFY_SOURCE=2 -fPIC' --with-ld-opt='-Wl,-Bsymbolic-functions -Wl,-z,relro -Wl,-z,now -Wl,--as-needed -pie'
Sau khi cài đặt NginX xong. Chúng ta thực hiện tải source code của NginX và OpenSSL mới nhất về để thực hiện build lại NginX. Tại sao chúng ta phải cài đặt NginX từ APT xong build từ source? Vì khi cài đặt từ APT, chúng ta đã có các cấu hình mặc định (như NginX service, NginX config, ...). Và việc build lại này chỉ là thực hiện cấu hình thêm OpenSSL bản mới nhất cho NginX mà thôi. Đầu tiên là NginX source:
wget http://nginx.org/download/nginx-1.15.7.tar.gz
Kế đến là OpenSSL (mình chọn phiên bản mới nhất luôn cho máu):
wget https://www.openssl.org/source/openssl-1.1.1a.tar.gz
Sau khi xong, thực hiện xả nén 2 file .tar.gz mà chúng ta vừa tải về:
tar vzxf nginx-1.15.7.tar.gz && tar vzxf openssl-1.1.1a.tar.gz
Sau khi đã xả nén xong. Chúng ta đi build NginX.
cd nginx-1.15.7
Build NginX:
./configure --prefix=/etc/nginx --sbin-path=/usr/sbin/nginx --modules-path=/usr/lib64/nginx/modules --conf-path=/etc/nginx/nginx.conf --error-log-path=/var/log/nginx/error.log --http-log-path=/var/log/nginx/access.log --pid-path=/var/run/nginx.pid --lock-path=/var/run/nginx.lock --http-client-body-temp-path=/var/cache/nginx/client_temp --http-proxy-temp-path=/var/cache/nginx/proxy_temp --http-fastcgi-temp-path=/var/cache/nginx/fastcgi_temp --http-uwsgi-temp-path=/var/cache/nginx/uwsgi_temp --http-scgi-temp-path=/var/cache/nginx/scgi_temp --user=nginx --group=nginx --with-compat --with-file-aio --with-threads --with-http_addition_module --with-http_auth_request_module --with-http_dav_module --with-http_flv_module --with-http_gunzip_module --with-http_gzip_static_module --with-http_mp4_module --with-http_random_index_module --with-http_realip_module --with-http_secure_link_module --with-http_slice_module --with-http_ssl_module --with-http_stub_status_module --with-http_sub_module --with-http_v2_module --with-mail --with-mail_ssl_module --with-stream --with-stream_realip_module --with-stream_ssl_module --with-stream_ssl_preread_module --with-cc-opt='-O2 -g -pipe -Wall -Wp,-D_FORTIFY_SOURCE=2 -fexceptions -fstack-protector --param=ssp-buffer-size=4 -m64 -mtune=generic -fPIC' --with-ld-opt='-Wl,-z,relro -Wl,-z,now -pie' --with-openssl=/openssl-1.1.1a
Complie NginX:
make install
Sau khi compile xong, chúng ta thực hiện thay thế NginX cũ với NginX mà chúng ta đã build với OpenSLL mới nhất:
ln -sf $(pwd)/objs/nginx $(which nginx)
Bây giờ chúng ta thử kiểm tra lại thông tin của NginX xem sao:
$ nginx -V
nginx version: nginx/1.15.7
built by gcc 4.8.4 (Ubuntu 4.8.4-2ubuntu1~14.04.4)
built with OpenSSL 1.1.1a  20 Nov 2018
TLS SNI support enabled
configure arguments: --prefix=/etc/nginx --sbin-path=/usr/sbin/nginx --modules-path=/usr/lib64/nginx/modules --conf-path=/etc/nginx/nginx.conf --error-log-path=/var/log/nginx/error.log --http-log-path=/var/log/nginx/access.log --pid-path=/var/run/nginx.pid --lock-path=/var/run/nginx.lock --http-client-body-temp-path=/var/cache/nginx/client_temp --http-proxy-temp-path=/var/cache/nginx/proxy_temp --http-fastcgi-temp-path=/var/cache/nginx/fastcgi_temp --http-uwsgi-temp-path=/var/cache/nginx/uwsgi_temp --http-scgi-temp-path=/var/cache/nginx/scgi_temp --user=nginx --group=nginx --with-compat --with-file-aio --with-threads --with-http_addition_module --with-http_auth_request_module --with-http_dav_module --with-http_flv_module --with-http_gunzip_module --with-http_gzip_static_module --with-http_mp4_module --with-http_random_index_module --with-http_realip_module --with-http_secure_link_module --with-http_slice_module --with-http_ssl_module --with-http_stub_status_module --with-http_sub_module --with-http_v2_module --with-mail --with-mail_ssl_module --with-stream --with-stream_realip_module --with-stream_ssl_module --with-stream_ssl_preread_module --with-cc-opt='-O2 -g -pipe -Wall -Wp,-D_FORTIFY_SOURCE=2 -fexceptions -fstack-protector --param=ssp-buffer-size=4 -m64 -mtune=generic -fPIC' --with-ld-opt='-Wl,-z,relro -Wl,-z,now -pie' --with-openssl=/openssl-1.1.1a
Oh, nó đã được build với OpenSSL bản mới nhất do chúng ta tải về rồi kìa. Thế là xong, giờ chúng ta có thể sử dụng HTTP2 rồi  !
!
Giờ chúng ta cùng đi cấu hình HTTP2 cho NginX xem sao nhé. Đầu tiên chúng ta cần phải có HTTPS, các bạn có thể tham khảo bài viết này. Sau khi đã tạo SSL certificate ở host. Chúng ta thực hiện copy hai files .crt và .key vào thư mục ~/http2-demo để cấu hình cho NginX trong container. Quay trở lại container, chúng ta thực hiện sửa lại file /etc/nginx/conf.d/default.conf sang như sau:
server {
  listen 443 http2 ssl;

  server_name _;

  ssl_certificate     /http2/<ssl-filename>.crt;
  ssl_certificate_key /http2/<ssl-filename>.key;
  ssl_protocols       TLSv1 TLSv1.1 TLSv1.2;
  ssl_ciphers         HIGH:!aNULL:!MD5;

  location / {
    root /http2;
    index index.html index.htm;
    add_header 'Cache-Control' 'no-store, no-cache, must-revalidate, proxy-revalidate, max-age=0';
    expires off;
  }
}
Tạo file index.html trong thư mục /http2 với nội dung sau:
<!DOCTYPE html>
<html>
<head>
  <meta charset="utf-8">
  <title>Test HTTP2</title>
</head>
<body>
  <h1>Hello, HTTP2 :D</h1>
</body>
</html>
Giờ chúng ta thực hiện khởi động lại NginX:
service nginx restart
Vậy là đã xong phần chuẩn bị. Chúng ta quay trở lại host. Thực hiện edit file /etc/hosts/ và trỏ domain vào IP của container. Để lấy IP của container, chúng ta thực hiện lệnh sau:
sudo docker inspect http2_demo | grep -i ipaddr
Sau khi đã có IP address của container. Thực hiện edit file hosts:
sudo vi /etc/hosts
Và thêm nội dung sau vào cuối file:
# <Docker container IP address>   <Your choose domain>
172.17.0.2   http2-demo.local
Giờ bạn thử truy cập vào https://<Your choose domain> (https://http2-demo.local) xem kết quả nhé !
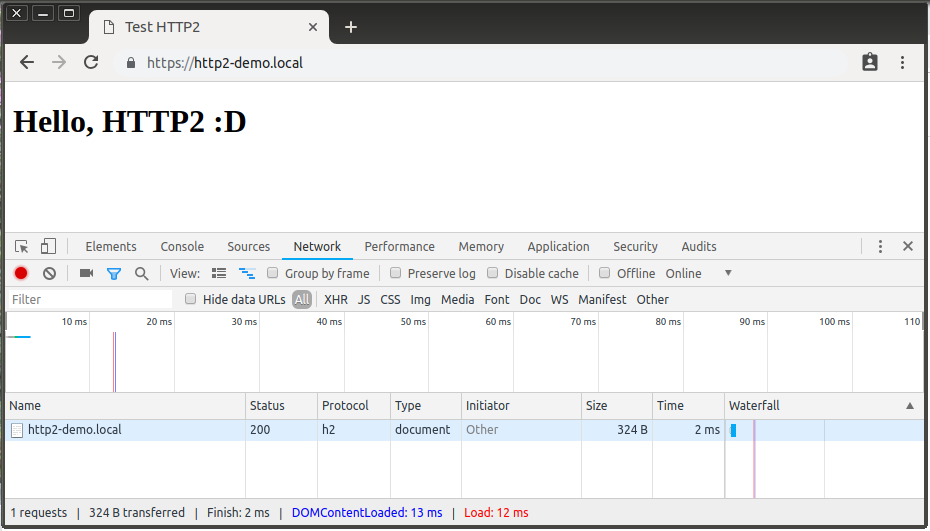
Nếu bạn nhìn thấy phần Protocol là h2 thì bạn đã thành công rồi !
Lời kết
Trên đây là bài viết hướng dẫn cài đặt HTTP2 cho NginX. Nếu các bạn thích, các bạn có thể thực hiện thêm demo của Akamai ở đây để có thể so sánh tốc độ xem nó như thế nào. Hy vọng bài viết này sẽ giúp ích cho các bạn trong một tương lai không xa (hoặc ít nhất là hiểu cách làm sao để cấu hình HTTP2 với NginX). Đến đây mình xin phép được kết thúc bài viết. Hẹn gặp lại 
Original post: https://namnv609.cf/posts/http2-with-nginx.html
All rights reserved