Authenticate với Identity trên ASP.NET Core
Bài đăng này đã không được cập nhật trong 7 năm
1. ASP.NET Core Identity là gì ?
ASP.NET Core Identity là một thành phần (built-in) của ASP.NET Core, nó cung cấp cho bạn các tính năng đầy đủ và đa dạng về authentication. Có thể như: Tạo tài khoản, login với user name và password, cập nhật profile. Hoặc cũng có thể sử dụng những provider bên ngoài giống như: Facebook, Google, Twitter, Microsoft account và nhiều cái khác nữa. Bạn có thể cấu hình ASP.NET Core để sử dụng với SQL Server nhằm lưu trữ user name, password và dữ liệu profile. Bài lược dịch này tôi sẽ giới thiệu với các bạn cách tạo, cấu hình project có sửu dụng Identity, đồng thời custom một số thông tin của người dùng.
2. Tạo một project có sử dụng ASP.NET Core Identity
Command line
Nếu các bạn yêu thích những dòng lệnh, để tạo một project mvc có sử dụng Identity như lện bên dưới.
dotnet new mvc --auth Individual --name aspnetCoreIdentity
Trong đó aspnetCoreIdentity là tên project, Individual chỉ định project sử dụng cơ chế authentication là Identity
Với Visual studio
Nếu đã quen thuộc với Visual studio, các bạn làm theo các bước như bên dưới:
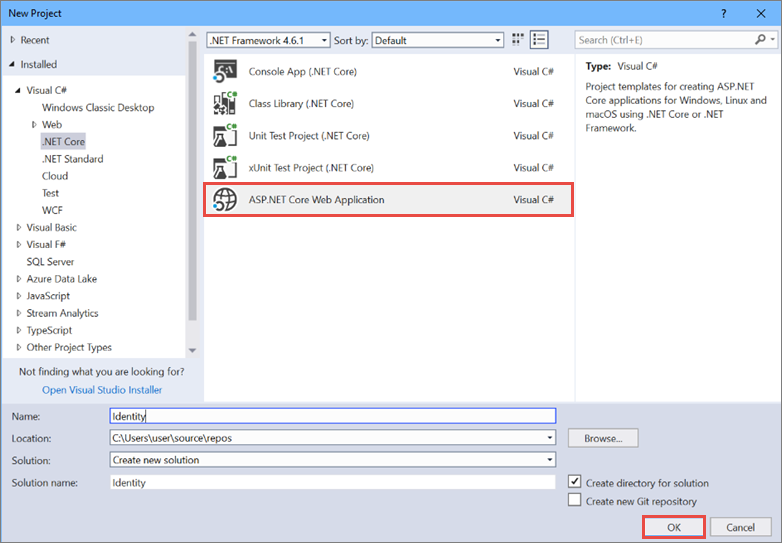
- Trong Visual Studio, Chọn File > New > Project. Select ASP.NET Core Web Application và click OK.

- Chọn ASP.NET Core Web Application (MVC) for ASP.NET Core, tiếp theo chọn Change Authentication.

- Cửa sổ xuất hiện, với một số options cho việc Authenticate . Chọn Individual User Accounts và click OK để trở về cửa sổ trước đó

Dù bạn chọn theo cách nào, ASP.NET Core cũng sẽ generate cho bạn một template đủ để bạn có thể thực hiện các chức năng: login, logout, tạo user, cập nhật profile mà không cần code bất kì dòng code nào. Thật dễ dàng phải không nào. Tuy nhiên, chúng ta nên tìm hiểu qua một số cấu hình cần thiết.
3.Cấu hình
Các bạn có thể xem những config được xây dựng sẵn tại phương thức ConfigureServices của Startup.cs
            services.AddDbContext<ApplicationDbContext>(options =>
                options.UseSqlite(Configuration.GetConnectionString("DefaultConnection")));

            services.AddIdentity<ApplicationUser, IdentityRole>()
                .AddEntityFrameworkStores<ApplicationDbContext>()
                .AddDefaultTokenProviders();

            services.Configure<IdentityOptions>(options =>
            {
                // Password settings
                options.Password.RequireDigit = true;
                options.Password.RequiredLength = 10;
                options.Password.RequireNonAlphanumeric = true;
                options.Password.RequireUppercase = false;
                options.Password.RequireLowercase = false;
                options.Password.RequiredUniqueChars = 6;

                // Lockout settings
                options.Lockout.DefaultLockoutTimeSpan = TimeSpan.FromMinutes(30);
                options.Lockout.MaxFailedAccessAttempts = 10;
                options.Lockout.AllowedForNewUsers = true;

                // User settings
                options.User.RequireUniqueEmail = true;
            });
Đầu tiên, là cấu hình database lưu trữ thông tin user, các bạn có thể sử dụng Sqlite, Sql server, hoặc InMemoryDatabase. Tiếp đến, chỉ định User model sử dụng cho ASP.NET Identity. Ngoài ra, các bạn cũng có thể cấu hình cho password, Lockout, user. Có thể nói là đầy đủ cho những yêu cầu cơ bản của cơ chế authen thông thường. Để hiểu kĩ hơn về các config này, các bạn có thể tìm hiểu thêm Identity Configuration
Cuối cùng, bạn cần gọi UseAuthenticationtrong phương thức Configure. Điều này nhằm mục đích để kích hoạt Identity cho ứng dụng
public void Configure(IApplicationBuilder app, IHostingEnvironment env)
{
    if (env.IsDevelopment())
    {
        app.UseDeveloperExceptionPage();
        app.UseBrowserLink();
        app.UseDatabaseErrorPage();
    }
    else
    {
        app.UseExceptionHandler("/Home/Error");
    }

    app.UseStaticFiles();

    app.UseAuthentication();

    app.UseMvc(routes =>
    {
        routes.MapRoute(
            name: "default",
            template: "{controller=Home}/{action=Index}/{id?}");
    });
}
4. Custom User Model
Mặc định, sau khi tạo project có sử dụng Identity, ta sẽ có một model ApplicationUser
public class ApplicationUser : IdentityUser
{
}
- Để thêm các thông tin cần thiết cho User bạn có thể sử dụng model này, hoặc bạn có thể tạo một model riêng tùy ý và kế thừa interface
IdentityUser. Ví du:
using System;
using System.Collections.Generic;
using System.Linq;
using System.Threading.Tasks;
using Microsoft.AspNetCore.Identity;

namespace IdentityAuth.Models
{
    public class CustomUser : IdentityUser
    {
        [PersonalData]
        public string Name { get; set; }
        [PersonalData]
        public DateTime Birthday { get; set; }
    }
}
- Sửa InputModel
public class InputModel
{
    [Required]
    [DataType(DataType.Text)]
    [Display(Name = "Full name")]
    public string Name { get; set; }

    [Required]
    [Display(Name = "Birth Day")]
    [DataType(DataType.Date)]
    public DateTime Birthday { get; set; }

    [Required]
    [EmailAddress]
    public string Email { get; set; }
    ...
}
3- Update các hàm có sử dụng InputModel Các bạn cần tìm các hàm có sử dụng InputModel để bổ sung các trường mới cho nó, ví dụ như hàm:
- OnGetAsync
Input = new InputModel
{
    Name = user.Name,
    Birthday = user.Birthday,
    Email = email,
    PhoneNumber = phoneNumber
};
- OnPostAsync
if (Input.Name != user.Name)
{
    user.Name = Input.Name;
}

if (Input.Birthday != user.Birthday)
{
    user.Birthday = Input.Birthday;
}
- Sửa view /Account/Manage/Index.cshtml
<div class="form-group">
    <div class="form-group">
        <label asp-for="Input.Name"></label>
        <input asp-for="Input.Name" class="form-control" />
    </div>
    <div class="form-group">
        <label asp-for="Input.Birthday"></label>
        <input asp-for="Input.Birthday" class="form-control" />
    </div>
    <label asp-for="Input.PhoneNumber"></label>
    <input asp-for="Input.PhoneNumber" class="form-control" />
    <span asp-validation-for="Input.PhoneNumber" class="text-danger"></span>
</div>
Mọi thứ đã xong, bây giờ các bạn có thể kiểm tra kết quả bởi các lệnh sau:
dotnet build
dotnet run
5. Kết
ASP.NET Core Identy hộ trợ rất đầy đủ và mạnh mẽ cho việc authentication của ứng dụng. Trong bài viết này, tôi chỉ mong muốn giới thiệu sơ lược cũng như cách tùy biến user model sẵn có của nó. Nếu với ứng dụng các bạn không có những yêu cầu quá đặc biệt cho quá trình Authenticate, thì rõ ràng Identy hoàn toàn có thể đáp ứng bài toán của bạn. Ở mức độ cao hơn, các bạn có thể tích hợp đăng nhập cùng Facebook, Google, Twitter,..và tích hợp QR code.
Link bài viết gốc:
All rights reserved