RxSwift and MVVM
Bài đăng này đã không được cập nhật trong 2 năm
 Hello everybody! Today we will learn how to use RxSwift with MVVM.
The connection of Model and ViewController looks like hack, when we're using the MVC pattern.
 MVC is also OK, but you'll see that MVVM is much better then MVC for iOS development.
Usually we use something like a function
MVC is also OK, but you'll see that MVVM is much better then MVC for iOS development.
Usually we use something like a function updateUI()/tableView.reloadData() in a controller somewhere in the setter, when your program things, that Model have changed. If you need to connect many Controllers to one model, you can use Notifications, but Controllers have to has been run before. Of course you can send current model state when create Controllers , but this all things can appear many problems with rewriting code, replace models or objects, etc
Model-View-ViewModel
MVVM facilitates a separation of development of the graphical user interface – be it via a markup language or GUI code – from development of the business logic or back-end logic (the data model). The view model of MVVM is a value converter; meaning the view model is responsible for exposing (converting) the data objects from the model in such a way that objects are easily managed and presented. In this respect, the view model is more model than view, and handles most if not all of the view's display logic. The view model may implement a mediator pattern, organizing access to the back-end logic around the set of use cases supported by the view.
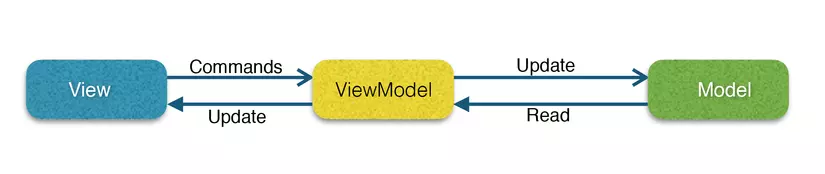
That how looks MVVM patern. There are all busines logic implemented into Model and ViewModel for connect to View. Model for data, and View for UI. MVVM is better then MVC, cuz View does not know about model nothing, and it's more flexible for programming.

How we're gonna use FRP in MVVM pattern. We will replace standart connection ViewModel and View with binding. That's mean that View will know every changes of ViewModel state.
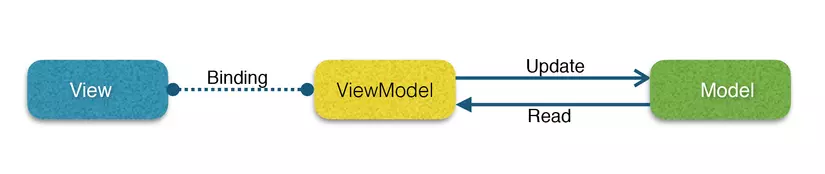 It's looks like on picture above. And that will help to us, that ViewModel does not know about View, and we can esaly change it or add many Views to one ViewModel.
Implementation
Lets practice. We'll implemente login using FirebaseAuth with RxSwift & MVVM.
Firstuful add pods:
pod 'Firebase/Core'
pod 'Firebase/Auth'
pod 'RxSwift'
pod 'RxCocoa'
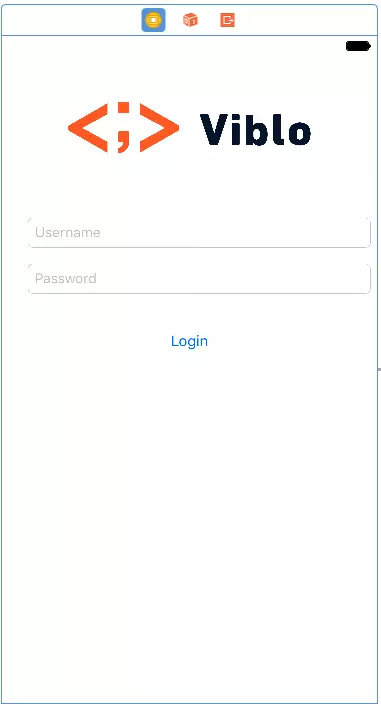
Create simple ViewController in Main.storyboard with Username TextFields, Password TextFields and Login Button.
Connect IBOutlets with ViewController(View):
@IBOutlet private weak var usernameTextField: UITextField!
@IBOutlet private weak var passwordTextField: UITextField!
@IBOutlet private weak var loginButton: UIButton!
Now we need create Obsevables from IBOutlets by using RxCocoa. It helps to get from any cocoa object Obsevable:
private var usernameObservable: Observable<String> {
    return usernameTextField.rx.text.throttle(0.5, scheduler : MainScheduler.instance).map(){ text in
        return text ?? ""
    }
}
private var passwordObservable: Observable<String> {
    return passwordTextField.rx.text.throttle(0.5, scheduler : MainScheduler.instance).map(){ text in
        return text ?? ""
    }
}
private var loginButtonObservable: Observable<Void> {
    return self.loginButton.rx.tap.asObservable()
}
usernameObservable and passwordObservable observable for any text changes.
loginButtonObservable observable for button taps
.rx - help to make your cocoa object more "reactive"
Now, we have to create LoginViewModel(ViewModel):
class LoginViewModel {
    let validatedEmail: Observable<Bool>
    let validatedPassword: Observable<Bool>
    let loginEnabled: Observable<Bool>
    let loginObservable: Observable<(FIRUser?, Error?)>

    // There are input Observables from TextFields and Button that will be init from View
    init(input: (username: Observable<String>,
        password: Observable<String>,
        loginTap: Observable<Void>)) {

        // Observables which will help to validate data from TextFields
        self.validatedEmail = input.username
            .map { $0.characters.count >= 5 }
            .shareReplay(1)

        self.validatedPassword = input.password
            .map { $0.characters.count >= 4 }
            .shareReplay(1)

        // Check that's validatedEmail and validatedPassword return true
        self.loginEnabled = Observable.combineLatest(validatedEmail, validatedPassword ) { $0 && $1 }

        // Just combine two latest value of username and password
        let userAndPassword = Observable.combineLatest(input.username, input.password) {($0,$1)}

        self.loginObservable = input.loginTap.withLatestFrom(userAndPassword).flatMapLatest{ (username, password) in
            // Call login method when button is tapped, with latest username and password
            return LoginViewModel.login(username: username, password: password).observeOn(MainScheduler.instance)
        }
    }

    private class func login(username: String?, password: String?) -> Observable<(FIRUser?, Error?)> {
        return  Observable.create { observer in
            if let username = username, let password = password {
                // FirebaseAuth method
                FIRAuth.auth()?.signIn(withEmail: username, password: password) { user, error in
                    observer.onNext((user, error))
                }
            } else {
                let error = AError.General("General error message")
                observer.onNext((nil, error))
            }
            return Disposables.create()
        }
    }
}
I won't create Model, cuz its already exist, our model is FirebaseAuth Lib, and it's esay to use.
Go back to our ViewController, and add next lines for setup ViewModel and observer:
private func setupModelView() {
    self.viewModel = LoginViewModel(input: (username: self.usernameObservable,
        password: self.passwordObservable,
        loginTap: self.loginButtonObservable))
}

override func viewDidLoad() {
    super.viewDidLoad()
    setupModelView()

    // set that this View will listen events from ViewModel
    self.viewModel.loginObservable.bindNext{ user, error in
        // TODO: - add logic for login
    }.addDisposableTo(disposeBag)

    // Set login button validation, if data is unvalid button is not available
    self.viewModel.loginEnabled.bindNext{ valid  in
        self.loginButton.isEnabled = valid
        self.loginButton.alpha = valid ? 1 : 0.5
    }.addDisposableTo(disposeBag)
}
Congratulations! You created "Reactive" login in app!

You can download this project here. Good luck! Be reactive!
All rights reserved
