Sử dụng Oauth2
Bài đăng này đã không được cập nhật trong 8 năm
Để cho nhanh chóng, các bạn muốn biết Oauth2 để làm cái gì thì mời các bạn đọc bài Introduction to Oauth2 của anh Tùng D. Bài này mình sẽ giới thiệu cách sử dụng 1 package Oauth2 trong Laravel.
Giới thiệu package
Ở đây mình muốn giới thiệu package oauth2 server laravel mà mình đã dùng qua. Nó hỗ trợ hết các loại grant:
- Authorization code grant
- Client credentials grant
- Resource owner password credentials grant
- Refresh grant
- Ngoài ra còn có thể sử dụng grant tự định nghĩa của người dùng.
Cài đặt
Laravel 4
- Thêm dòng sau vào file
composer.json
"lucadegasperi/oauth2-server-laravel": "^3.0"
-
Chạy
composer update -
Thêm vào
providerstrong fileapp/config/app.phpdòng sau
'LucaDegasperi\OAuth2Server\Storage\FluentStorageServiceProvider',
'LucaDegasperi\OAuth2Server\OAuth2ServerServiceProvider',
- Thêm
aliases
'Authorizer' => 'LucaDegasperi\OAuth2Server\Facades\AuthorizerFacade',
- Để tùy chỉnh package, chạy lệnh sau:
php artisan config:publish lucadegasperi/oauth2-server-laravel
sau đó vào app/config/packages/lucadegasperi/oauth2-server-laravel/oauth2.php để cấu hình theo ý muốn.
- Thêm migration:
php artisan oauth2-server:migrations
- Tạo Controller:
php artisan oauth2-server:controller
Laravel 5
Tuơng tự với laravel 4, ta có:
- Thêm dòng sau vào file
composer.json
"lucadegasperi/oauth2-server-laravel": "5.0.*"
-
Chạy
composer update -
Thêm vào
providerstrong fileconfig/app.phpdòng sau
LucaDegasperi\OAuth2Server\Storage\FluentStorageServiceProvider::class,
LucaDegasperi\OAuth2Server\OAuth2ServerServiceProvider::class,
- Thêm
aliases
'Authorizer' => LucaDegasperi\OAuth2Server\Facades\Authorizer::class,
- Thêm vào
$middlewaretrong fileapp/Http/Kernel.php
\LucaDegasperi\OAuth2Server\Middleware\OAuthExceptionHandlerMiddleware::class,
- Sau đó thêm vào
$routeMiddleware
'oauth' => \LucaDegasperi\OAuth2Server\Middleware\OAuthMiddleware::class,
'oauth-user' => \LucaDegasperi\OAuth2Server\Middleware\OAuthUserOwnerMiddleware::class,
'oauth-client' => \LucaDegasperi\OAuth2Server\Middleware\OAuthClientOwnerMiddleware::class,
'check-authorization-params' => \LucaDegasperi\OAuth2Server\Middleware\CheckAuthCodeRequestMiddleware::class,
- Để tùy chỉnh package, chạy lệnh sau:
php artisan vendor:publish
sau đó vào config/oauth2.php để cấu hình theo ý muốn.
- Thêm migration:
php artisan migrate
Sử dụng
Để hiểu cách dùng, ta giả sử có 1 ứng dụng client muốn sử dụng 1 tài nguyên nào đó của 1 server chẳng hạn.
Server
- Cấu hình lại oauth, giả sử ta dùng laravel 4, và dùng
authorization code grantkết hợp vớirefresh token, chúng ta vàoapp/config/packages/lucadegasperi/oauth2-server-laravel/oauth2.phpvà cài đặt grant type như sau:
    'grant_types' => [
        'authorization_code' => [
            'class' => '\League\OAuth2\Server\Grant\AuthCodeGrant',
            'access_token_ttl' => 3600,
            'auth_code_ttl'   => 3600
        ],
        'refresh_token' => [
            'class' => '\League\OAuth2\Server\Grant\RefreshTokenGrant',
            'access_token_ttl' => 3600,
            'refresh_token_ttl' => 36000
        ]
    ],
Giải thích lại 1 chút, khi chúng ta dùng như trên, thì cách hoạt động của ứng dụng sẽ như thế này: client sẽ gửi yêu cầu tới server, sau đó server trả lại 1 mã, gọi là authorization code, sau đó, client sẽ dùng mã này gửi lại tới server và server sẽ trả về access token. Và client sẽ dùng access token để sử dụng tài nguyên server cho phép.
Nhưng mà cái access token này cũng có hạn sử dụng, hết hạn thì hết dùng, nếu mà làm lại các bước trên cũng mệt, thế nên ta có refresh token được gửi kèm access token đầu tiên. Khi access token này hết hạn thì sẽ dùng refresh token đi kèm để được lấy 1 access token mới và kèm theo là 1 refresh token mới, và cái refresh token cũng có thời hạn, nếu hết hạn cả 2 cái thì mời bạn làm lại từ đầu 
Trước hết là tạo dữ liệu cho client trên server này để mà còn sử dụng chứ. Khi bạn tạo migration thì sẽ có khá nhiều bảng được tạo ra như thế này:
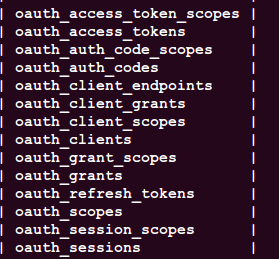
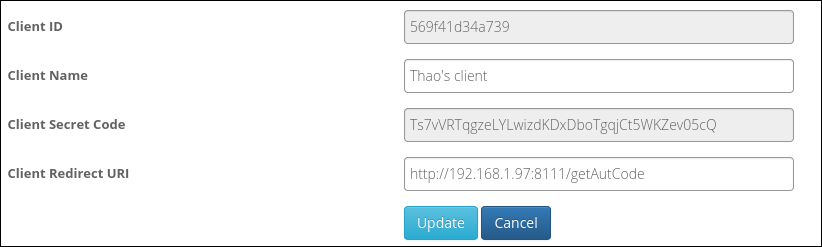
Các bạn desc 2 bảng oauth_client_endpoints và oauth_clients là biết ngay cần phải thêm những dữ liệu nào, ở đây mình có viết sẵn 1 khung nhập dữ liệu client cho đỡ mỏi tay:
Giả sử ta có 1 controller OAuthController như thế này:
use Illuminate\Routing\Controller;
use LucaDegasperi\OAuth2Server\Authorizer;

class OAuthController extends BaseController
{
    protected $authorizer;

    public function __construct(Authorizer $authorizer)
    {
        parent::__construct();

        $this->authorizer = $authorizer;

        $this->beforeFilter('auth', ['only' => ['postAuthorize']]);
        $this->beforeFilter('csrf', ['only' => ['postAuthorize']]);
        $this->beforeFilter('check-authorization-params', ['only' => ['getAuthorize', 'postAuthorize']]);
    }

    public function postAccessToken()
    {
        return Response::json($this->authorizer->issueAccessToken());
    }

    public function getAuthorize()
    {
        if (!Auth::check()) {
            $input = Input::all();
            return View::make('oauth.authorization_login_form', $input);
        }

        $authParams = $this->authorizer->getAuthCodeRequestParams();
        $formParams = array_except($authParams, 'client');
        $formParams['client_id'] = $authParams['client']->getId();

        $dataParams = [
            'params' => $formParams,
            'client' => $authParams['client'],
            'currentUser' => $this->currentUser,
        ];

        return View::make('oauth.authorization-form', $dataParams);
    }

    public function postAuthorize()
    {
        $params['user_id'] = Auth::user()->id;
        $redirectUri = '';

        if (!is_null(Input::get('approve'))) {
            $redirectUri = $this->authorizer->issueAuthCode('user', $params['user_id'], $params);
        }

        if (!is_null(Input::get('deny'))) {
            $redirectUri = $this->authorizer->authCodeRequestDeniedRedirectUri();
        }

        return Redirect::to($redirectUri);
    }
}
và có routes như thế này:
Route::post('oauth/access_token', 'OAuthController@postAccessToken');
Route::get('oauth/authorize', ['uses' => 'OAuthController@getAuthorize', 'as' => 'oauth.authorize.get']);
Route::post('oauth/authorize', ['uses' => 'OAuthController@postAuthorize', 'as' => 'oauth.authorize.post']);
Gõ đường dẫn sau lên trình duyệt:
http://192.168.1.97/oauth/authorize?redirect_uri=http://192.168.1.97:8111/getAutCode&response_type=code&client_id=569f41d34a739
Ta có:
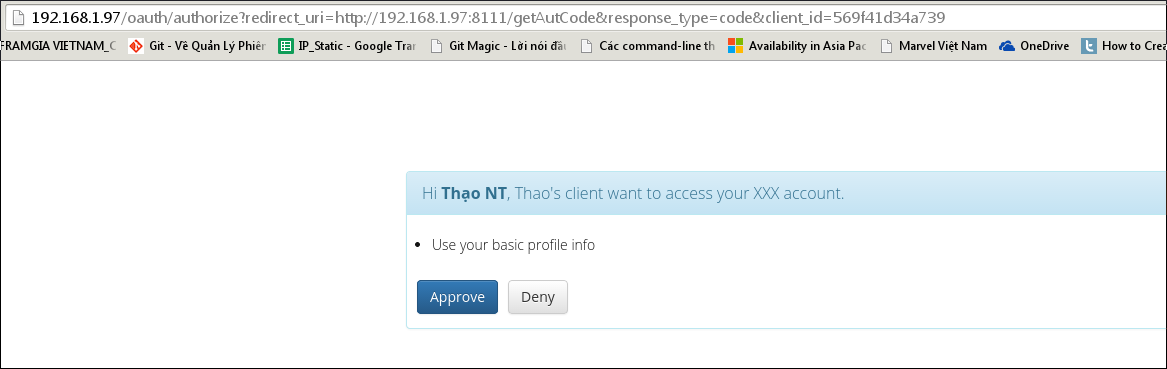
Tức là thế này, cái đường dẫn trên gọi route tới getAuthorize() dùng để yêu cầu server trả lại code cho client, với điều kiện là phải có sự đồng ý của người dùng. Form view của trang này là:
    {{ Form::open(['method' => 'POST', 'class' => 'form-horizontal', 'url' => route('oauth.authorize.post', $params)]) }}
        <div class="form-group">
            <ul>
                <li>Use your basic info</li>
            </ul>
        </div>
        {{ Form::hidden('client_id', $params['client_id']) }}
        {{ Form::hidden('redirect_uri', $params['redirect_uri']) }}
        {{ Form::hidden('response_type', $params['response_type']) }}
        {{ Form::hidden('state', $params['state']) }}
        {{ Form::submit('Approve', ['name' => 'approve', 'value' => 1, 'class' => 'btn btn-primary']) }}
        {{ Form::submit('Deny', ['name' => 'deny', 'value' => 1, 'class' => 'btn btn-default']) }}
    {{ Form::close() }}
Nếu mà người dùng chưa đăng nhập thì sẽ dẫn tới trang yêu cầu đăng nhập, sau khi đăng nhập thành công thì lại dẫn về trang này (các bạn tự làm nhé).
Đoạn này hơi lằng nhằng tý, sau khi người dùng đồng ý, postAuthorize() sẽ đưa chúng ta tới redirectUri của client, tại đây, client làm khá nhiều việc, đó là lấy mã code, gửi mã code rồi nhận về access token, sau đó thì dùng access token để làm gì thì tùy các bạn.
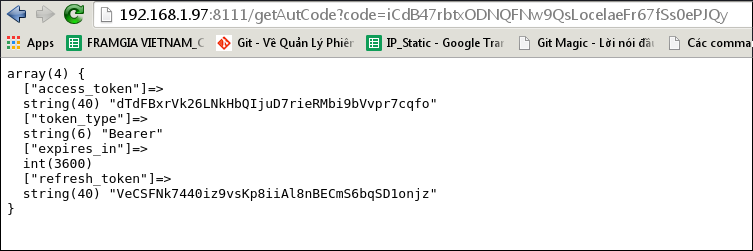
Đấy, chúng ta đã có access token và refresh token và công việc tiếp theo chỉ là dùng nó như thế nào thôi.

Client
Đây là đoạn code ở client, làm các công việc đã nêu ở trên, viết luôn ngay tại routes 
Route::get('getAutCode', function() {
    $input = Input::all();
    $code = isset($input['code']) ? $input['code'] : '';
    if (!empty($code)) {
        $url = 'http://192.168.1.97/oauth/access_token';//server
        $data = [
            'grant_type' => 'authorization_code',
            'client_id' => '569f41d34a739',
            'client_secret' => 'Ts7vVRTqgzeLYLwizdKDxDboTgqjCt5WKZev05cQ',
            'redirect_uri' => 'http://192.168.1.97:8111/getAutCode',
            'code' => $code,
        ];
        $a = post_to_url($url, $data);
        echo "<pre>";
        var_dump(json_decode($a, true));
    } else {
        $error = [
            'error' => $input['error'],
            'error_description' => $input['error_description'],
        ];
        var_dump($error);
    }
});
//function post_to_url()
function post_to_url($url, $data) {
    $fields = '';
    foreach ($data as $key => $value) {
        $fields .= $key . '=' . urlencode($value) . '&';
    }
    rtrim($fields, '&');

    $post = curl_init();

    curl_setopt($post, CURLOPT_URL, $url);
    curl_setopt($post, CURLOPT_POST, count($data));
    curl_setopt($post, CURLOPT_POSTFIELDS, $fields);
    curl_setopt($post, CURLOPT_RETURNTRANSFER, 1);

    $result = curl_exec($post);

    curl_close($post);
    return $result;
}
Kết luận
- Các kiểu grant khác tuơng tự, các bạn có thể làm tuơng tự như thế này, tùy vào mục đích của mình.
- Oauth2 được sử dụng rộng rãi và phổ biến, nên hiểu thêm về flow của nó cũng khá là hay và bổ ích.
All rights reserved
