「Spring Boot #10」 @RequestMapping + @PostMapping + @ModelAttribute + @RequestParam + Web To-Do với Thymeleaf
Bài đăng này đã không được cập nhật trong 4 năm
Nguồn: loda.me
Giới thiệu
Trong bài hôm nay chúng ta sẽ tìm hiểu cách handle request POST của Spring Boot.
Trước đó, bạn nên biết
- 「Spring Boot #8」Tạo Web Helloworld với @Controller
- 「Spring Boot #9」Giải thích cách Thymeleaf vận hành + Expression + Demo Full
@PostMapping
@PostMapping có nhiệm vụ đánh dấu hàm xử lý POST request trong Controller.
Khái niệm về GET và POST hi vọng các bạn đã biết rồi và tôi sẽ không đề cập thêm trong bài này. Còn nếu chưa biết bạn có thể tham khảo tại wiki: Hypertext Transfer Protocol
Ví dụ:
Tôi có 2 hàm xử lý, một cho GET method và một cho POST.
Cả hai đều chung đường dẫn nhưng bạn nên biết rằng cùng một path nhưng khác method thì sẽ xử lý khác nhau.
@Controller
public class WebController {
    @GetMapping("/addTodo")
    public String addTodo(Model model) {
        return "addTodo";
    }

    @PostMapping("/addTodo")
    public String addTodo(Model model) {
        return "success";
    }
}
Từ đây bạn có thể suy ra cách handle cho các method khác như PUT, DELETE, v.v..
@PutMapping@DeleteMapping
@RequestMapping
Trong trường hợp bạn muốn tất cả các method đều dùng chung một cách xử lý thì có thể sử dụng Annotation @RequestMapping.
@RequestMapping là một annotation có ý nghĩa và mục đích sử dụng rộng hơn các loại @GetMapping, @PostMapping,v.v..
ví dụ:
@Controller
@RequestMapping("api/v1")
public class WebController {

    // Đường dẫn lúc này là: /api/v1/addTodo và method GET
    @RequestMapping(value = "/addTodo", method = RequestMethod.GET)
    public String addTodo(Model model) {
        return "addTodo";
    }

    // Đường dẫn lúc này là: /api/v1/addTodo và method POST
    @RequestMapping(value = "/addTodo", method = RequestMethod.POST)
    public String addTodo(@ModelAttribute Todo todo) {
        return "success";
    }
}
Nếu không chỉ định method cho @RequestMapping thì nó sẽ nhận toàn bộ các method.
Website To-do
Vẫn còn một vài kiến thức tôi cần giới thiệu với các bạn.
Tuy nhiên tôi sẽ sử dụng ví dụ để giúp bạn hiểu nó nhanh hơn.
Chúng ta sẽ làm một WebApp quản lý công việc và từ đó tìm hiểu cách gửi dữ liệu lên Server thông qua 2 method GET và POST.
Cài đặt
pom.xml
<?xml version="1.0" encoding="UTF-8"?>
<project xmlns="http://maven.apache.org/POM/4.0.0" xmlns:xsi="http://www.w3.org/2001/XMLSchema-instance"
         xsi:schemaLocation="http://maven.apache.org/POM/4.0.0 http://maven.apache.org/xsd/maven-4.0.0.xsd">
    <modelVersion>4.0.0</modelVersion>
    <packaging>pom</packaging>
    <parent>
        <groupId>org.springframework.boot</groupId>
        <artifactId>spring-boot-starter-parent</artifactId>
        <version>2.0.5.RELEASE</version>
        <relativePath /> <!-- lookup parent from repository -->
    </parent>
    <groupId>me.loda.spring</groupId>
    <artifactId>spring-boot-learning</artifactId>
    <version>0.0.1-SNAPSHOT</version>
    <name>spring-boot-learning</name>
    <description>Everything about Spring Boot</description>

    <properties>
        <java.version>1.8</java.version>
    </properties>

    <dependencies>

        <!--spring mvc, rest-->
        <dependency>
            <groupId>org.springframework.boot</groupId>
            <artifactId>spring-boot-starter-web</artifactId>
        </dependency>

        <!-- thymeleaf -->
        <dependency>
        <groupId>org.springframework.boot</groupId>
        <artifactId>spring-boot-starter-thymeleaf</artifactId>
        </dependency>
    </dependencies>

    <build>
        <plugins>
        <plugin>
            <groupId>org.springframework.boot</groupId>
            <artifactId>spring-boot-maven-plugin</artifactId>
        </plugin>
        </plugins>
    </build>

</project>
Cấu trúc thư mục:

Tạo model
Chúng ta sẽ tạo ra một đối tượng gọi là Todo để thể hiện thông tin.
Todo.java
import lombok.Data;

@Data
public class Todo {
    public String title;
    public String detail;
}
GET /listTodo - Lấy danh sách các việc cần làm
Chúng ta sẽ dùng đường dẫn /listTodo để lấy ra danh sách việc cần làm.
Thiết kế method cho đường dẫn /listTodo là GET.
WebController.java
@Controller
public class WebController {
    // Sử dụng tạm List để chứa danh sách công việc
    // Thay cho Database.
    // Chỉ dùng cách này khi DEMO ^^
    List<Todo> todoList = new CopyOnWriteArrayList<>();

    /*
        @RequestParam dùng để đánh dấu một biến là request param trong request gửi lên server.
        Nó sẽ gán dữ liệu của param-name tương ứng vào biến
     */
    @GetMapping("/listTodo")
    public String index(Model model, @RequestParam(value = "limit", required = false) Integer limit) {
        // Trả về đối tượng todoList.
        // Nếu người dùng gửi lên param limit thì trả về sublist của todoList
        model.addAttribute("todoList", limit != null ? todoList.subList(0, limit) : todoList);

        // Trả về template "listTodo.html"
        return "listTodo";
    }
}
Khi tôi request lên server như này http://localhost:8080/listTodo?limit=2.
Thì cái đoạn ?limit=2 là Request Param.
Spring Boot sẽ tự xử lý và gán số 2 vào biến Integer limit hộ chúng ta.
Nếu chúng ta không gửi gì lên, thì limit sẽ là null.
listTodo.html
<!DOCTYPE html>
<html xmlns:th="http://www.thymeleaf.org">
<head>
<meta charset="UTF-8" />
<title>Loda To-do</title>
<meta http-equiv="Content-Type" content="text/html; charset=UTF-8" />
<!--css-->
<link th:href="@{/css/bootstrap.css}" rel="stylesheet" />
<link th:href="@{/css/main.css}" rel="stylesheet" />
<!--js-->
<script th:src="@{/js/bootstrap.js}"></script>
</head>
<body>
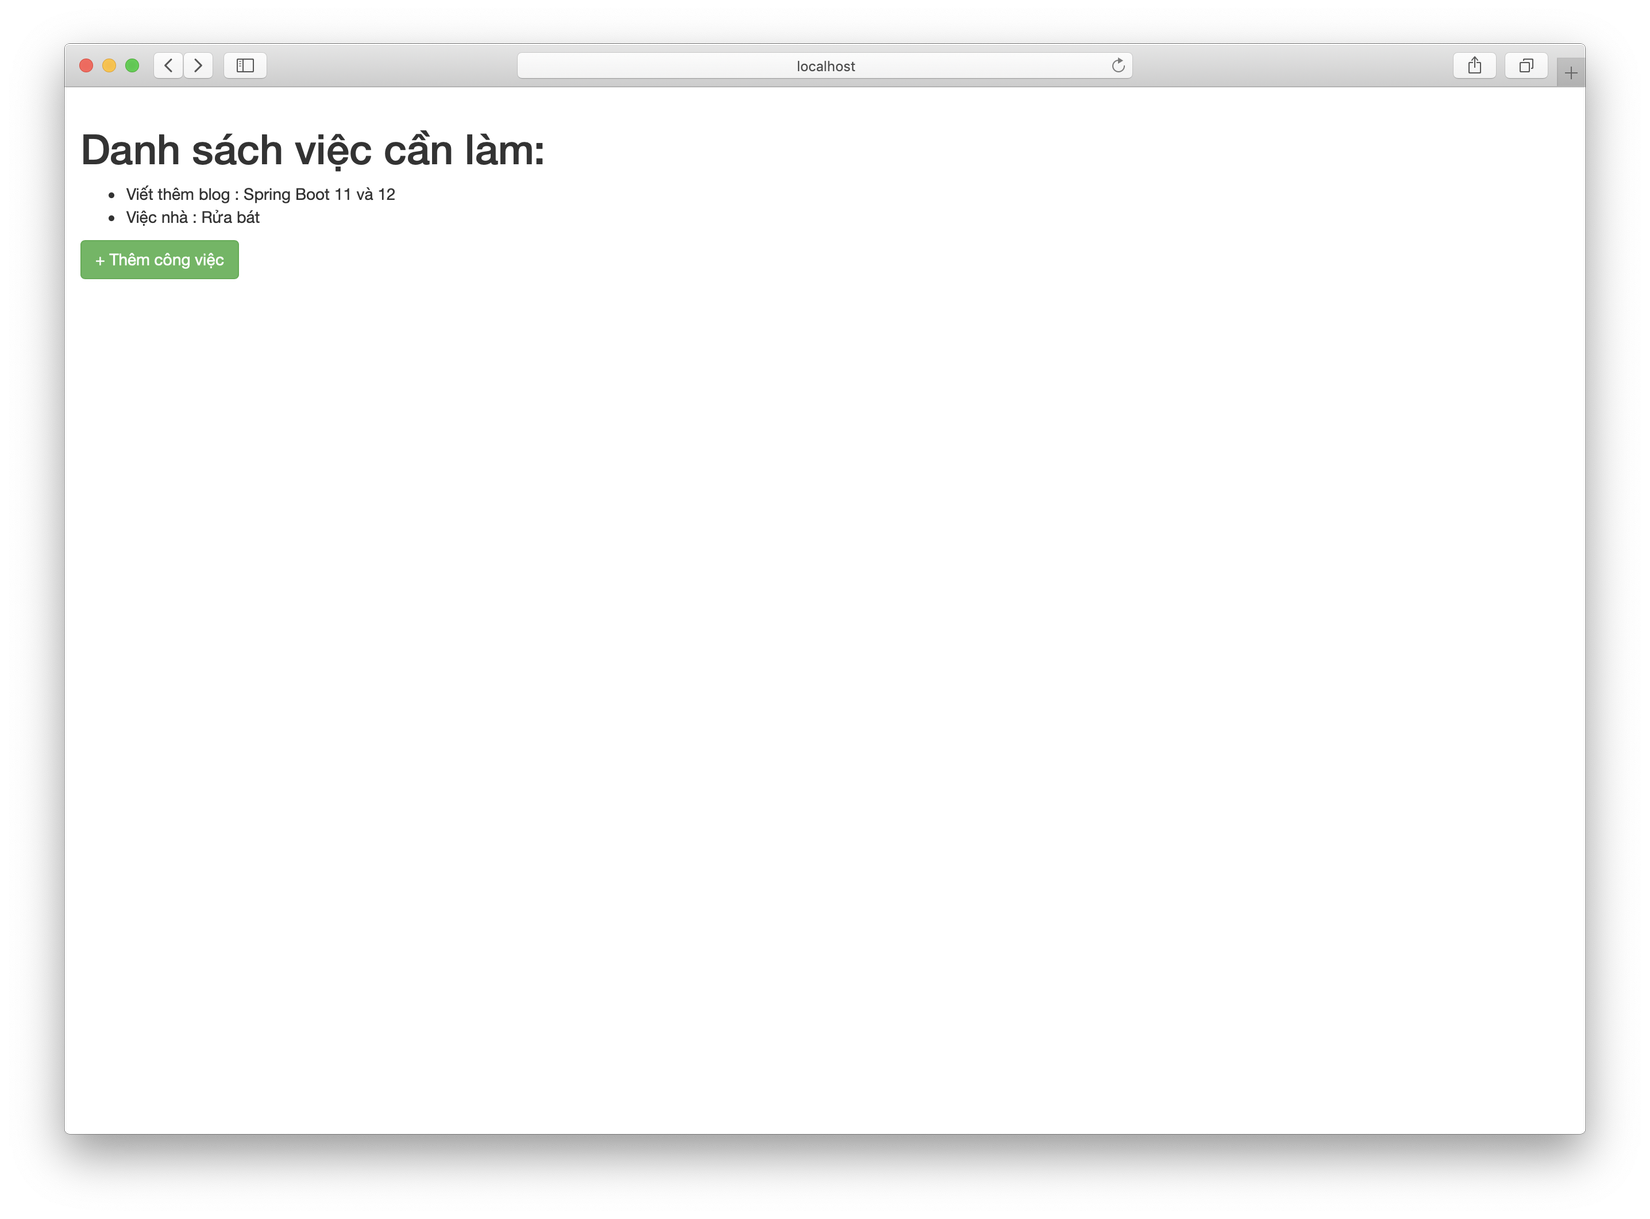
<h1>Danh sách việc cần làm:</h1>
<ul>
<!--Duyệt qua toàn bộ phần tử trong biến "todoList"-->
<li th:each="todo : ${todoList}">
<!--Với mỗi phần tử, lấy ra title và detail-->
<span th:text="*{todo.getTitle()}"></span> : <span th:text="*{todo.getDetail()}"></span>
</li>
</ul>
<a th:href="@{/addTodo}" class="btn btn-success"> + Thêm công việc</a>
</body>
</html>
GET /addTodo - Trang thêm công việc
GET /addTodo sẽ trả về webpage cho ngừoi dùng nhập thông tin công việc và thêm vào danh sách việc cần làm.
WebController.java
@GetMapping("/addTodo")
public String addTodo(Model model) {
    // Thêm mới một đối tượng Todo vào model
    model.addAttribute("todo", new Todo());
    // Trả về template addTodo.html
    return "addTodo";
}
addTodo.html
<!DOCTYPE html>
<html xmlns:th="http://www.thymeleaf.org">
<head>
<meta charset="UTF-8" />
<title>Loda To-do</title>
<meta http-equiv="Content-Type" content="text/html; charset=UTF-8" />
<!--css-->
<link th:href="@{/css/bootstrap.css}" rel="stylesheet" />
<link th:href="@{/css/main.css}" rel="stylesheet" />
<!--js-->
<script th:src="@{/js/bootstrap.js}"></script>
</head>
<body>
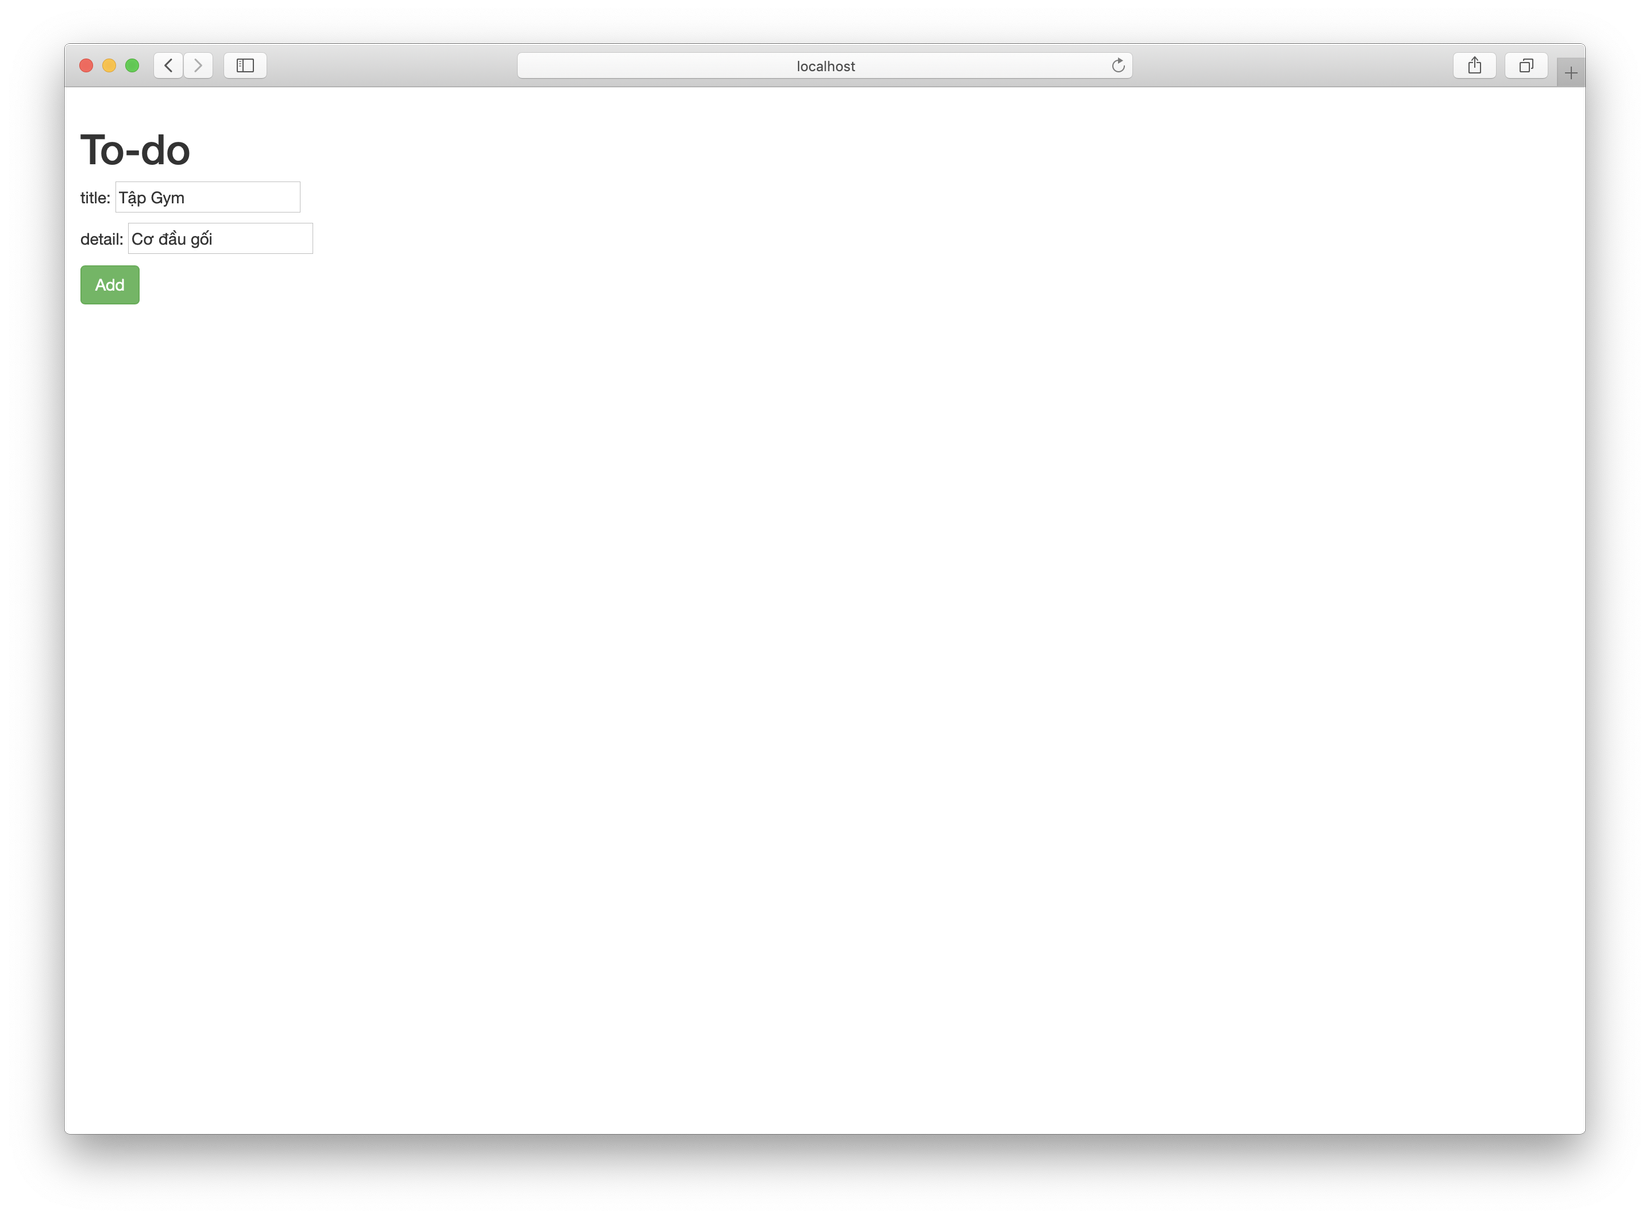
<h1>To-do</h1>
<form th:action="@{/addTodo}" th:object="${todo}" method="post">
<p>title: <input type="text" th:field="*{title}" /></p>
<p>detail: <input type="text" th:field="*{detail}" /></p>
<p><button type="submit" class="btn btn-success">Add</button></p>
</form>
</body>
</html>
<form></form> là thẻ tag mà bạn cần biết khi làm Web. Nó tạo Request Form gửi tới server với thông tin và các thẻ <input> trong nó.
Ở đây, tôi gán vào Model một đối tượng Todo.
Trong form, chúng ta lấy ra đối tượng Todo và chỉ định bởi th:object="${todo}"
Gán thông tin người dùng nhập vào Todo bằng cú pháp th:field=*{tên_thuộc_tính}.
Bấm Button thì form sẽ gửi request POST có chứa Todo lên địa chỉ /addTodo.
POST /addTodo - Thêm công việc vào list
WebController.java
    /*
    @ModelAttribute đánh dấu đối tượng Todo được gửi lên bởi Form Request
     */
@PostMapping("/addTodo")
public String addTodo(@ModelAttribute Todo todo) {
    // Thêm đối tượng todo vào list
    todoList.add(todo);
    // Trả về trang thành công success.html
    return "success";
}
success.html
<!DOCTYPE html>
<html xmlns:th="http://www.thymeleaf.org">
<head>
<meta charset="UTF-8" />
<title>Loda To-do</title>
<meta http-equiv="Content-Type" content="text/html; charset=UTF-8" />
<link th:href="@{/css/bootstrap.css}" rel="stylesheet" />
<link th:href="@{/css/main.css}" rel="stylesheet" />
</head>
<body>
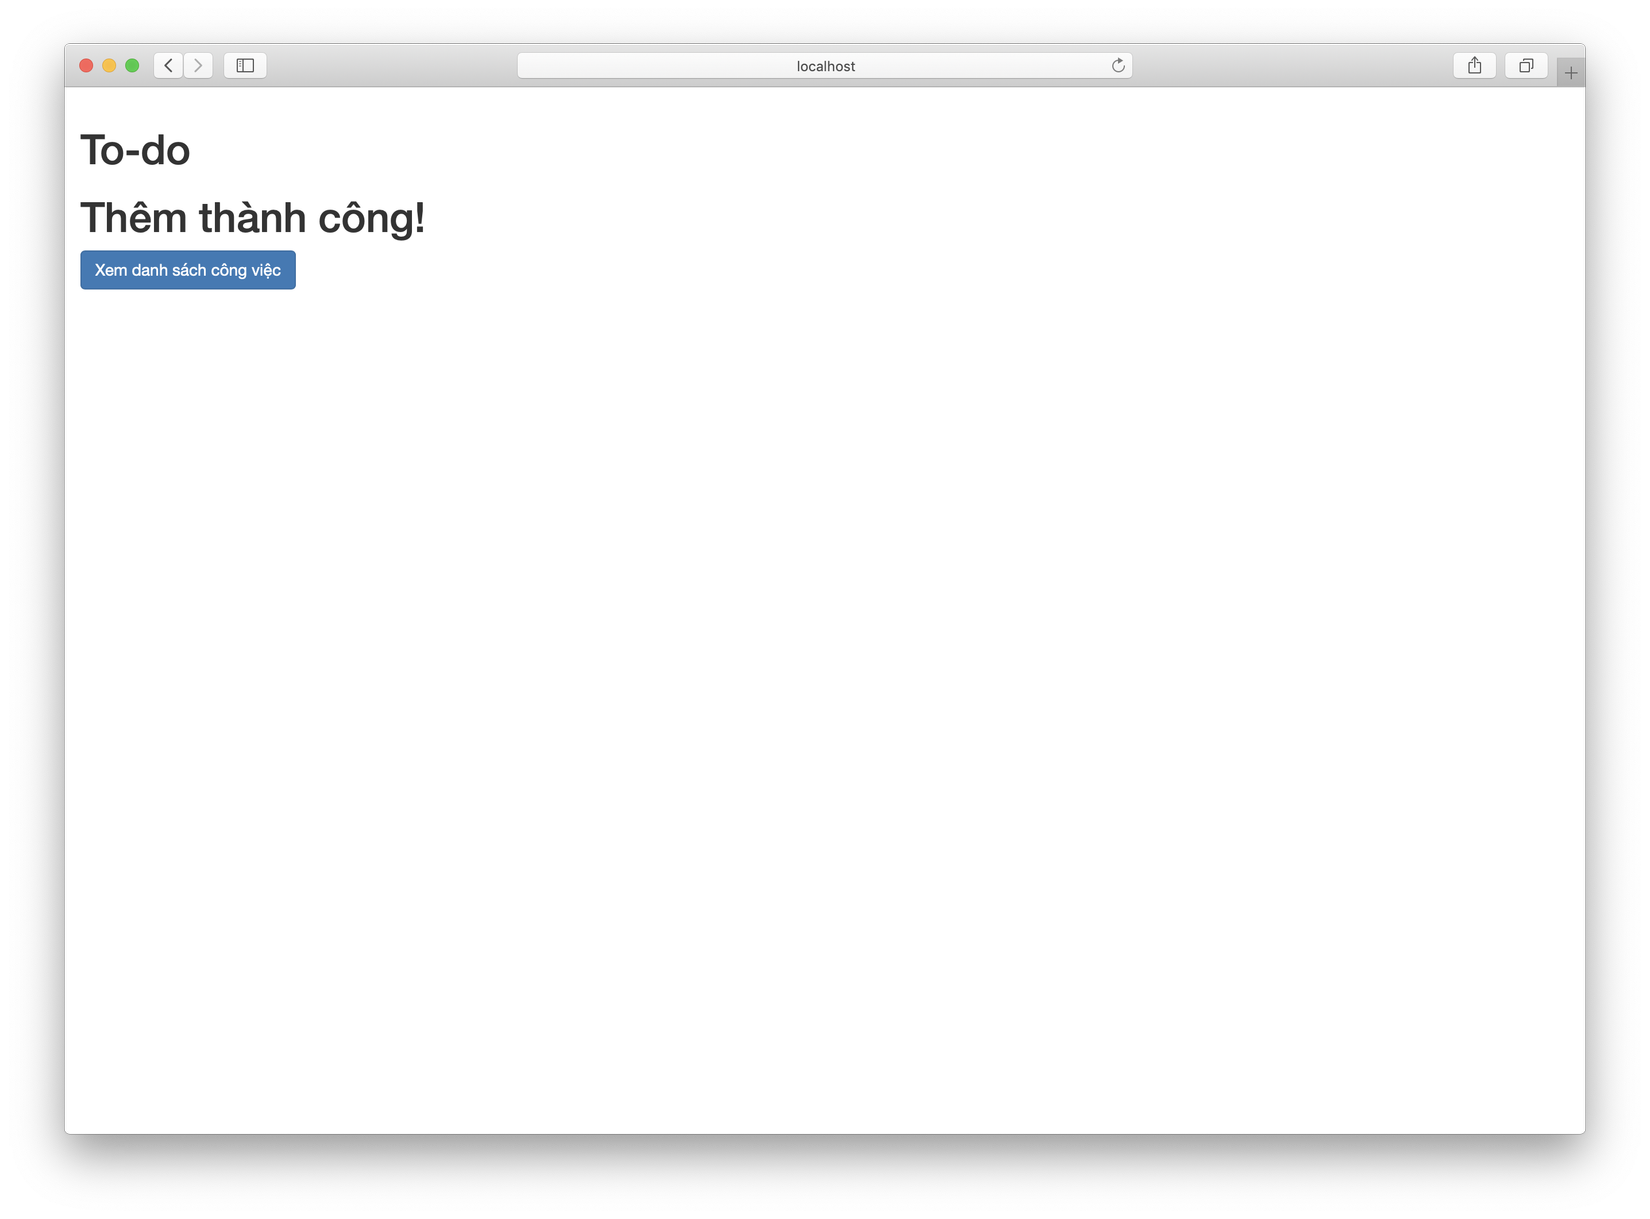
<h1>To-do</h1>
<h1>Thêm thành công!</h1>
<a th:href="@{/listTodo}" class="btn btn-primary">Xem danh sách công việc</a>
</body>
</html>
Chạy chương trình.
Sau khi hoàn thiện xong các phần trên, chúng ta sẽ bổ sung index.html và App.java để khởi động server Web
App.java
@SpringBootApplication
public class App {
    public static void main(String[] args) {
        SpringApplication.run(App.class, args);
    }
}
index.html
<!DOCTYPE html>
<html xmlns:th="http://www.thymeleaf.org">
<head>
  <meta charset="UTF-8" />
  <title>Loda To-do</title>
  <meta http-equiv="Content-Type" content="text/html; charset=UTF-8" />

  <!--css-->
  <link th:href="@{/css/bootstrap.css}" rel="stylesheet" />
  <link th:href="@{/css/main.css}" rel="stylesheet" />

  <!--js-->
  <script th:src="@{/js/bootstrap.js}"></script>
</head>
<body>
<h1>Todo App</h1>

<a th:href="@{/listTodo}" class="btn btn-primary">Xem danh sách</a>
<a th:href="@{/addTodo}" class="btn btn-success">+ Thêm công việc</a>
</body>

</html>
Khởi động ứng dụng vào truy cập vào địa chỉ: http://localhost:8080/

Nhấn vào nút Xem Danh Sách để đi tới GET /listTodo
Bấm Thêm Công Việc để đi tới trang GET /addTodo
Nhập thông tin và bấm Add để gửi thông tin tới server POST /addTodo.
Nếu thành công, server sẽ trả về thành công.
Xem lại danh sách công việc bằng cách bấm vào Xem danh sách công việc.
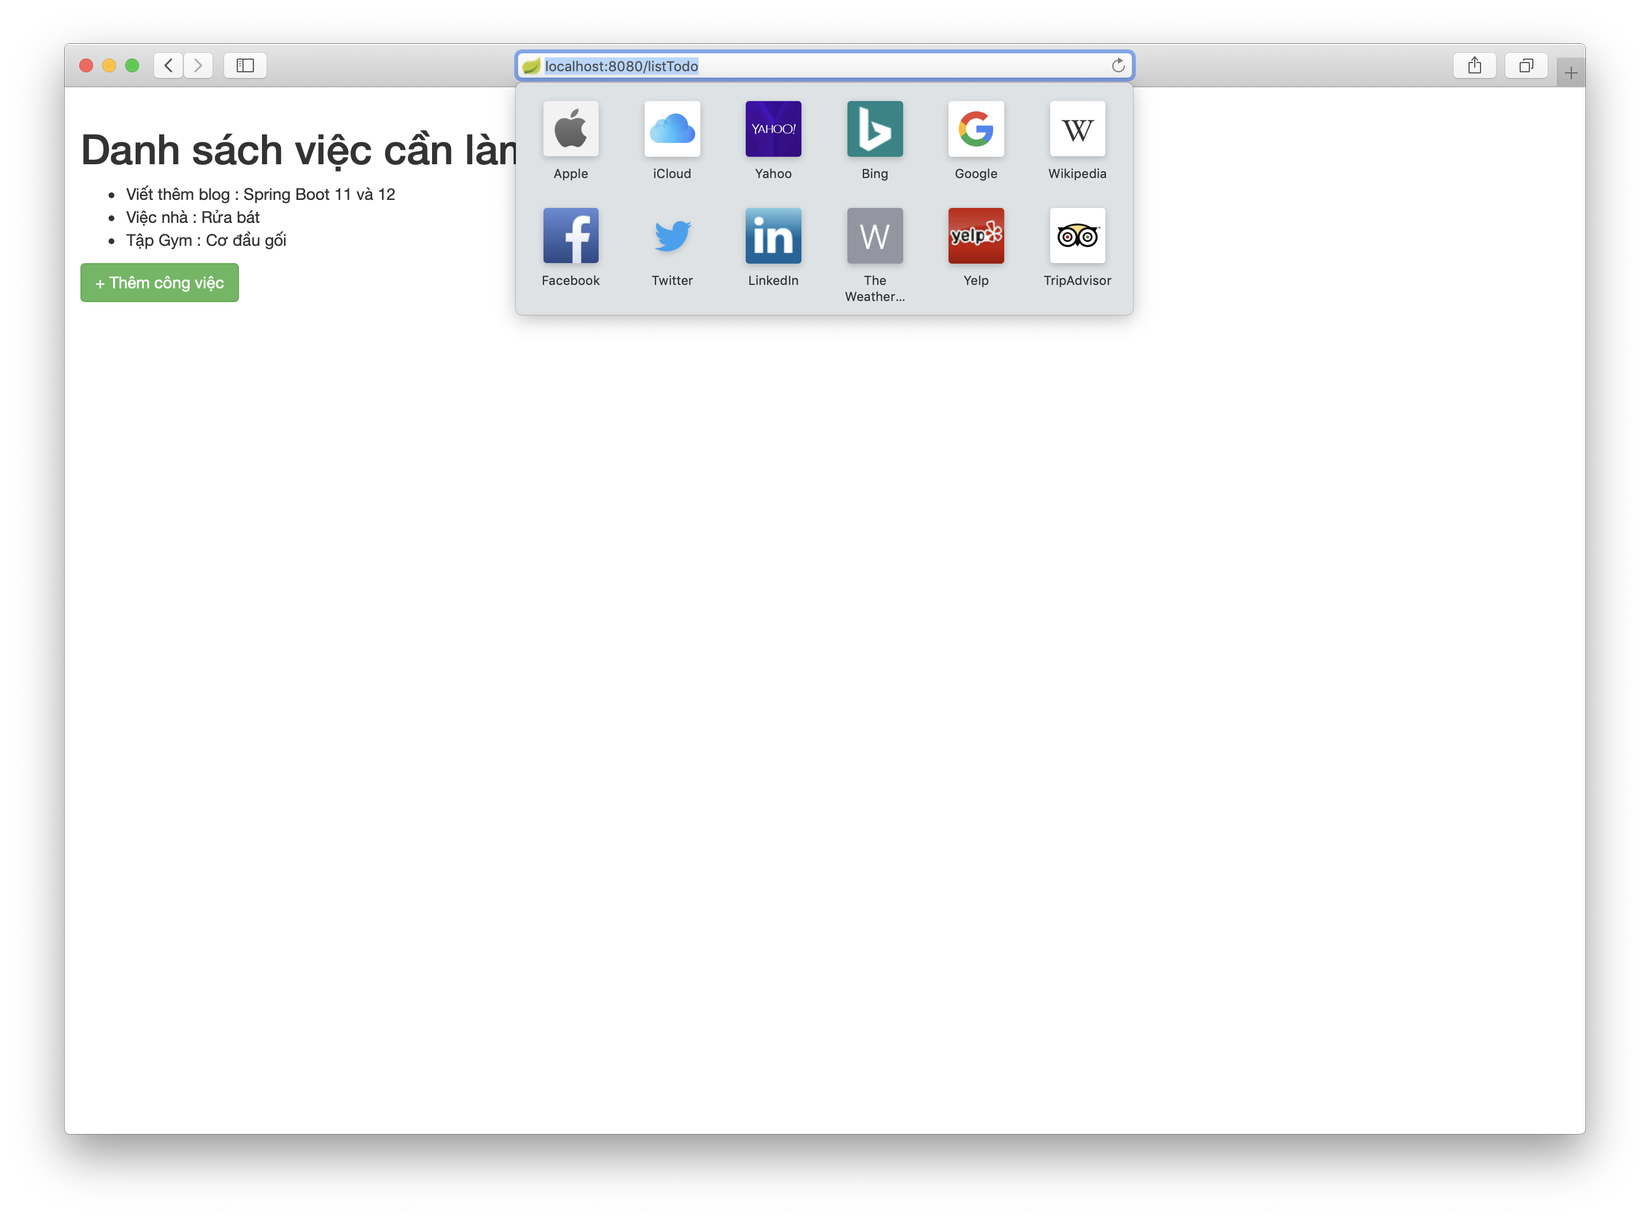
Nếu danh sách quá nhiều, chúng ta có giới hạn bằng cách truyền lên param limit.
Ví dụ tôi truyền vào là http://localhost:8080/listTodo?limit=2
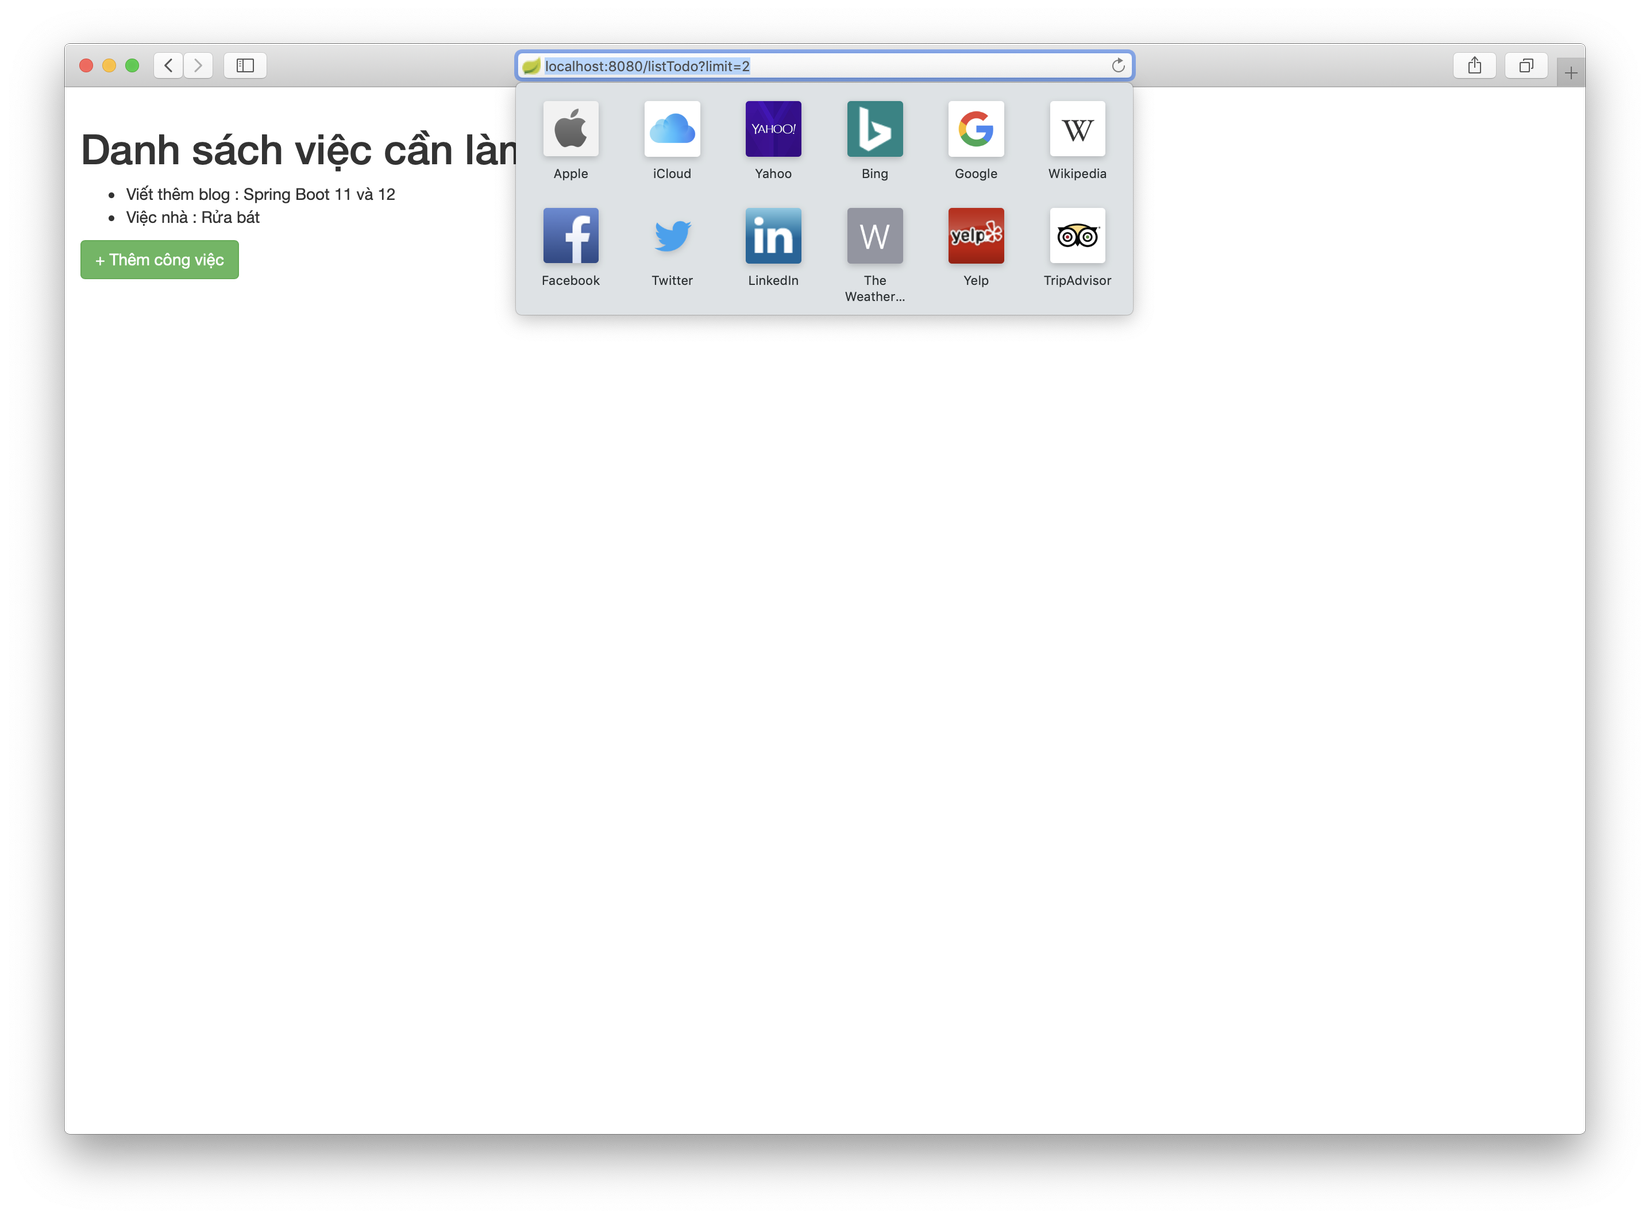
Kết quả chỉ còn 2 việc phải làm =)))
Kết
Đây là một bài viết trong [Series làm chủ Spring Boot, từ zero to hero][link-series-spring-boot] [link-series-spring-boot]: https://loda.me/spring-boot-0-series-lam-chu-spring-boot-tu-zero-to-hero-loda1558963914472
Như mọi khi, toàn bộ code tham khảo tại Github <i class="fab fa-github"></i>
All rights reserved
