Firebase - Android: Firebase Cloud Messaging
Bài đăng này đã không được cập nhật trong 3 năm
Như đã được giới thiệu ở bài Tổng quan về Firebase , mình đã giới thiệu qua về FCM rồi, phần này mình sẽ chia sẻ chi tiết hơn về FCM, mọi người cùng theo dõi nhé ! Let's go!
1. Cài đặt client ở app Android
Luồng hoạt động của FCM
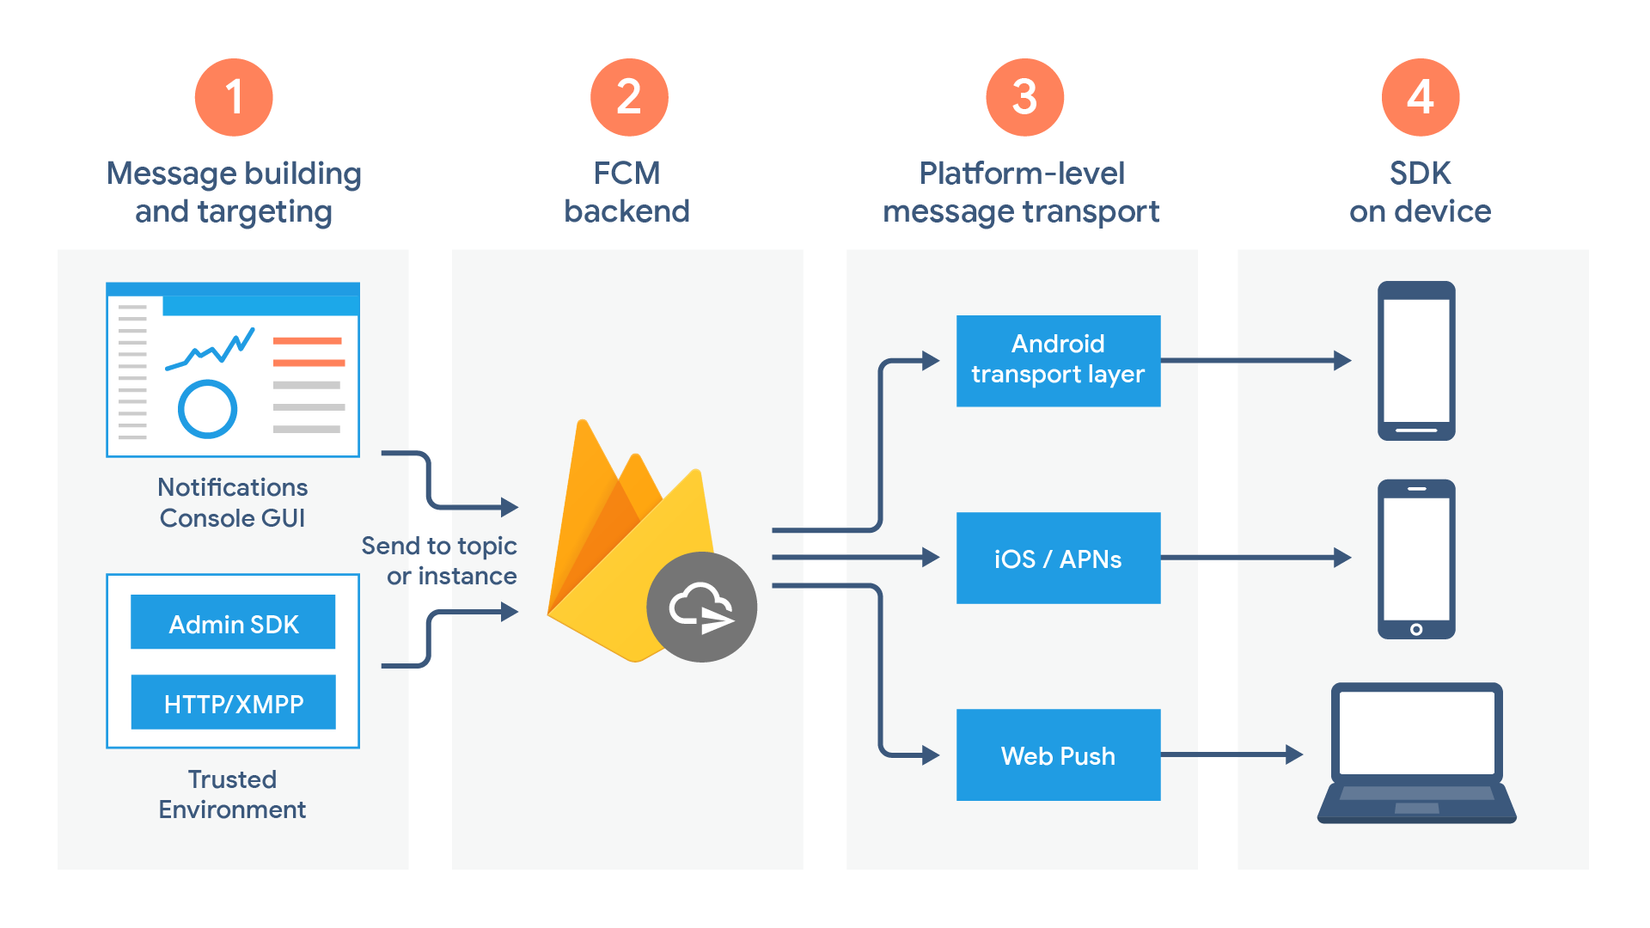
- Công cụ để tạo và yêu cầu message. Notification composer sẽ cung cấp cho mình một giao diện để mình tạo request. Bạn phải build cái message request này trên môi trường server đáng tin cậy mà hỗ trợ Firebase Admin SDK hoặc các giao thức server FCM như HTTP/XMPP. Môi trường này có thể là Cloud Functions for Firebase, Google App Engine hoặc app server của bạn.
- FCM backend, cái này có nhiệm vụ accept các request message, thực hiện tạo dữ liệu cho message như là ID, ...
- Lớp vận chuyển message ở mức nền tảng, cái này có tác dụng là xác định xem message được gửi đến những device thuộc nền tảng nào, xử lý việc gửi tin nhắn và áp dụng các cấu hình dành riêng cho từng nền tảng. Lớp này bao gồm :
- Android transport layer (ATL) cho các thiết bị Android với Google Play services
- Apple Push Notification service (APNs) cho các thiết bị iOS.
- Web push protocol cho các web app.
- The FCM SDK , đây là nơi notification được hiển thị, và các message được xử lý logic khi app ở foreground hay background.
Add Firebase SDKs
- Cài đặt Firebase vào app của bạn, nếu app chưa setup thì hãy theo dõi tại đây nhé !
- Trong file build.gradle của project, thêm Maven của Google vào cả hai khối buildscript và *allprojects *.
- Thêm dependence Cloud Messaging Android vào *app/build.gradle *:
implementation 'com.google.firebase:firebase-messaging:20.2.1'
Thêm vào file Mainifest.xml :
- Khai báo class nào mà extends từ FirebaseMessagingService. Class này có nhiệm vụ để xử lý các message, để nhận các notification ở foreground app hay data payload, gửi các upstream messages. Ví dụ như dưới đây :
        <service
                android:name=".service.MovieFirebaseMessagingService"
                android:exported="false">
            <intent-filter>
                <action android:name="com.google.firebase.MESSAGING_EVENT" />
            </intent-filter>
        </service>
- (Optional) Khai báo thẻ meta-data để set notification_icon và notification_color :
        <meta-data
                android:name="com.google.firebase.messaging.default_notification_icon"
                android:resource="@drawable/default_notification" />
        <meta-data
                android:name="com.google.firebase.messaging.default_notification_color"
                android:resource="@color/colorAccent" />
- (Optional) Từ Android 8.0 (API level 26) trở lên, thì bạn phải implement cả notification channels . FCM cung cấp notification channel mặc định với những setting cơ bản, để setting default id cho chanel thì sử dụng default_notification_channel_id :
<meta-data
    android:name="com.google.firebase.messaging.default_notification_channel_id"
    android:value="@string/default_notification_channel_id" />
Nhưng mà nếu như 2 app có cùng id thì nó sẽ gộp notification của 2 app thành 1 chanel, cho nên mình cũng cân nhắc khi sử dụng default này nhé !
Lấy token của device để đăng ký với firebase:
Khi mà app của bạn được khởi tạo lần đầu tiên, FCM SDK sẽ tạo ra một token để bạn đăng ký nó với firebase. Để làm được điều này thì bạn cần extends FirebaseMessagingService và override hàm* onNewToken()* .
Vì là cái token nó sẽ thay đổi sau lần chạy app đầu tiên, vì vậy bạn nên update token ngay sau khi có token mới. Việc đăng ký token có thể thay đổi khi :
- App xóa Instance ID .
- App được khôi phục trên một thiết bị mới.
- Người dùng gỡ cài đặt hoặc cài đặt lại app.
- Người dúng xóa app data.
Về việc quản lý những token mới, thì firebase có cung cấp cho mình callback onNewToken(). Hàm này chỉ được gọi một lần khi có bất kỳ token mới nào được sinh ra :
/**
* Called if InstanceID token is updated. This may occur if the security of
* the previous token had been compromised. Note that this is called when the InstanceID token
* is initially generated so this is where you would retrieve the token.
*/
override fun onNewToken(token: String) {
   Log.d(TAG, "Refreshed token: $token")

   // If you want to send messages to this application instance or
   // manage this apps subscriptions on the server side, send the
   // Instance ID token to your app server.
   sendRegistrationToServer(token)
}
Khi mà bạn cần lấy ra token hiện tại để sử dụng thì gọi hàm FirebaseInstanceId.getInstance().getInstanceId() như sau :
private fun registrationToken() {
        FirebaseInstanceId.getInstance().instanceId
            .addOnCompleteListener(OnCompleteListener { task ->
                if (!task.isSuccessful) {
                    return@OnCompleteListener
                }
                // Get new Instance ID token
                val token = Objects.requireNonNull<InstanceIdResult>(task.result).token
               Log.d("RegistrationToken", "RegistrationToken: $token")
            })
    }
2. Send and Receive message
Nhận message
Mình sẽ tạo một ví dụ demo việc gửi notification đến app. Đầu tiên bạn tạo class extend từ FirebaseMessagingService :
class MovieFirebaseMessagingService : FirebaseMessagingService() {

   // Receive notification
    override fun onMessageReceived(remoteMessage: RemoteMessage) {
        super.onMessageReceived(remoteMessage)

        val intent = Intent(this, MainActivity::class.java).apply {
            addFlags(Intent.FLAG_ACTIVITY_SINGLE_TOP)
        }

        var title = ""
        var body = ""
        var name = ""

        remoteMessage.notification?.let { notification ->
            title = notification.title.toString()
            body = notification.body.toString()
        }

        remoteMessage.data.let { data ->
            name = data["name"].toString()
        }

        intent.apply {
            putExtra(Constants.TITLE, title)
            putExtra(Constants.BODY, body)
            putExtra(Constants.NAME, name)
        }

        try {
            val pendingIntent = PendingIntent.getActivity(
                this.applicationContext, 0 /* Request code */, intent,
                PendingIntent.FLAG_UPDATE_CURRENT
            )

            val channelId = getString(R.string.default_notification_channel_id)

            val notificationBuilder = NotificationCompat.Builder(this.applicationContext, channelId)
                .setSmallIcon(R.drawable.default_notification)
                .setContentTitle(title)
                .setContentText(body)
                .setAutoCancel(true)
                .setContentIntent(pendingIntent)

            val notificationManager =
                getSystemService(Context.NOTIFICATION_SERVICE) as NotificationManager
            if (Build.VERSION.SDK_INT >= Build.VERSION_CODES.O) {
                val channel = NotificationChannel(
                    channelId,
                    getString(R.string.notification_channel),
                    NotificationManager.IMPORTANCE_DEFAULT
                )
                notificationManager.createNotificationChannel(channel)
            }
            notificationManager.notify(0, notificationBuilder.build())
        } catch (e: RemoteException) {
            e.printStackTrace()
        }
    }
 //Do FCMMessageService start NotificationsProcessingService khi muốn hiển thị thông báo. Nếu FCMMessageService bị kill trước khi NotificationsProcessingService start thì có thể dẫn đến ngoại lệ DeadSystemException.
//Cách fix:
//- Do DeadSystemException này chỉ được add khi API >= 24 cho nên sẽ bắt ngoại lên cha của nó là RemoteException.

    // Get new token
    override fun onNewToken(token: String) {
        super.onNewToken(token)
        FirebaseMessaging.getInstance().subscribeToTopic(TOPIC)
        sendRegistrationToServer(token)
    }

    // Regist token with server
    private fun sendRegistrationToServer(token: String) {
        // send token to server
    }

    companion object {
        private const val TOPIC = "PUSH_RC"
    }
}
API dùng để đăng ký token với server sẽ như sau :
@PUT("user/device")
@FormUrlEncoded
fun registerDeviceToken(
        @Field("fcm_token") token: String
): Single<String>
Sau khi tạo xong thì nhớ khai báo service này vào AndroidManifest.xml như mình đã nói trên kia nhé. Tiếp theo, để xử lý data gửi về từ notification bằng cách nhận Intent được gửi từ MovieFirebaseMessagingService về MainActivity, override hàm onNewIntent() :
override fun onNewIntent(intent: Intent?) {
        super.onNewIntent(intent)
        intent?.run {
            // handle Intent notification
        }
    }
Chú ý, đây là trong trường hợp app đang mở, bạn sẽ nhận được noti trong hàm onMessageReceived() , bạn click vào mở noti thì khi đó mình gửi data của noti qua Intent về cho MainActivity xử lý. MainActivity sẽ nhận Intent này trong hàm onNewIntent(), trong hàm này bạn xử lý như thế nào thì tùy bạn.
Và note một chút là hàm onNewIntent() này nó sẽ nhận tất cả các Intent được gửi về app khi mà app đang mở, ví dụ như Dynamic Links,... Cho nên bạn hãy chú ý xử lý khi nhận Intent về nhé. Còn trong trường hợp app đang tắt thì hệ thống sẽ nhận và tự xử lý để hiển thị notification, khi bạn click mở noti, thì Intent từ notification có thể được lấy ra ngay từ function onCreate() của MainActivity.
Gửi message
Cấu trúc notification mình gửi đi sẽ có dạng như sau:
{
 "to" : "YOUR_FCM_TOKEN_WILL_BE_HERE",
 "collapse_key" : "type_a",
 "notification" : {
     "body" : "Body of Your Notification",
     "title": "Title of Your Notification"
 },
 "data" : {
     "body" : "Body of Your Notification in Data",
     "title": "Title of Your Notification in Title",
     "key_1" : "Value for key_1",
     "key_2" : "Value for key_2"
 }
}
Lưu ý một chút : với phần thẻ "notification" thì khi app ở background sẽ không thể lấy được body và title, mà nó sẽ được đưa vào khay hệ thống, sau đó hệ thống sẽ tự xử lý để hiển thị lên, mình không can thiệp vào được. Còn với phần thẻ "data" thì mình sẽ lấy được dữ liệu trong này dù app đang ở background hay đang ở foreground. Nhìn vào bảng sau ta sẽ phân tách được rõ ràng các trường hợp :

Chú ý chỗ này, nếu bên server bắn noti cho mà không có phần notification message thì khi app ở background hay app bị kill thì sẽ không hiển thị noti đâu.
Chính vì hệ thống sẽ can thiệp vào xử lý noti khi mà app đang tắt nên có một lưu ý nữa đó là : trong hàm onCreate() bạn nhận Intent để xử lý thì phải để name trùng với name trong thẻ data :
Ở đây trong thẻ data của mình có "body" và "title" , thì khi get intent trong onCreate() cũng nên để là :
intent.getStringExtra("body")
intent.getStringExtra("title")
Nếu để sai name thì bạn sẽ không lấy được data từ intent khi mà app đang tắt đâu nhé.
Mình biết được 2 cách để setup gửi noti về cho app :
1. Dùng Postman
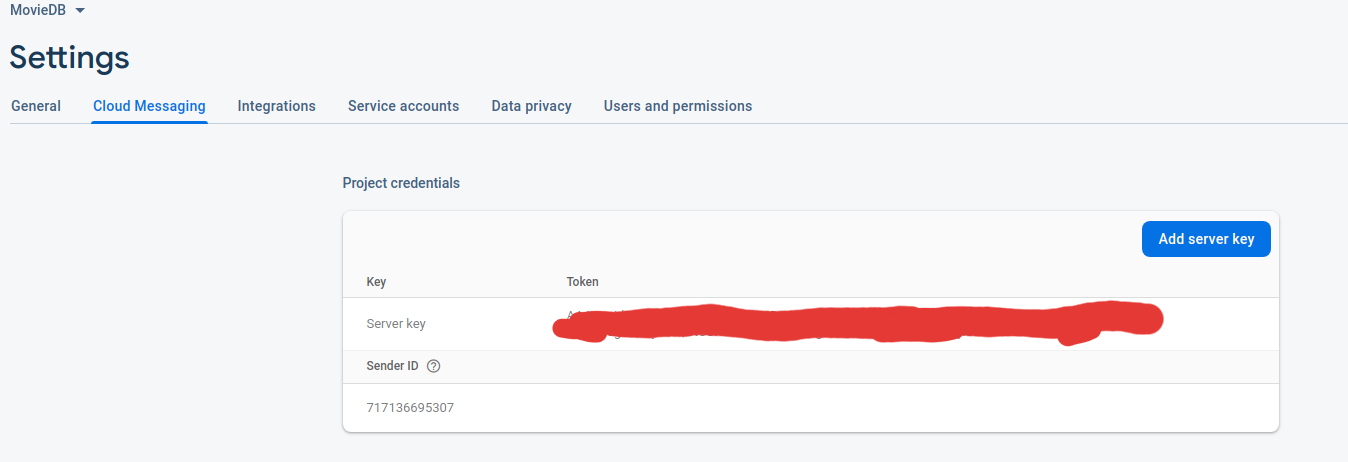
- Lấy Server Key : Firebase Console > Project Settings > Cloud Messaging :
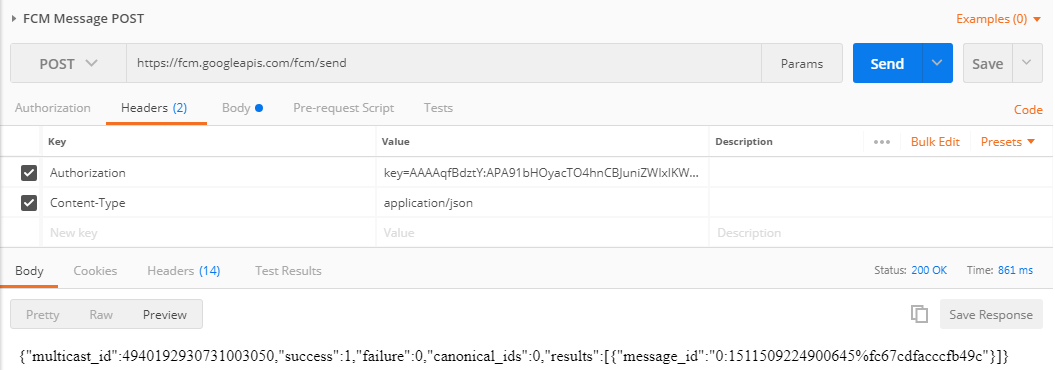
Sau đó vào Postman, chọn phương thức POST và URL là : https://fcm.googleapis.com/fcm/send
Thêm Header: Authorization: key=<server_key>and Content-Type: application/json.
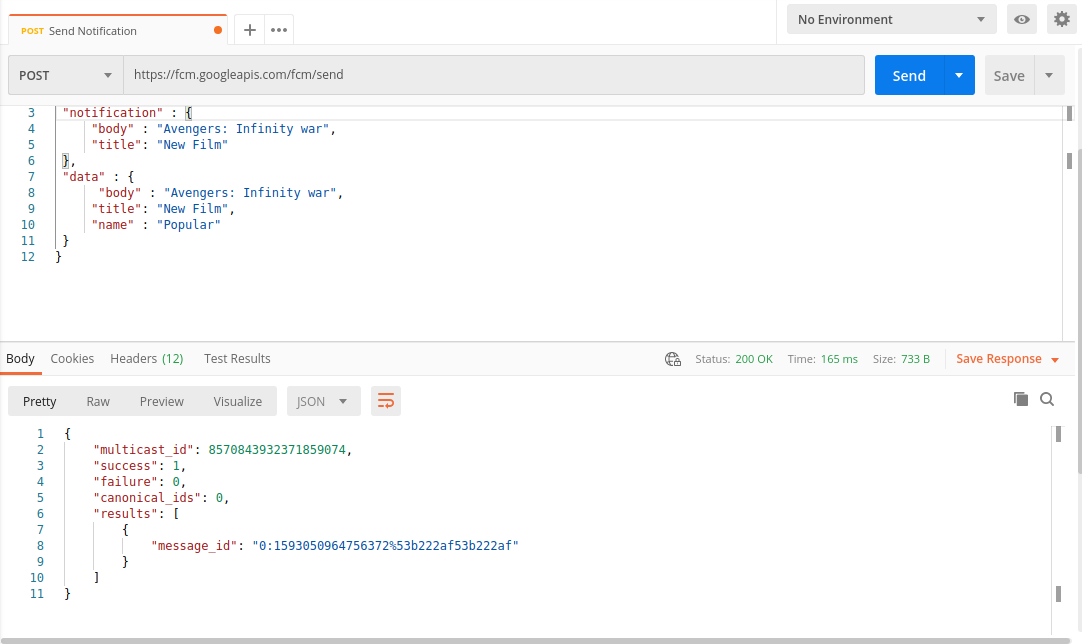
Sau đó chọn Body > raw > JSON (application/json) và thêm đoạn json sau :
{
 "to" : "YOUR_FCM_TOKEN_WILL_BE_HERE",
 "collapse_key" : "type_a",
 "notification" : {
     "body" : "Avengers: Infinity war",
     "title": "New Film"
 },
 "data" : {
      "body" : "Avengers: Infinity war",
     "title": "New Film",
     "name" : "Popular"
 }
}
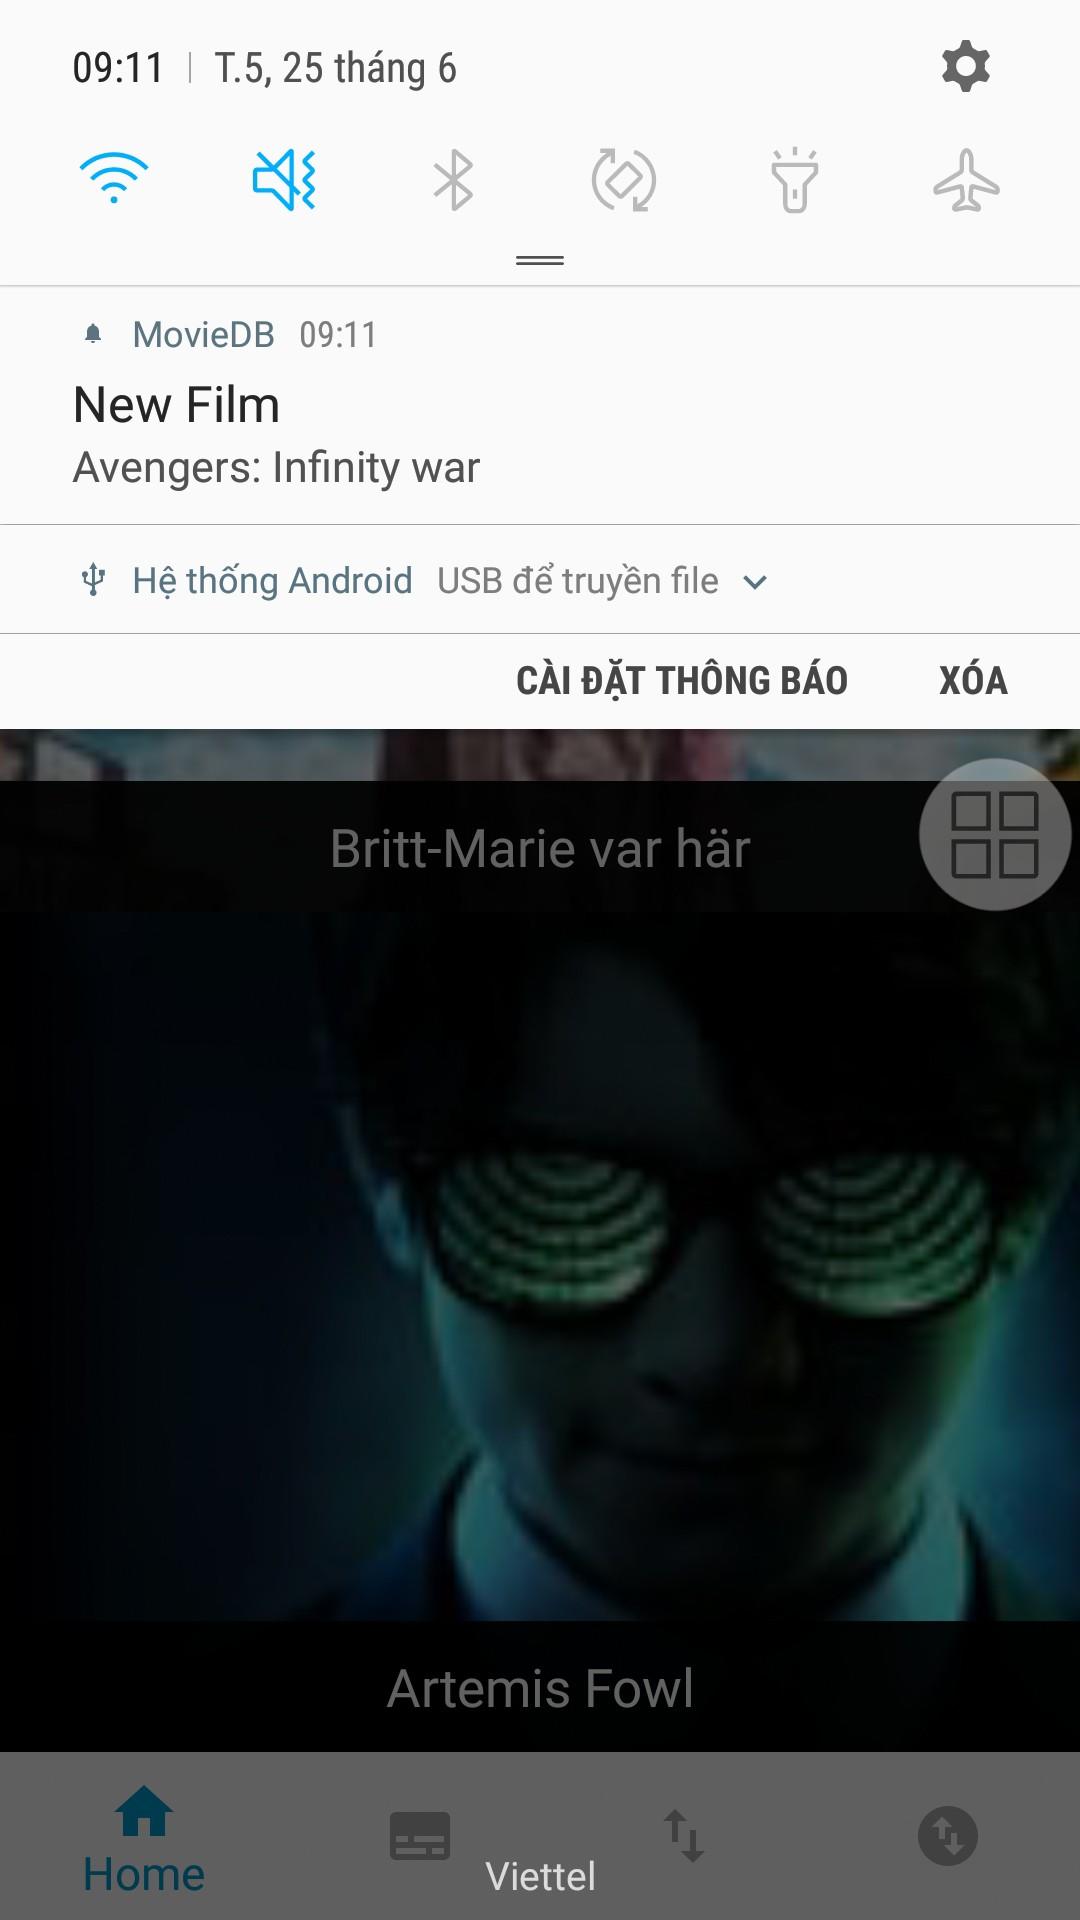
Thay đoạn FCM token vào nhé, rồi nhấn Send thôi. Kết quả như sau :
2. Dùng Firebase console.
Mở Console lên và vào mục Cloud Messaging, chọn "Send your first message", ở đây console sẽ hiển thị các step cho bạn làm, đầu tiên hãy điền title và body cho notification :
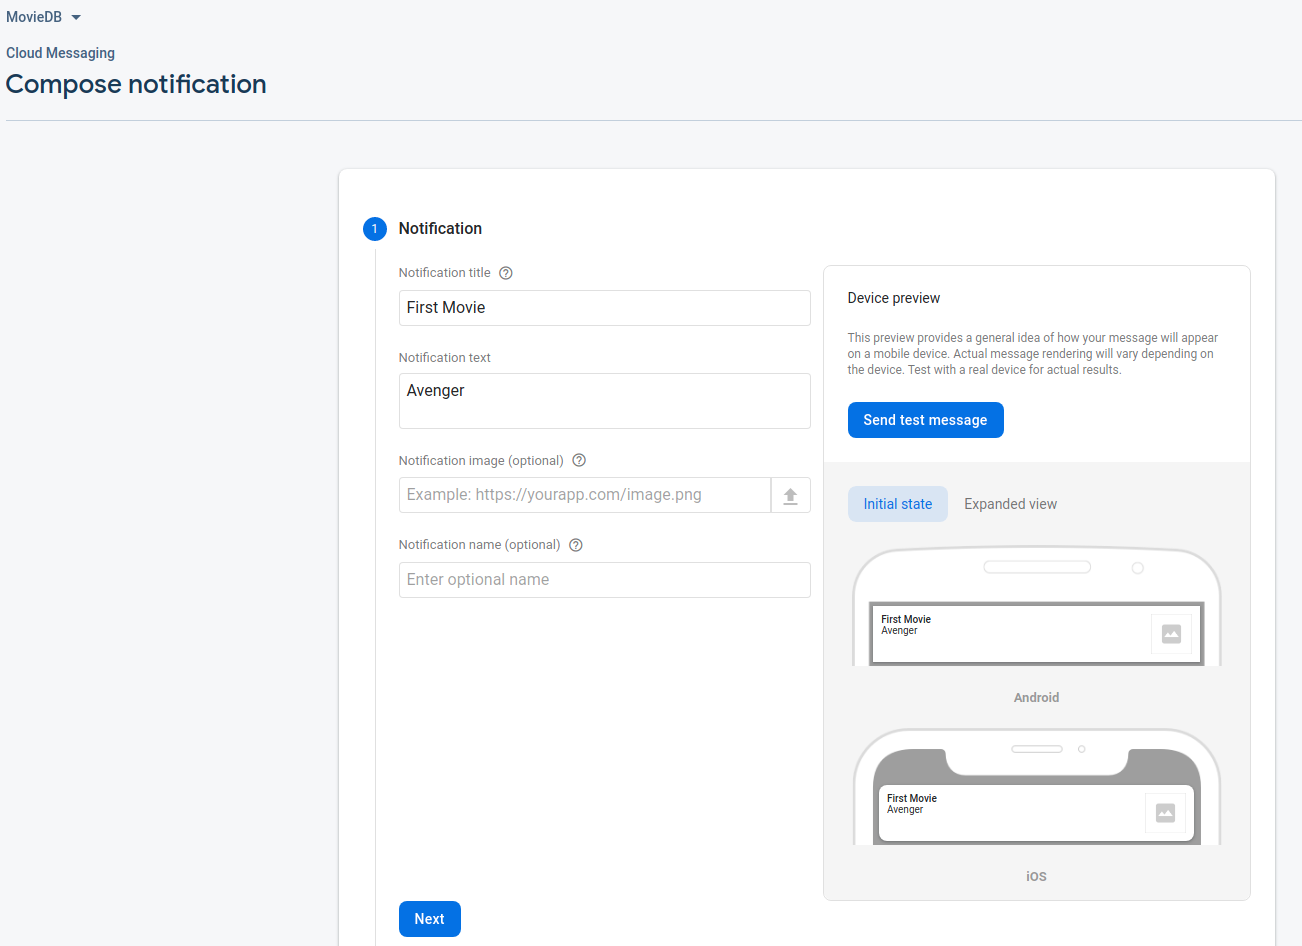
Không cần care các step tiếp, nhấn nút "Send test message" màu xanh phía bên trái, lúc này console sẽ bắt mình nhập device token muốn nhận message :
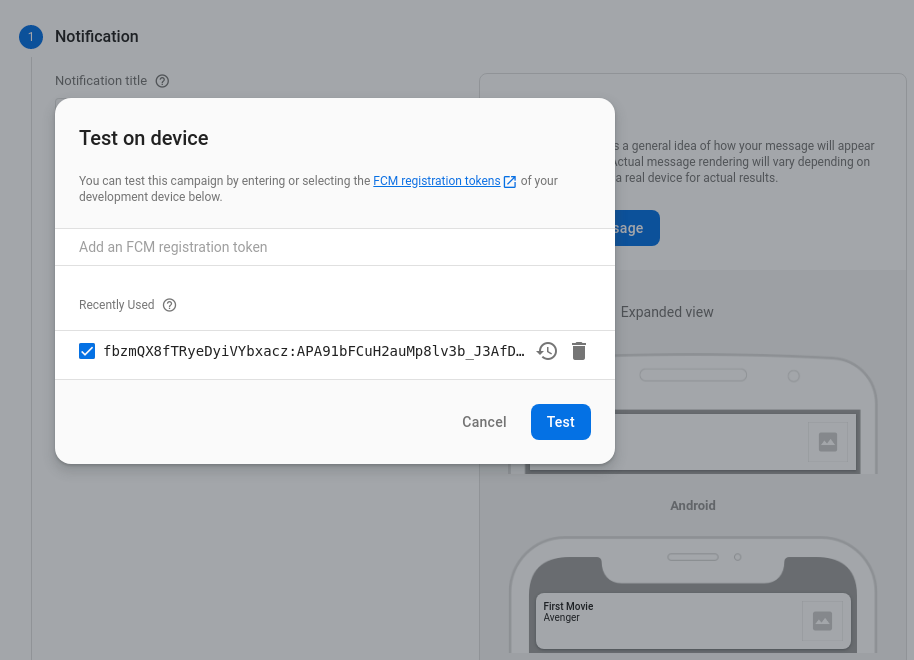
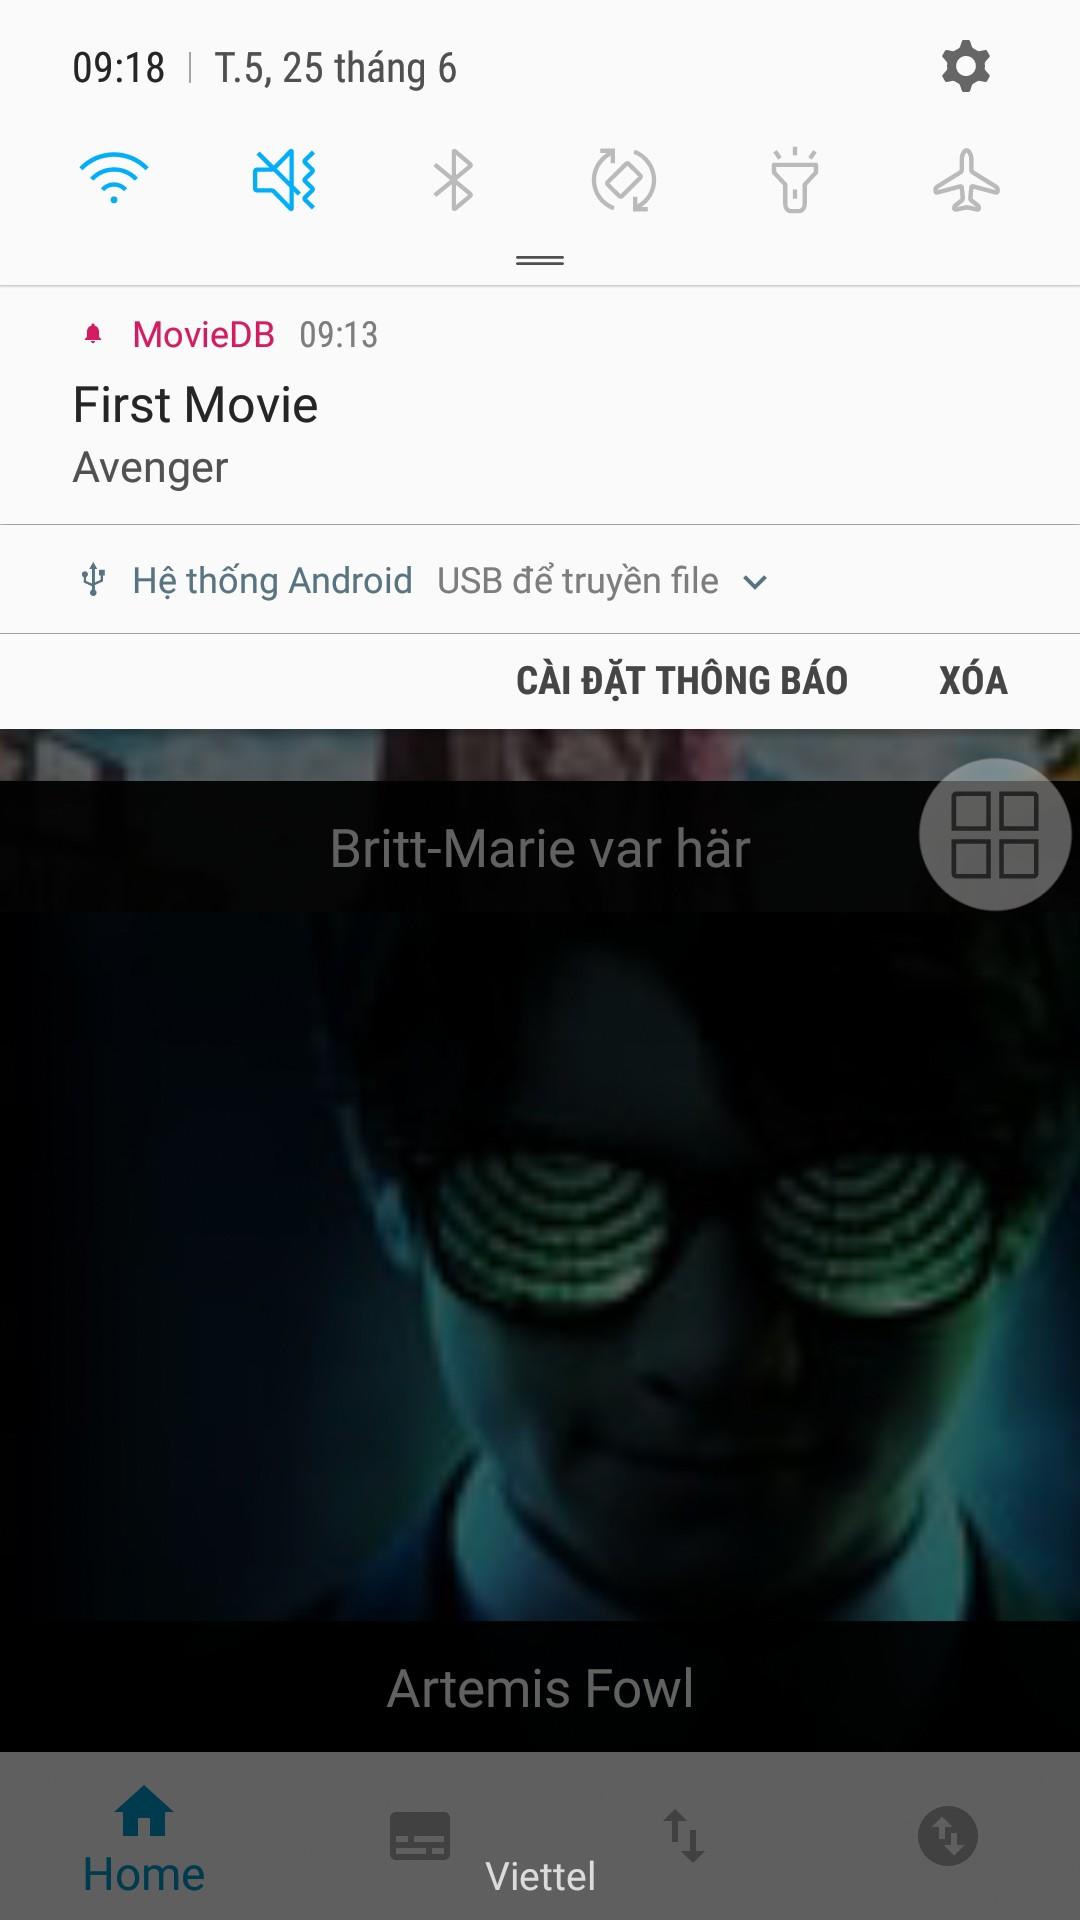
Nhập xong rồi thì nhấn nút Test, và xem kết quả trên app :
Cả hai cách trên đều có ưu nhược điểm riêng, với cách dùng Postman thì chỉ send được đến 1 device, còn dùng Console thì có thể send được nhiều device bằng cách thêm các device muốn nhận notification ở bước nhập device token là được.
Github: https://github.com/DongHien0896/Traning-Kotlin
Trên đây là những gì mình biết về FCM, chúc mọi người code vui vẻ.
Tham khảo :
Firebase docs : https://firebase.google.com/docs/cloud-messaging
All rights reserved
