Làm việc với SVG / vector drawables trong Android
Bài đăng này đã không được cập nhật trong 2 năm
Khi phát triển ứng dụng Android, hỗ trợ nhiều độ phân giải là đôi khi cơn ác mộng trong việc phát triển. Bao gồm nhiều hình ảnh cho độ phân giải khác nhau làm tăng dung lương dự án. Giải pháp là sử dụng Vector Graphics như hình ảnh SVG. Trong khi Android không hỗ trợ trực tiếp SVGs, với sự ra mắt của Lollipop một class mới đã được giới thiệu tên là VectorDrawable (Scalable Vector Graphics), nó cho phép các nhà thiết kế, các nhà phát triển vẽ mà chỉ sử dụng mã
Đồ họa Vector là một cách để mô tả các yếu tố đồ họa sử dụng hình dạng hình học. Họ đặc biệt rất thích hợp với các yếu tố đồ họa tạo ra trong gói phần mềm như Adobe Illustrator hoặc Inkscape nơi hình dạng hình học đơn giản có thể được kết hợp trong các yếu tố phức tạp hơn nhiều.
1. VectorDrawable là gì?
Drawables vector dựa trên đồ họa vector, như trái ngược với đồ họa raster. Đồ họa vector là một cách để mô tả các yếu tố đồ họa sử dụng hình dạng hình học. Nó tương tự như một tập tin SVG. Trong Android Vector thể vẽ được tạo ra dưới dạng file XML. Bây giờ không cần thiết để tạo ra hình ảnh có kích thước khác nhau cho mdpi, hdpi, xhdpi, xxhdpi, xxxhdpi. Chỉ cần một tập tin vector cho nhiều thiết bị kích thước màn hình. Ngoài ra đối với các phiên bản cũ của Android không hỗ trợ drawables vector, Vector Asset Studio có thể biến drawables vector của bạn thành các kích cỡ khác nhau cho mỗi bitmap mật độ màn hình khi chạy.
Dưới đây là thông tin chi tiết Vector Asset Studio.
Lưu ý: Đối với demo này sẽ sử dụng phiên bản gradle 2.2, suggession là sử dụng 2.0+.
2. Tạo ứng dụng demo
Bước 1. Tạo một dự án mới trong Android Studio từ File ⇒ New Project và điền thông tin chi tiết của dự án. Bước 2. Mở build.gradle, thêm dòng code dưới đây trong defaultConfig.
vectorDrawables.useSupportLibrary = true
Khi hoàn thành file build.gradle giống như sau:
build.gradle
apply plugin: 'com.android.application'

android {
   compileSdkVersion 25
   buildToolsVersion "25.0.2"
   defaultConfig {
       applicationId "info.androidhive.vectordrawable"
       minSdkVersion 17
       targetSdkVersion 25
       versionCode 1
       versionName "1.0"
       testInstrumentationRunner "android.support.test.runner.AndroidJUnitRunner"
       vectorDrawables.useSupportLibrary = true
   }
   buildTypes {
       release {
           minifyEnabled false
           proguardFiles getDefaultProguardFile('proguard-android.txt'), 'proguard-rules.pro'
       }
   }
}

dependencies {
   compile fileTree(dir: 'libs', include: ['*.jar'])
   androidTestCompile('com.android.support.test.espresso:espresso-core:2.2.2', {
       exclude group: 'com.android.support', module: 'support-annotations'
   })
   compile 'com.android.support:appcompat-v7:25.1.0'
   testCompile 'junit:junit:4.12'
}
Nếu sử dụng phiên bản gradle dưới 2.0 thì làm như sau.
build.gradle
apply plugin: 'com.android.application'

android {
    compileSdkVersion 24
    buildToolsVersion "25.0.2"
    defaultConfig {
        applicationId "info.androidhive.vectordrawable"
        minSdkVersion 17
        targetSdkVersion 24
        versionCode 1
        versionName "1.0"
        testInstrumentationRunner "android.support.test.runner.AndroidJUnitRunner"
        vectorDrawables.useSupportLibrary = true
        generatedDensities=[]
    }
    buildTypes {
        release {
            minifyEnabled false
            proguardFiles getDefaultProguardFile('proguard-android.txt'), 'proguard-rules.pro'
        }
    }
    aaptOptions {
        additionalParameters "--no-version-vectors"
    }
}

dependencies {
    compile fileTree(dir: 'libs', include: ['*.jar'])
    androidTestCompile('com.android.support.test.espresso:espresso-core:2.2.2', {
        exclude group: 'com.android.support', module: 'support-annotations'
    })
    compile 'com.android.support:appcompat-v7:24.2.1'
    testCompile 'junit:junit:4.12'
}
2.1. Tạo VectorDrawable từ Material Icons.
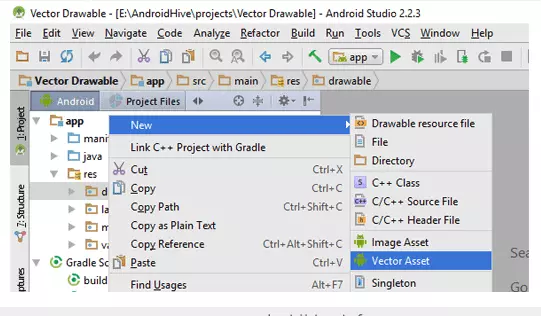
Chúng ta bắt đầu bằng cách tạo ra VectorDrawables từ Material Icons (Material Icons là biểu tượng chính thức thiết lập từ Google được thiết kế theo hướng dẫn theo material design, các biểu tượng này là mã nguồn mở và dễ dàng để sử dụng trong các trang web của bạn, dự án Android và iOS). Bước 3. Click chuột phải vào thư mục drawable
Bước 4. Chọn New ⇒ Vector Asset
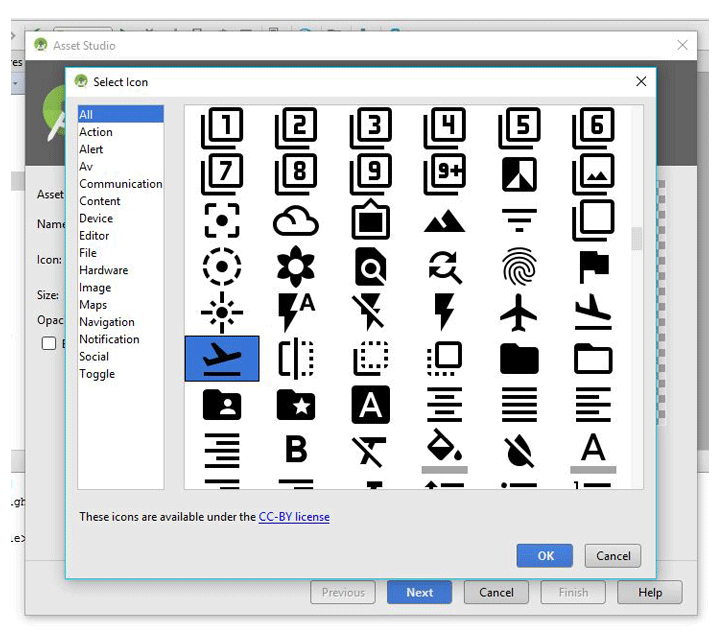
Bước 5. Click chuột vào launcher icon để duyệt Material Icons
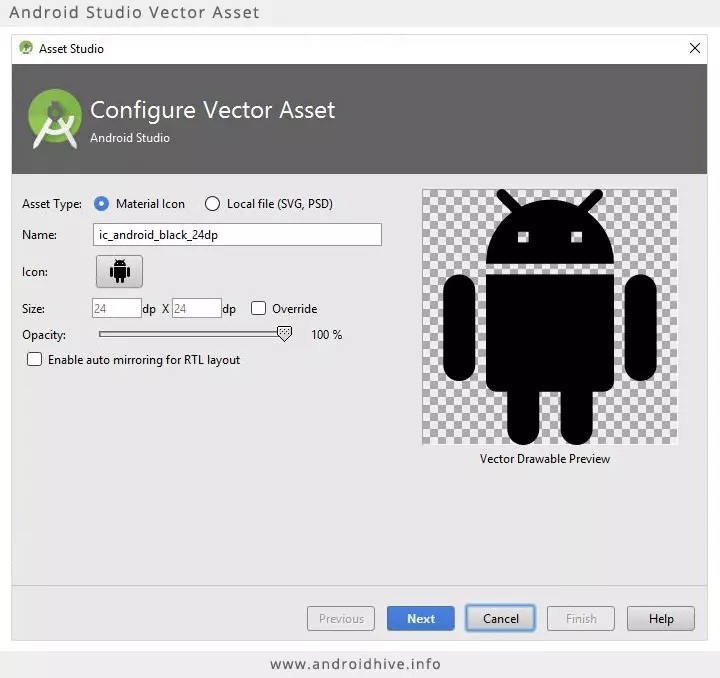
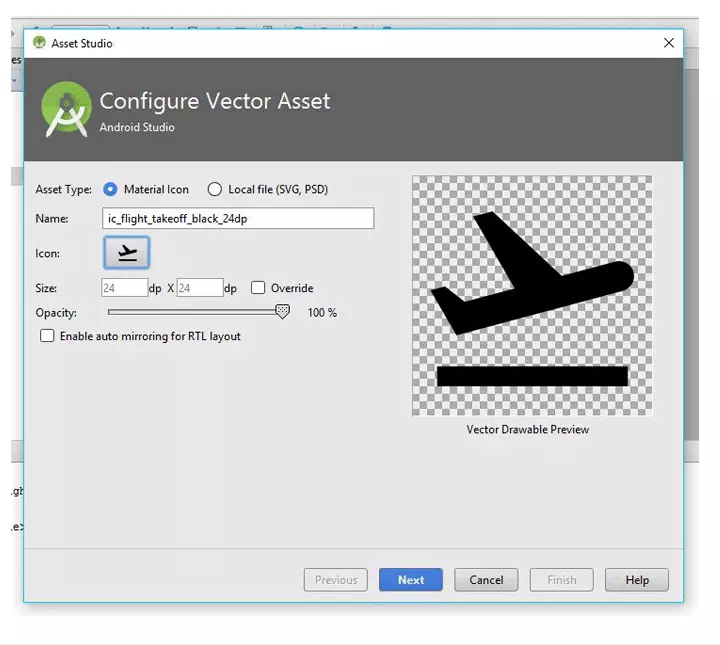
Bước 6. Chọn một icon và bấm vào ok
Bước 7. Xem lại tên của tập tin sau đó bấm vào next.
Bước 8. Bây giờ Vector Asset Studio sẽ hiển thị vị trí file được lưu, xem lại rồi bấm vào kết thúc.
Bước 9. Thư mục drawable bây giờ sẽ bao gồm một tập tin mới được tạo
ic_flight_takeoff.xml
<vector xmlns:android="http://schemas.android.com/apk/res/android"
        android:width="35dp"
        android:height="35dp"
        android:viewportWidth="24.0"
        android:viewportHeight="24.0">
    <path
        android:fillColor="#FFe29069"
        android:pathData="M2.5,19h19v2h-19zM22.07,9.64c-0.21,-0.8 -1.04,-1.28 -1.84,-1.06L14.92,10l-6.9,-6.43 -1.93,0.51 4.14,7.17 -4.97,1.33 -1.97,-1.54 -1.45,0.39 1.82,3.16 0.77,1.33 1.6,-0.43 5.31,-1.42 4.35,-1.16L21,11.49c0.81,-0.23 1.28,-1.05 1.07,-1.85z"/>
</vector>
Chúng ta có thể thay đổi chiều rộng và chiều cao của các vector theo yêu cầu (theo mặc định nó vẫn là 24dp), một vector có thể bao gồm một hoặc nhiều đường dẫn. Một đường dẫn có thể có nhiều thuộc tính trong đó fillColor và pathData là quan trọng nhất. fillColor thuộc tính xác định màu sắc của đường dẫn, nó phải là một thuộc tính màu (mã băm trong #aarrggbb, hoặc cũng có thể trỏ đến một nguồn tài nguyên màu). pathData xác định hình dạng đường. Trong trường hợp này tôi đã sửa đổi chiều rộng vector, chiều cao và đường dẫn fillColor.
2.2. Tạo VectorDrawable từ SVG hoặc PSD.
Bây giờ chúng ta đã tạo vectorDrawable từ Material Icon, nếu chúng ta muốn có một icon riêng biệt? Chúng ta có thể tạo ra nó từ SVG hoặc PSD, dưới đây là những thủ tục, nhưng nó cũng có một số hạn chế, bạn có thể xem ở đây - https://developer.android.com/studio/write/vector-asset-studio.html#PSD ( mặc dù những hạn chế được liệt kê ở đây cho PSD, nócũng áp dụng cho SVG).
Bước 10. Click chuột phải vào drawable
Bước 11. Chọn New ⇒ Vector Asset
Bước 12. Click vào radio button “Local File (SVG, PSD)”
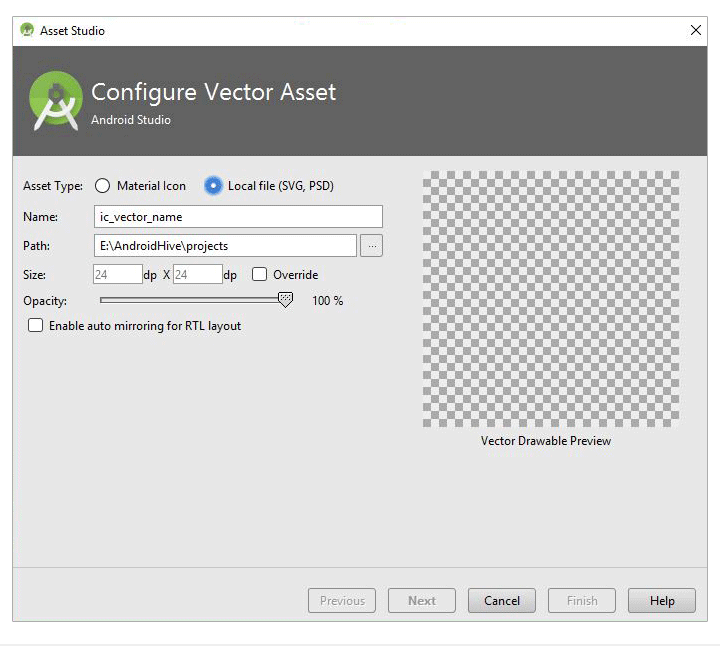
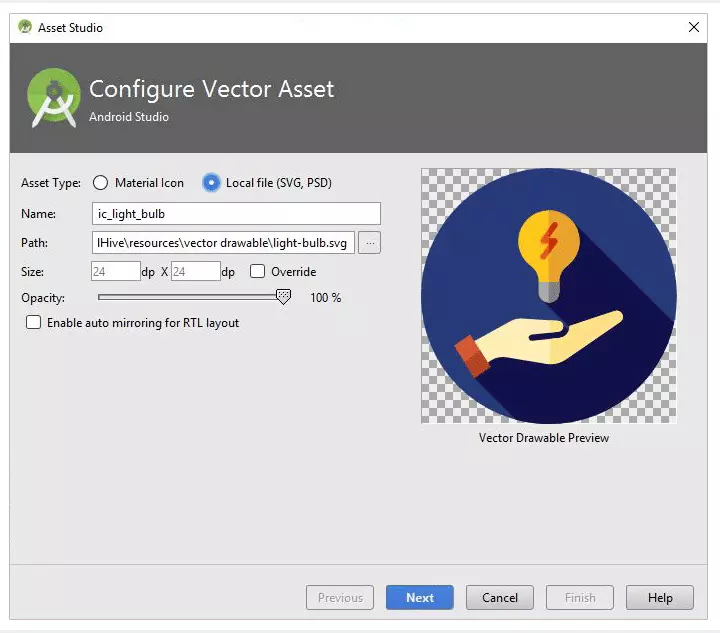
Bước 13. Click vào trình duyệt icon và điều hướng đến SVG của bạn hoặc tập tin PSD để chọn nó
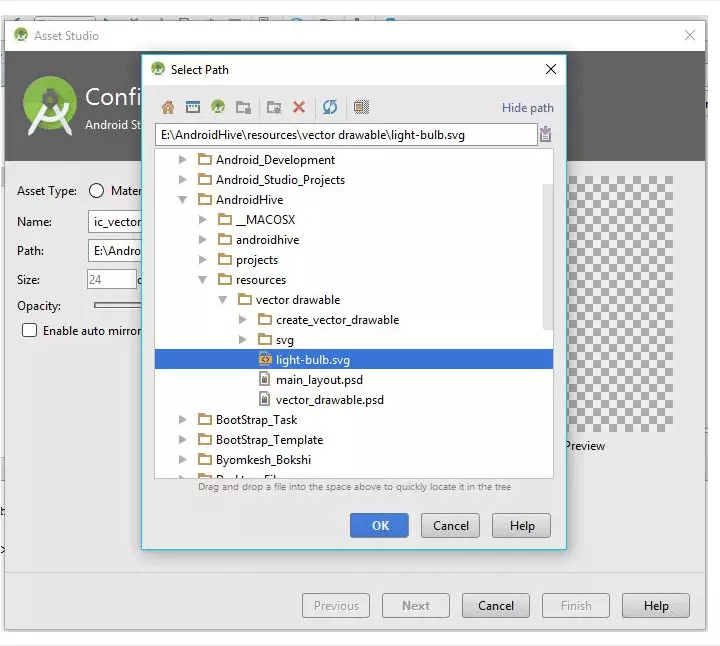
Bước 14. Sau đó lựa chọn file
Bước 15. Xác minh hình ảnh xem trước và nhấn Next ⇒ Finish.
Dưới đây là mã tập tin được tạo từ svg
ic_light_bulb.xml
<vector xmlns:android="http://schemas.android.com/apk/res/android"
    android:width="100dp"
    android:height="100dp"
    android:viewportHeight="512.0"
    android:viewportWidth="512.0">
    <path
        android:fillColor="#273B7A"
        android:pathData="M256,256m-256,0a256,256 0,1 1,512 0a256,256 0,1 1,-512 0" />
    <path
        android:fillColor="#121149"
        android:pathData="M506.4,309.5L300.1,103.3l-62.2,113.4l2.3,44.8l82.5,82.5l-3.4,3.4l-35.8,-35.8l-45.6,2.9h-64.7l-66.7,105.5l83.6,83.6C211.2,509 233.2,512 256,512C379,512 481.8,425.2 506.4,309.5z" />
    <path
        android:fillColor="#FFEDB5"
        android:pathData="M401.6,290.3c-3.3,-4.6 -9.3,-6.4 -14.6,-4.4c-0.1,0 -0.2,0.1 -0.2,0.1l-89.6,29.8c0,0.7 0,1.4 -0,2.2c-0.7,11.4 -9.6,20.6 -21,21.8l-54,5.6c-3.4,0.4 -6.5,-2.1 -6.8,-5.5c-0.4,-3.4 2.1,-6.6 5.5,-6.8l54,-5.6c5.3,-0.6 9.5,-4.9 9.8,-10.2c0.2,-2.9 -0.8,-5.8 -2.7,-8c-1.9,-2.2 -4.6,-3.5 -7.6,-3.7l-71.7,-4.7c-8.1,-0.5 -16,1.3 -23.1,5.1L85,358l25.6,51.6l23.8,-20.7c10.1,-8.8 23.5,-12.6 36.7,-10.4l79.4,13.2c14.6,1.9 29.1,-1.7 41.1,-10.2l108.1,-74.5C404.5,302.8 405.4,295.5 401.6,290.3z" />
    <path
        android:fillColor="#FEE187"
        android:pathData="M274.9,327.4c5.3,-0.6 9.5,-4.9 9.8,-10.2c0.2,-2.9 -0.8,-5.8 -2.7,-8c-1.9,-2.2 -4.6,-3.5 -7.6,-3.7l-15.9,-1v24.7L274.9,327.4z" />
    <path
        android:fillColor="#FEE187"
        android:pathData="M401.6,290.3c-3.3,-4.6 -9.3,-6.4 -14.6,-4.4c-0.1,0 -0.2,0.1 -0.2,0.1l-89.6,29.8c0,0.7 0,1.4 -0,2.2c-0.7,11.4 -9.6,20.6 -21,21.8l-17.7,1.8v50.6c11.8,-0.1 23.3,-3.8 33.1,-10.7l108.1,-74.5C404.5,302.8 405.4,295.5 401.6,290.3z" />
    <path
        android:fillColor="#FFC61B"
        android:pathData="M317.4,146c0,-34.7 -28.9,-62.8 -63.9,-61.4c-31.4,1.2 -57.1,26.5 -58.9,57.9c-1.2,21.6 8.7,40.9 24.6,52.7c10.1,7.6 16.3,19.2 16.3,31.9v21.3c0,11.3 9.2,20.5 20.5,20.5l0,0c11.3,0 20.5,-9.2 20.5,-20.5V227.4c0,-12.8 6.2,-24.6 16.5,-32.3C307.8,183.9 317.4,166 317.4,146z" />
    <path
        android:fillColor="#EAA22F"
        android:pathData="M255.4,84.6v184.2c0.2,0 0.4,0 0.6,0c11.3,0 20.5,-9.2 20.5,-20.5V227.4c0,-12.8 6.2,-24.6 16.5,-32.3c14.9,-11.2 24.5,-29 24.5,-49.1C317.4,111.9 289.6,84.3 255.4,84.6z" />
    <path
        android:fillColor="#A6A8AA"
        android:pathData="M235.5,227.9v20.5c0,11.3 9.2,20.5 20.5,20.5l0,0c11.3,0 20.5,-9.2 20.5,-20.5v-20.5L235.5,227.9z" />
    <path
        android:fillColor="#808183"
        android:pathData="M255.4,227.9v40.9c0.2,0 0.4,0 0.6,0c11.3,0 20.5,-9.2 20.5,-20.5v-20.5L255.4,227.9z" />
    <path
        android:fillColor="#FF5419"
        android:pathData="M244.2,183.8c-1.1,0 -2.3,-0.3 -3.3,-1.1c-2.5,-1.8 -3,-5.3 -1.2,-7.8l17.1,-23.4H244.2c-2.1,0 -4,-1.2 -5,-3.1c-1,-1.9 -0.8,-4.1 0.5,-5.8l23.6,-32.3c1.8,-2.5 5.3,-3 7.8,-1.2c2.5,1.8 3,5.3 1.2,7.8L255.2,140.4h12.6c2.1,0 4,1.2 5,3.1c1,1.9 0.8,4.1 -0.5,5.8l-23.6,32.3C247.6,183 245.9,183.8 244.2,183.8z" />
    <path
        android:fillColor="#C92F00"
        android:pathData="M272.3,117c1.8,-2.5 1.3,-6 -1.2,-7.8c-2.5,-1.8 -6,-1.3 -7.8,1.2l-7.9,10.8v18.9L272.3,117z" />
    <path
        android:fillColor="#C92F00"
        android:pathData="M267.8,140.4h-12.4v11.2h1.4l-1.4,1.9v18.9l16.9,-23.1c1.2,-1.7 1.4,-3.9 0.5,-5.8C271.8,141.6 269.9,140.4 267.8,140.4z" />
    <path
        android:fillColor="#D35933"
        android:pathData="M66.1,355.1l32.5,-22.2l40.5,64.7l-32.5,22.2z" />
    <path
        android:fillColor="#B54324"
        android:pathData="M139.1,397.6l-20.5,-32.8l-32.4,22.5l20.4,32.6z" />
</vector>
3. Sử dụng VectorDrawable
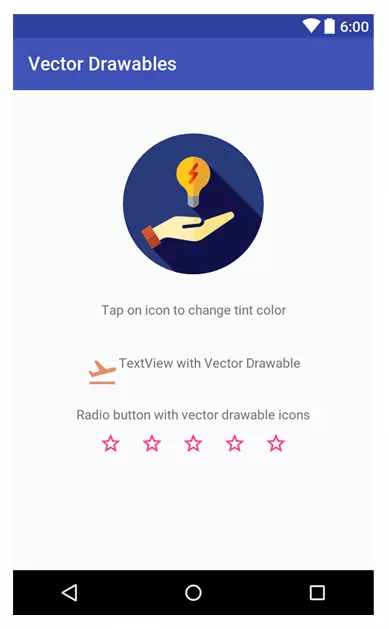
Bước 16. Mở file layout activity_main.xml và thêm đoạn mã xml dưới đây. Layout này có chứa chương trình làm thế nào để sử dụng VectorDrawable cùng với ImageView và các View khác như ở dưới.
activity_main.xml
<?xml version="1.0" encoding="utf-8"?>
<LinearLayout xmlns:android="http://schemas.android.com/apk/res/android"
    xmlns:app="http://schemas.android.com/apk/res-auto"
    xmlns:tools="http://schemas.android.com/tools"
    android:id="@+id/activity_main"
    android:layout_width="match_parent"
    android:layout_height="match_parent"
    android:orientation="vertical"
    android:paddingBottom="@dimen/activity_vertical_margin"
    android:paddingLeft="@dimen/activity_horizontal_margin"
    android:paddingRight="@dimen/activity_horizontal_margin"
    android:paddingTop="@dimen/activity_vertical_margin"
    tools:context="info.androidhive.vectordrawable.MainActivity">

    <ImageView android:id="@+id/ic_logo"
        android:layout_width="150dp"
        android:layout_height="150dp"
        android:layout_gravity="center_horizontal"
        android:layout_marginBottom="30dp"
        android:layout_marginTop="30dp"
        app:srcCompat="@drawable/ic_light_bulb" />

    <TextView
        android:layout_width="match_parent"
        android:layout_height="wrap_content"
        android:layout_marginBottom="10dp"
        android:gravity="center_horizontal"
        android:text="Tap on icon to change tint color" />

    <android.support.v7.widget.AppCompatImageView
        android:id="@+id/ic_android"
        android:layout_width="wrap_content"
        android:layout_height="wrap_content"
        android:layout_gravity="center_horizontal"
        android:layout_marginBottom="30dp" />

    <android.support.v7.widget.AppCompatTextView
        android:layout_width="wrap_content"
        android:layout_height="wrap_content"
        android:layout_gravity="center_horizontal"
        android:layout_marginBottom="20dp"
        android:drawableLeft="@drawable/ic_flight_takeoff"
        android:gravity="center_horizontal"
        android:text="TextView with Vector Drawable" />

    <TextView
        android:layout_width="wrap_content"
        android:layout_height="wrap_content"
        android:layout_gravity="center_horizontal"
        android:text="Radio button with vector drawable icons" />

    <RadioGroup
        android:layout_width="match_parent"
        android:layout_height="wrap_content"
        android:showDividers="middle"
        android:orientation="horizontal"
        android:gravity="center">

        <android.support.v7.widget.AppCompatRadioButton
            android:id="@+id/radioBtn"
            android:layout_width="wrap_content"
            android:layout_height="wrap_content"
            android:layout_margin="10dp"
            android:background="@drawable/radio_selector"
            android:button="@android:color/transparent" />

        <android.support.v7.widget.AppCompatRadioButton
            android:id="@+id/radioBtn2"
            android:layout_width="wrap_content"
            android:layout_height="wrap_content"
            android:layout_margin="10dp"
            android:background="@drawable/radio_selector"
            android:button="@android:color/transparent" />

        <android.support.v7.widget.AppCompatRadioButton
            android:id="@+id/radioBtn3"
            android:layout_width="wrap_content"
            android:layout_height="wrap_content"
            android:layout_margin="10dp"
            android:background="@drawable/radio_selector"
            android:button="@android:color/transparent" />

        <android.support.v7.widget.AppCompatRadioButton
            android:id="@+id/radioBtn4"
            android:layout_width="wrap_content"
            android:layout_height="wrap_content"
            android:layout_margin="10dp"
            android:background="@drawable/radio_selector"
            android:button="@android:color/transparent" />

        <android.support.v7.widget.AppCompatRadioButton
            android:id="@+id/radioBtn5"
            android:layout_width="wrap_content"
            android:layout_height="wrap_content"
            android:layout_margin="10dp"
            android:background="@drawable/radio_selector"
            android:button="@android:color/transparent" />

    </RadioGroup>


</LinearLayout>
Layout bên dưới được tạo như màn hình ở dưới
3.1. Sử dụng VectorDrawable cùng với ImageView từ xml
Chúng ta hãy bắt đầu với một ImageView đơn giản, bằng cách gán các VectorDrawable đến ImageView thông qua bố trí xml.
<ImageView
   android:layout_width="wrap_content"
   android:layout_height="wrap_content"
   app:srcCompat="@drawable/ic_light_bulb"/>
Chúng ta sử dụng ứng dụng: srcCompat thay vì android: src, để các thư viện hỗ trợ có thể làm phần còn lại để hiển thị các hình ảnh liền mạch trên tất cả các phiên bản của Android. (Các thư viện hỗ trợ chuyển đổi VectorDrawables đồ họa raster tự động trên các phiên bản Android dưới 5.0 - API 21, chi tiết ở đây).
3.2. Sử dụng VectorDrawable cùng với ImageView từ Java
Bây giờ chúng ta hãy làm điều tương tự với mã Java, nghĩa là gán VectorDrawable để ImageView qua mã code Java.
Bước 17. Thêm một Vector Drawabler khác(tên nó ic_android.xml) với các bước đề cập đến trong phần 2.1 hoặc 2.2, bạn cũng có thể tạo một tập tin với tên đó và dán mã dưới đây.
ic_android.xml
<vector xmlns:android="http://schemas.android.com/apk/res/android"
    android:width="50dp"
    android:height="50dp"
    android:viewportHeight="24.0"
    android:viewportWidth="24.0">
    <path
        android:fillColor="@color/colorPrimaryDark"
        android:pathData="M6,18c0,0.55 0.45,1 1,1h1v3.5c0,0.83 0.67,1.5 1.5,1.5s1.5,-0.67 1.5,-1.5L11,19h2v3.5c0,0.83 0.67,1.5 1.5,1.5s1.5,-0.67 1.5,-1.5L16,19h1c0.55,0 1,-0.45 1,-1L18,8L6,8v10zM3.5,8C2.67,8 2,8.67 2,9.5v7c0,0.83 0.67,1.5 1.5,1.5S5,17.33 5,16.5v-7C5,8.67 4.33,8 3.5,8zM20.5,8c-0.83,0 -1.5,0.67 -1.5,1.5v7c0,0.83 0.67,1.5 1.5,1.5s1.5,-0.67 1.5,-1.5v-7c0,-0.83 -0.67,-1.5 -1.5,-1.5zM15.53,2.16l1.3,-1.3c0.2,-0.2 0.2,-0.51 0,-0.71 -0.2,-0.2 -0.51,-0.2 -0.71,0l-1.48,1.48C13.85,1.23 12.95,1 12,1c-0.96,0 -1.86,0.23 -2.66,0.63L7.85,0.15c-0.2,-0.2 -0.51,-0.2 -0.71,0 -0.2,0.2 -0.2,0.51 0,0.71l1.31,1.31C6.97,3.26 6,5.01 6,7h12c0,-1.99 -0.97,-3.75 -2.47,-4.84zM10,5L9,5L9,4h1v1zM15,5h-1L14,4h1v1z" />
</vector>
Bước 18. Mở file MainActivity.java và paste đoạn mã dưới đây
MainActivity.java
package info.androidhive.vectordrawable;

import android.graphics.Color;
import android.os.Bundle;
import android.support.v7.app.AppCompatActivity;
import android.support.v7.app.AppCompatDelegate;
import android.support.v7.widget.AppCompatImageView;
import android.view.View;

import java.util.Random;

public class MainActivity extends AppCompatActivity {

    static {
        AppCompatDelegate.setCompatVectorFromResourcesEnabled(true);
    }

    @Override
    protected void onCreate(Bundle savedInstanceState) {
        super.onCreate(savedInstanceState);
        setContentView(R.layout.activity_main);

        final AppCompatImageView icAndroid = (AppCompatImageView) findViewById(R.id.ic_android);
        icAndroid.setImageResource(R.drawable.ic_android);

        icAndroid.setOnClickListener(new View.OnClickListener() {
            @Override
            public void onClick(View view) {
                Random rnd = new Random();
                int color = Color.argb(255, rnd.nextInt(256), rnd.nextInt(256), rnd.nextInt(256));
                icAndroid.setColorFilter(color);
            }
        });
    }
}
Bước 19. Để sử dụng VectorDrawable từ java hoặc sử dụng xml
static {
        AppCompatDelegate.setCompatVectorFromResourcesEnabled(true);
    }
Bước 20. Bất cứ khi nào bạn sử dụng VectorDrawable từ java hoặc sử dụng xml cũng nhớ để sử dụng AppCompatView thay vì xem bình thường, ở đây tôi đã sử dụng AppCompatImageView, vui lòng tham khảo layout, đã đc tạo ra trước.
Bước 21. Bây giờ giao cho VectorDrawable như src hoặc background như bạn làm nó bình thường, AppCompat sẽ quan tâm phần còn lại.
Bước 22. Chúng ta thực hiện OnClickListener trên ImageView để thiết lập bộ lọc màu sắc ngẫu nhiên vào nó, khi nhấp chuột.
3.3. Sử dụng VectorDrawable như là Drawable cùng với TextView
<android.support.v7.widget.AppCompatTextView
        android:layout_width="wrap_content"
        android:layout_height="wrap_content"
        android:layout_gravity="center_horizontal"
        android:layout_marginBottom="20dp"
        android:drawableLeft="@drawable/ic_flight_takeoff"
        android:gravity="center_horizontal"
        android:text="TextView with Vector Drawable" />
3.4. Sử dụng VectorDrawable để customise RadioButton
radio_selector.xml
<?xml version="1.0" encoding="utf-8"?>
<selector xmlns:android="http://schemas.android.com/apk/res/android" >
    <item
        android:drawable="@drawable/ic_star"
        android:state_checked="true"
        android:state_pressed="true" />
    <item
        android:drawable="@drawable/ic_star"
        android:state_pressed="true" />
    <item
        android:drawable="@drawable/ic_star"
        android:state_checked="true" />
    <item
        android:drawable="@drawable/ic_star_border" />
</selector>
All rights reserved
