Tìm hiểu về Routes trong Backbone.js
Bài đăng này đã không được cập nhật trong 2 năm
Giới thiệu Trong các ứng dụng singleton của Backbone JS có sử dụng rất nhiều về routes , vậy Routes là gì ,và tại sao nó lại đc sử dụng nhiều như vậy, thì trong bài viết này ,chúng ta sẽ cùng tìm hiểu về vấn đề này.
Backbone routes và history cung cấp cho chúng ta những cơ chế mà chúng ta có thể sao chép URL và sử dụng chúng để đạt được cái nhìn chính xác. Nó cũng cho phép chúng ta sử dụng điều hướng trình duyệt với các ứng dụng trang duy nhất.
Với những ứng dụng ko sử dụng Routes ,thì code của chúng ta sẽ như sau :
    var View1 = Backbone.View.extend({

        initialize: function() {
            this.render();
        },

        render: function() {
            this.$el.html(this.model.get('Message') + " from the View 1");
            return this;
        }
    });

    var View2 = Backbone.View.extend({

        initialize: function() {
            this.render();
        },

        render: function() {
            this.$el.html(this.model.get('Message') + " from the View 2");
            return this;
        }
    });

    var View3 = Backbone.View.extend({

        initialize: function() {
            this.render();
        },

        render: function() {
            this.$el.html(this.model.get('Message') + " from the View 3");
            return this;
        }
    });
Sử dụng ContentView để show ra dữ liệu :
var ContainerView = Backbone.View.extend({
     myChildView: null,

     render: function() {
        this.$el.html("Greeting Area");

        this.$el.append(this.myChildView.$el);
        return this;
    }
});

var greeting = new GreetModel({ Message: "Hello world" });

var container = new ContainerView({ el: $("#AppContainer"), model: greeting });
var view1 = null;
var view2 = null;
var view3 = null;

function showView1() {
    if (view1 == null) {
        view1 = new View1({ model: greeting });
    }

    container.myChildView = view1;
    container.render();
}

function showView2() {
    if (view2 == null) {
        view2 = new View2({ model: greeting });
    }

    container.myChildView = view2;
    container.render();
}

function showView3() {
    if (view3 == null) {
        view3 = new View3({ model: greeting });
    }

    container.myChildView = view3;
    container.render();
}
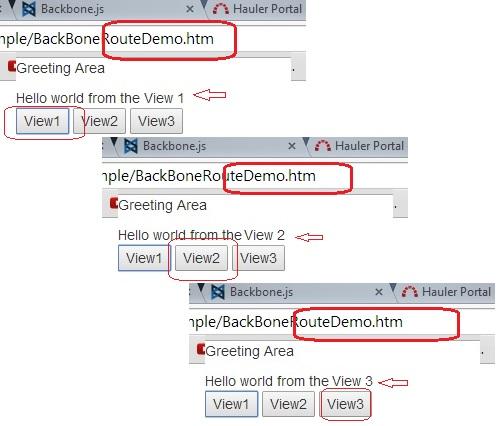
và theo như kết quả thu đc ,ta có thể thấy khi click vào các button để chuyển view 1, view 2,view 3 thì URL không thay đổi.
Với những ứng dụng sử dụng Routes đồng thời với việc truyền các params từ URL ,thì code của cta sẽ như sau:
var myRouter = Backbone.Router.extend({

    greeting: null,
    container: null,
    view1: null,
    view2: null,
    view3: null,

    initialize: function () {
        this.greeting = new GreetModel({ Message: "Hello world" });
        this.container = new ContainerView({ el: $("#rAppContainer"), model: this.greeting });
    },

    routes: {
        "": "handleRoute1",
        "view1": "handleRoute1",
        "view2": "handleRoute2",
        "view3": "handleRoute3",
        "view/:viewid(/:msg)": "handleRouteAll"
    },

    handleRoute1: function () {
        if (this.view1 == null) {
            this.view1 = new View1({ model: this.greeting });
        }

        this.container.myChildView = this.view1;
        this.container.render();
    },

    handleRoute2: function () {
        if (this.view2 == null) {
            this.view2 = new View2({ model: this.greeting });
        }

        this.container.myChildView = this.view2;
        this.container.render();
    },

    handleRoute3: function () {
        if (this.view3 == null) {
            this.view3 = new View3({ model: this.greeting });
        }

        this.container.myChildView = this.view3;
        this.container.render();
    },

    handleRouteAll: function (viewid, msg) {

        if (viewid == 1) {
            this.handleRoute1();
        }
        else if (viewid == 2) {
            this.handleRoute2();
        }
        else if (viewid == 3) {
            this.handleRoute3();
        }

        if (msg) {
            alert(msg);
        }
    }
});
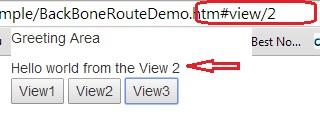
và ta có thế thấy đc sự khác biệt khi thay đổi view:
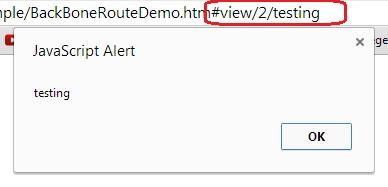
và với việc truyền các params khác ở trên URL:
Tài liệu tham khảo:
All rights reserved
