Web Laravel - Tạo Bot gửi message lên chatwork nhắc nhở lịch học cho sinh viên
Bài đăng này đã không được cập nhật trong 3 năm
Dân IT ai cũng từng là sinh viên hoặc đang là sinh viên, mà đã là sinh viên học theo tín chỉ thì không thể nào nhớ hết được lịch học và mình cũng vậy là một người thường xuyên quên lịch học, nhầm lịch học với lại khi nhìn vào cái lịch học từ web của trường cảm giác muốn nổ tung, phải xem hôm nay là ngày bao nhiêu rồi dò xem hôm nay học môn gì, tiết mấy, phòng học nào ... mà lịch học hiển thị theo dạng file excel nhìn đau đầu thực sự. Chính vì vậy mình viết một ứng dụng web nho nhỏ giải quyết việc này.
Mục Tiêu
Mục tiêu bài viết này là tạo ra 1 ứng dụng web có chức năng sau
- Import lịch học từ file excel, phân tích và hiển thị lên calendar để dễ dàng xem lịch
- Tạo Bot tự động gửi message nhắc nhở lịch học từng ngày
Kèm theo sản phẩm được tạo ra thì mình cũng giới thiệu và hướng dẫn sử dụng một số package hay ho.
một số ảnh demo:
![]()
![]()
Công nghệ và một số package sử dụng
Framework Laravel
Laravel là một PHP Framework mã nguồn mở và miễn phí ...
Package Maatwebsite/Excel
Package này xử lý việc nhập và xuất dữ liệu vào database thông qua các file như excel, csv ...
https://docs.laravel-excel.com/3.1/getting-started/
Package sun-asterisk/chatwork-php
Package này được phát triển bởi bộ phận R&D thuộc Sun-asterisk. Package giúp cho việc thao tác với chatwork dễ dàng hơn...
https://github.com/sun-asterisk-research/chatwork-php
Laravel Full Calendar
Package này hỗ trợ việc tạo calendar
https://github.com/maddhatter/laravel-fullcalendar
Bắt tay vào code
Trước khi code thì mình cũng list ra những việc cần làm đã
- Tạo project laravel, tạo kết nối database
- Tạo giao diện hiển thị calendar
- Lấy file excel lịch học, tạo bảng lưu dữ liệu môn học, tạo form gửi file để xử lý insert vào database
- Hiển thị lịch học lên calendar
- Tạo Bot chatwork, tạo cronjob Bot gửi message lên chatwork nhắc nhở lịch học từng ngày
Phần 1 cài project laravel tạo kết nối database, composer.... mn tự làm nhé, mình sẽ làm hướng dẫn từ phần 2.
Tạo giao diện hiển thị calendar
Phần này sẽ sử dụng đến package Laravel Full Calendar nên mình sẽ cài nó bằng lệnh
composer require maddhatter/laravel-fullcalendar
Tiếp tục tạo CalendarController và router để return ra view
Router
Route::get('/calendar', 'CalendarController@index');
Controller, phần này chỉ hiển thị calendar tạm chưa có dữ liệu tí nữa có dữ liệu mình sẽ truyền vào mảng $events là xong.
<?php

namespace App\Http\Controllers;

use Illuminate\Http\Request;
use App\Event;
use Calendar;

class CalendarController extends Controller
{
    public function index()
    {
        $events = [];
        $calendar = Calendar::addEvents($events);

        return view('calendar', compact('calendar'));
    }
}
Tạo file view calendar.blade.php trong foder resources
<!DOCTYPE html>
<html>
    <head>
        <meta charset="utf-8">
        <meta name="viewport" content="width=device-width, initial-scale=1">
        <title>Calendar</title>

        <link rel="stylesheet" media="screen" href="//netdna.bootstrapcdn.com/bootstrap/3.3.4/css/bootstrap.min.css">
        <script src="//code.jquery.com/jquery.js"></script>
        <script src="//netdna.bootstrapcdn.com/bootstrap/3.3.4/js/bootstrap.min.js"></script>

        <script src="//cdnjs.cloudflare.com/ajax/libs/moment.js/2.9.0/moment.min.js"></script>
        <script src="//cdnjs.cloudflare.com/ajax/libs/fullcalendar/2.2.7/fullcalendar.min.js"></script>
        <link rel="stylesheet" href="//cdnjs.cloudflare.com/ajax/libs/fullcalendar/2.2.7/fullcalendar.min.css"/>
    </head>
    <body>
        <div class="content" style="margin: 50px">
            <a class="btn btn-primary" data-toggle="modal" href='#modal-add'>Import file</a><br><br>
            <div class="modal fade" id="modal-add">
                <div class="modal-dialog">
                    <div class="modal-content">
                        <div class="modal-body">
                            <form action="/calendar/import" method="POST" role="form" enctype="multipart/form-data">
                                <legend>Import file</legend>
                                @csrf
                                <div class="form-group">
                                    <input type="file" class="form-control" name="calendar" id="" placeholder="Input field">
                                </div>
                                <button type="submit" class="btn btn-primary">Submit</button>
                            </form>
                        </div>
                    </div>
                </div>
            </div>

            {!! $calendar->calendar() !!}
            {!! $calendar->script() !!}
        </div>
    </body>
</html>
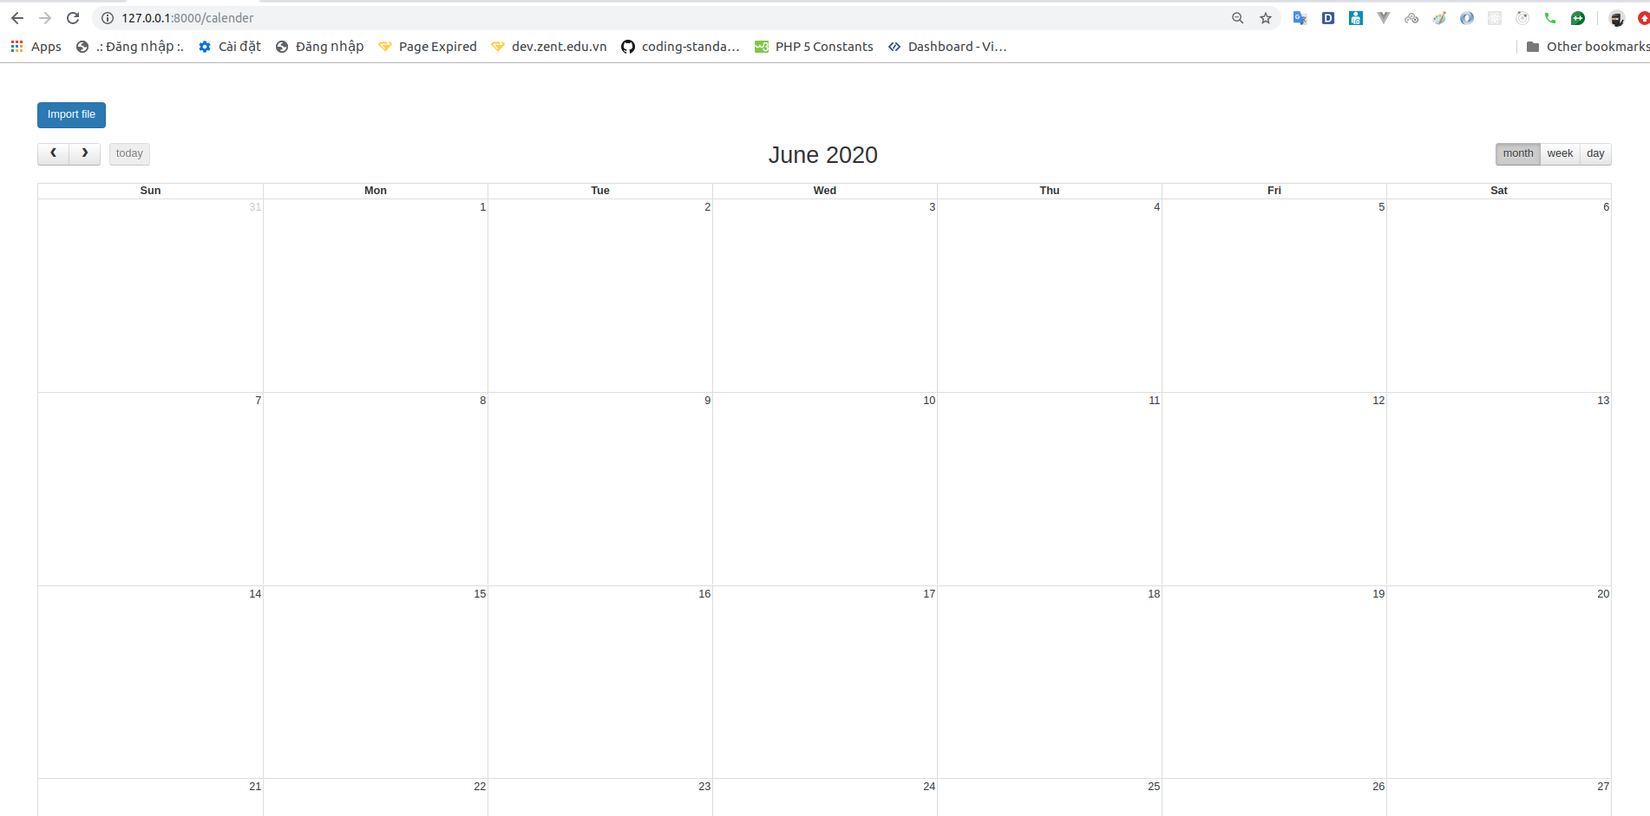
Giao diện trên mình sử dụng các link CDN mn có thể copy về chạy được luôn, giao diện bao gồm một form để mình gửi file và phần calendar để hiển thị lịch, xong thì vào route /calendar sẽ hiện thị giao diện như này
Lấy file excel lịch học, tạo bảng lưu dữ liệu môn học, tạo form gửi file để xử lý insert vào database
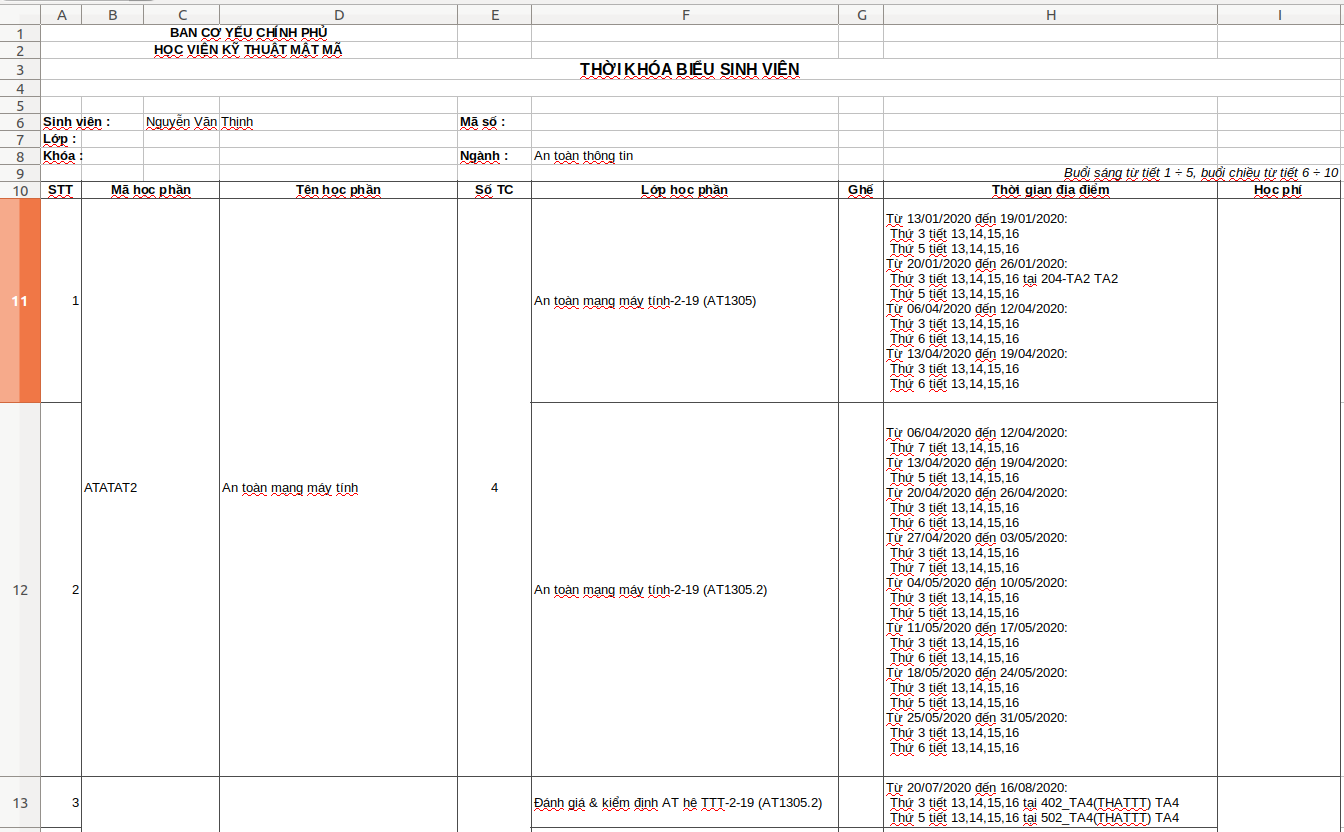
Tiếp theo mình truy cập vào trang web của trường để dowload file lịch học, ở đây mình xuất file theo dạng lớp hiển thị theo học phần, hình như nhiều trường cùng sử dụng 1 mẫu trang web nên có định dạng giống nhau, nếu trường bạn có khác thì không sao hết, sửa lại 1 chút ở phần đọc file thôi
File mở lên có dạng như này, nhìn rắc rối phết nhỉ.
Tiếp theo mình cần tạo bảng để lưu dữ liệu, migrate như sau nhé
    public function up()
    {
        Schema::create('schedules', function (Blueprint $table) {
            $table->bigIncrements('id');
            $table->string('class');
            $table->timestamp('date');
            $table->string('lesson');
            $table->string('room');
            $table->timestamps();
        });
    }
Cột class để lưu tên lớp học, date là ngày học,lession là tiết học, room là địa điểm phòng học. Nhớ tạo model tên là Schedule cho bảng dữ liệu schedules này luôn nhé.
Ở form giao diện phần trước có tạo action gửi đến route "/calender/import" rồi giờ mình tạo router và function nhận file ấy thôi
Router
Route::post('/calender/import', 'CalenderController@import');
Function import bên CalenderController
public function import(Request $request)
{
    Excel::import(new CalenderImport, $request->calender);

    return redirect('/calender');
}
Phần này sử dụng đến package Maatwebsite Excel nên mình sẽ cài nó bằng lệnh
composer require maatwebsite/excel
Publish config
php artisan vendor:publish --provider="Maatwebsite\Excel\ExcelServiceProvider"
Tạo file để sử lý việc đọc file excel và insert dữ liệu vào DB nhé
php artisan make:import CalenderImport --model=Schedule
Nội dung file này như sau
<?php

namespace App\Imports;

use App\Models\Schedule;
use Maatwebsite\Excel\Concerns\ToModel;
use Carbon\Carbon;
use DateTime;

class CalenderImport implements ToModel
{
    /**
    * @param array $row
    *
    * @return \Illuminate\Database\Eloquent\Model|null
    */
    public function model(array $row)
    {
        if($row[0] > 0){
            $period = explode("Từ", $row[7]);

            for($i = 1; $i < count($period); $i++) {
                $dateRange = explode(":", $period[$i]);
                    $date = explode(" đến ", $dateRange[0]);
                    $dateFormat = DateTime::createFromFormat('d/m/Y', trim($date[0]))->format('Y-m-d');
                    $startDate = Carbon::create($dateFormat);
                    $newformat = DateTime::createFromFormat('d/m/Y', trim($date[1]))->format('Y-m-d');
                    $endDate = Carbon::create($newformat);
                    $dayOfWeek = explode("Thứ", $dateRange[1]);

                    for ($j=1; $j < count($dayOfWeek); $j++) {
                        $studyTime = explode(" tiết ", trim($dayOfWeek[$j]));
                        $lesson = explode(" tại ", trim($studyTime[1]));
                        $startDate = Carbon::create($dateFormat);

                        for ( ; $startDate < $endDate; $startDate->addDay()) {
                            if($startDate->dayOfWeek == trim($studyTime[0]) - 1){
                                $data["date"] = $startDate;
                                $data["class"] = $row[5];
                                $data["lesson"] = $lesson[0];
                                $data["room"] = "N/A";
                                if (isset($lesson[1])) {
                                    $data["room"] = $lesson[1];
                                }

                                $user = Schedule::create($data);
                            };
                        }
                    }
                }
            }

        return true;
    }
}
Nhìn loằng ngoằng nhỉ: phần code này mình viết và dùng khoảng 1 năm trước nhưng mình sẽ giữ nguyên như này hơi dài và chưa được tối ưu, với dữ liệu lớn thì sẽ chạy chậm nhưng để demo và giải thích thì có vẻ dễ hiểu hơn
công việc hàm trên như sau, nó sẽ đọc từng row trong file excel, sau đó kiểm tra xem row đó có phải môn học không ( bỏ qua các row thông tin khác ) , nếu nó là row chưa thông tin từng môn học thì mình sử lý cắt chuỗi lấy thời gian học, ngày học, tiết học
, địa điểm học và tính chính sác thời gian ngày học theo khoảng thời gian trên rồi lưu thông tin từng buổi học vào DB ...
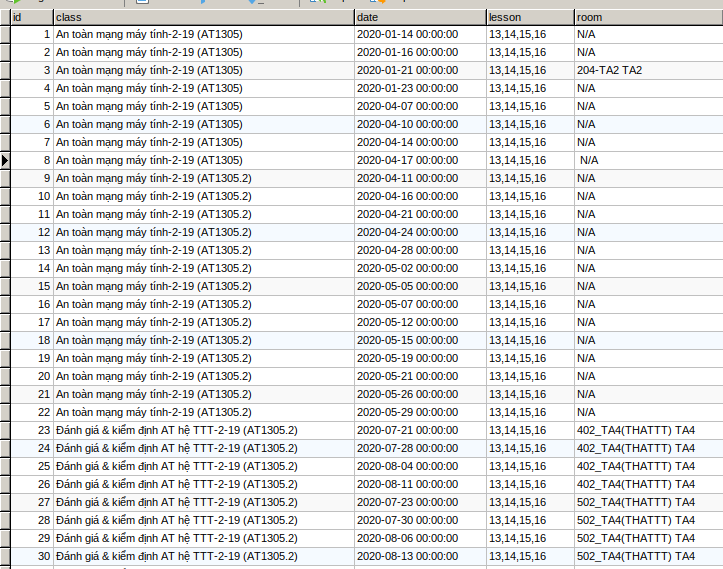
Dữ liệu được lưu vào dưới dang như sau
Hiển thị lịch học lên calender
Phần hiển thị mình chỉ cần lấy dữ liệu ra, tạo even hiên thị lên calender thôi
sửa lại function index bên controller là xong, CalenderController hoàn thiện sẽ như sau
<?php

namespace App\Http\Controllers;

use Illuminate\Http\Request;
use App\Imports\CalenderImport;
use Maatwebsite\Excel\Facades\Excel;
use App\Models\Schedule;
use Carbon\Carbon;
use App\Event;
use DateTime;
use Calendar;

class CalenderController extends Controller
{
    public function index()
    {
        $events = [];
        $data = Schedule::all();
        if($data->count()) {
            foreach ($data as $key => $value) {
                $startDate = Carbon::create($value->date);
                $time = explode(",", trim($value->lesson));
                switch ($time[0]) {
                    case 1:
                        $startDate->addHours(7);
                        break;
                    case 4:
                        $startDate->addHours(9);
                        $startDate->addMinute(30);
                        break;
                    case 7:
                        $startDate->addHours(12);
                        $startDate->addMinute(30);
                        break;
                    case 10:
                        $startDate->addHours(15);
                        $startDate->addMinute(30);
                        break;
                    case 13:
                        $startDate->addHours(18);
                        break;
                    default:
                    $startDate->addHours(18);
                        break;
                }
                $title = $value->room . " - " . $value->class;
                $events[] = Calendar::event(
                    $title,
                    false,
                    new DateTime($startDate),
                    new DateTime($startDate->addHours(2)->addMinute(30)),
                    null,
                    [
                        'color' => '#ff6100',
                    ]
                );
            }
        }
        $calendar = Calendar::addEvents($events);

        return view('calender', compact('calendar'));
    }

    public function import(Request $request)
    {
        Excel::import(new CalenderImport, $request->calender);

        return redirect('/calender');
    }
}
giờ thì vào lại view sẽ thấy lịch học hiển thị


Tạo Bot chatwork, tạo cronjob Bot gửi message lên chatwork nhắc nhở lịch học từng ngày
Phần này trước hết bạn cần có 2 tài khoản https://www.chatwork.com/, 1 tài khoản làm bot để gửi message và một tài khoản nhận message.
có 2 tài khoản này rồi thì mình bắt đầu tạo cronjob để gửi message lên chatwork
Để gửi message lên chatwork thì mình cần cài package sun-asterisk/chatwork-php đã giới thiệu ở đầu bài
composer require sun-asterisk/chatwork-php
xong rồi thì ta tiếp tục chạy lênh để tạo command
php artisan make:command DailyNotification
Lệnh này sẽ tạo ra file DailyNotification.php mình sẽ sử lí việc bắn message ở đây
giờ mình cần lấy token ở tài khoản bot đã, nó sẽ đại diện cho tài khoản bot để gửi message thay vì nhập tài khoản và mật khẩu.
Bạn đăng nhập chatwork và vào link này để lấy token https://www.chatwork.com/service/packages/chatwork/subpackages/api/token.php
Có token rồi thì sửa lại command như sau
<?php
namespace App\Console\Commands;
use Illuminate\Console\Command;
use App\Models\Schedule;
use DateTime;
use SunAsterisk\Chatwork\Chatwork;
use SunAsterisk\Chatwork\Helpers\Message;
class DailyNotification extends Command
{
/**
* The name and signature of the console command.
*
* @var string
*/
protected $signature = 'command:notification';
/**
* The console command description.
*
* @var string
*/
protected $description = 'Send a daily message to chatwork';
/**
* Create a new command instance.
*
* @return void
*/
public function __construct()
{
parent::__construct();
}
/**
* Execute the console command.
*
* @return mixed
*/
public function handle()
{
$now = new DateTime();
$lessions = Schedule::where('date', $now->format('Y-m-d'))->get();
$chatwork = Chatwork::withAPIToken('your-api-token');
foreach ($lessions as $lession) {
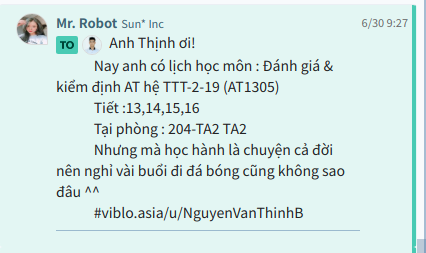
$mg = 'Chào Thịnh!
Nay bạn có lịch học môn : ' . $lession->class . '
Tiết :' . $lession->lesson . '
Tại phòng : ' . $lession->room . '
#viblo.asia/u/NguyenVanThinhB[hr]';
$message = Chatwork::message($mg);
$chatwork->room("your-room-id")->messages()->create((string) $message);
}
}
}
ở đây your-api-token là token nãy lấy ở tài khoản bot của bạn nhé
còn your-room-id là id phòng chát giữa bot và bạn, có thể lấy trực tiếp từ url phòng chát hoặc sử dụng lệnh trong package SunAsterisk\Chatwork
Xong rồi giờ bạn chạy command này là ngay lập tức Bot sẽ gửi messgae cho bạn cái lịch học,
php artisan command:notification
Giờ thì mình tạo lịch cho nó chạy hằng ngày thôi, đăng ký trong kernel và setup cronjob trên máy chủ nhé
    protected function schedule(Schedule $schedule)
    {
        $schedule->command('command:notification')->dailyAt('6:00');
    }
mình cho nó chạy thông báo lúc 6h sáng. Hoặc bạn có thể cho chạy trước mỗi buổi học ...
Kết bài
Bài biết này mình giới thiệu 1 số package và cách áp dụng nó, chỉ vài cái nhỏ nhỏ này thôi cũng làm cho cuộc sống đơn giản, thuận tiện hơn. Cảm ơn mọi người theo dõi, rất mong nhận được sự góp ý của mọi người để mình cải thiện chất lượng bài viết hơn. Thấy nó thú vị thì đừng quên upvote nhé
Make Awesome Things That Matter !
All rights reserved
