[React Native] Dựng base App React Native - Mobx - Form Validation
Bài đăng này đã không được cập nhật trong 2 năm
Chào mọi người. Hôm nay chúng ta sẽ tiếp tục đi tiếp với Mobx nha. Và bài này mình sẽ hướng dẫn các bạn sử dụng Mobx để viết 1 Form Validation (len).
Validation
Validation chắc hẳn sẽ là tính năng mà gần như tất cả các ứng dụng sẽ phải có, và chắc chắn cuộc đời của Dev sẽ gặp nó ở 100% dự án mà các bạn tham gia. Và thông thường khi validation thì chúng ta sẽ đi tìm những thư viện đã support tận răng cho nhanh đúng ko ạ. Nhưng đã bao giờ các bạn tự viết cho mình 1 component validation chưa. Nếu chưa thì bắt tay vào làm thôi.
Yêu cầu bài toán
Với chức năng Vlidation chúng ta sẽ cần phải có:
- Kiểm tra xem form có field nào bị validation không và hiển thị nó ra
- Lấy được form data.
Ok chúng ta sẽ đi làm những chức năng cơ bản này đã nha 
Thư viện cần thiết:
- Chúng ta đã có Mobx
- Chúng ta cần thêm validatorjs
Bùm chúng ta có Custom Validation.
Cài đặt ValidationJS
- Chúng ta cài đặt bằng Yarn hoặc NPM và mình thì đang sử dụng Yarn nha mn
yarn add validatorjs
yarn add @types/validatorjs --dev
Để sử dụng ValidationJS thì chúng ta cần phải set language cho nó, va chúng ta làm điều này ở App.tsx như sau:
useEffect(() => {
    Validator.setMessages('en', en);
  }, []);
FormField
Nguyên liệu đã có đầy đủ rồi, giờ là lúc chúng ta đi chế biến nó thôi. Đầu tiên mình sẽ tạo ra FormField Object. Đây sẽ là trung tâm xử lý validation của toàn bộ App chúng ta. Vậy nó có gì trong đó
fields
Kiểu dữ liệu: Object
export declare type Field = {
  value: string | number | Date | string[];
  error: string;
  rule: string[];
  name: string;
  customMessage?: object;
  fieldAlias?: string;
};

export declare type Parameter = {
  [key: string]: Field;
};

 @observable fields: Parameter = {};
- Đây là object chứa các thông tin các field mà chúng ta sẽ tiến hành validation.
- Mỗi một key sẽ đại diện cho một field, bao gồm:
- value: giá trị hiện tại của field
- error: error message, là error đầu tiên nếu validation trả về nhiều error
- rule: là 1 string array chứa các rule mà chúng ta quy định
- name: tên của field, nếu ko dùng alias thì sẽ hiển thị tên này ra cùng error
- fieldAlias: string này được dùng để hiển thị thay thế name trong error message.
initParameter
Kiểu dữ liệu: Function
@action initParameter(fields: Parameter): void {
    this.fields = fields;
  }
- Được sử dụng để khởi tạo ở mỗi form mà chúng ta sử dụng validation, xem chi tiết ở phần ví dụ.
checkFormValidate
Kiểu dữ liệu: Function
@action checkFormValidate() {
    Object.keys(this.fields).map((key) => {
      const ruleObj: { [name: string]: string } = {};
      const field = this.fields[key];

      const fieldName = field.name;

      if (field.rule.length > 0) {
        ruleObj[fieldName] = field.rule.join('|');
      }

      const fieldCustomMessage = field.customMessage ? { ...field.customMessage } : {};
      let valueObj = { [fieldName]: field.value };
      field.rule.forEach((rule: string) => {
        if (rule.startsWith(ValidationRule.Same)) {
          const appendFieldName = rule.replace(`${ValidationRule.Same}:`, '');
          if (appendFieldName) {
            const appendField = this.fields[appendFieldName];
            valueObj = { ...valueObj, ...{ [appendFieldName]: appendField.value } };
          }
        }
      });

      const validation = new Validator(valueObj, ruleObj, fieldCustomMessage);

      if (field.fieldAlias) {
        validation.setAttributeNames({ [fieldName]: field.fieldAlias });
      }
      validation.passes();
      const error = validation.errors.first(fieldName);
      this.fields[key].error = error || '';
    });
  }
Nó được sử dụng trước khi submit form để check xem trong form có field nào bị validation hay không. Nó chính là phần quan trọng nhất của chúng ta. Chúng ta sẽ sử dụng thư viện ValidationJS tại đây, và chúng ta sẽ cần phải chuẩn bị những gì cho ValidationJS.
- Chúng ta sẽ duyệt từng key một trong object
fields - Với mỗi key chúng ta sẽ lấy được các thông tin cần thiết nhất là
rulevàvalue - Kiểm tra xem object hiện tại có
custom messagekhông, nếu có thì đưa nó đưa nó vàoValidator - Tiếp theo là chúng ta set alias nếu field có setup.
- Đến đoạn này thì chúng ta đã chuẩn bị xong các parameter cần thiết cho
ValidationJSrồi và chỉ cần thực thi validation bằng cú phápvalidation.passes(). - Sau khi thực hiện validation thì chúng ta sẽ kiểm tra xem
ValidationJScó trả vềerror messagenào không, có thì chúng ta sẽ lấy message đầu tiên và gán cho keyerror.
isFormValid
Kiểu dữ liệu: Boolean
 @computed get isFormValid(): boolean {
    const errorList = Object.keys(this.fields).map((key) => {
      const field = this.fields[key];
      return field.error;
    });
    return !errorList.some((value) => !isEmpty(value));
  }
- Trả về kết quả xem form đó có valid hay ko.
formData
Kiểu dữ liệu: Json
@computed get formData(): any {
    return this.getFormData();
  }

  private getFormData(isSnake?: boolean, input?: Parameter): any {
    const data: { [name: string]: string | number | Date | any[] } = {};
    const dataInput = input ?? this.fields;
    Object.keys(dataInput).map((key) => {
      const keyName = isSnake ? this.camelToSnake(key) : key;
      const value = dataInput[key].value;
      const isString = typeof value === 'string';
      data[keyName] = isString ? value.toString().trim() : dataInput[key].value;
    });

    return data;
  }
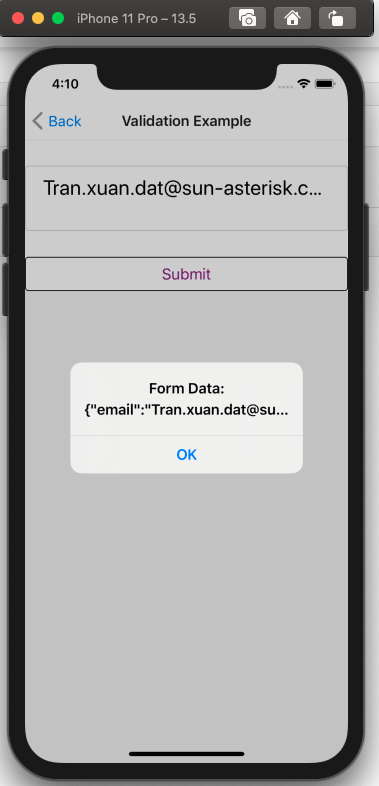
trả về cho chúng ta form data kiểu Json, ví dụ như:
{"email": "Tran.xuan.dat@sun-asterisk.com"}
Triển khai thực tế
Như đã môt tả ở trên thì bây giờ ở các màn hình chúng ta sẽ cần phải setup như sau:
Khởi tạo Validation
Để khởi tạo validation chúng ta sẽ khởi tạo trong hook useFocusEffect của Navigation, khởi tạo ở đây sẽ đảm bảo cho chúng ta khi focus vào screen thì validation cũng được khởi tạo lại.
import FormFields from './FormFields';

const initFields = {
  email: {
    value: '',
    rule: [ValidationRule.Required, ValidationRule.Email],
    error: '',
    name: 'Email',
    fieldAlias: 'Email Alias',
  },
};

useFocusEffect(
    React.useCallback(() => {
      FormFields.initParameter(initFields);
    }, []),
  );
Mapping giữa FormField và Input.
Mọi thứ chuẩn bị đã xong, bây giờ chúng ta sẽ setup cho Input. Setup Input sẽ phải đảm bảo như sau:
- Value của Formfield sẽ luôn được phản ánh lên input
- Mỗi lần Input thay đổi thì FormField sẽ được cập nhật lại gía trị mới nhất.
const onChangeText = (text: string) => {
    if (fields) {
      fields.email.value = text;
    }
  };

  const onValidation = () => {
    FormFields.checkFormValidate();
    if (FormFields.isFormValid) {
      console.log(FormFields.formData);
      Alert.alert(`Form Data: ${JSON.stringify(FormFields.formData)}`);
    } else {
      Alert.alert(fields.email?.error);
    }
  };

<View style={styles.body}>
    <View style={styles.inputContainer}>
      <TextInput
        style={styles.input}
        value={fields.email?.value?.toString()}
        underlineColorAndroid="transparent"
        onChangeText={onChangeText}
        autoFocus
        placeholder="Text Input"
      />
      <Text style={styles.errorText}>{fields.email?.error}</Text>
    </View>
    <View style={styles.buttonContainer}>
      <Button title="Validation" color="#841584" onPress={onValidation} />
    </View>
</View>
Và có một điều các bạn cần chú ý, đó là phải wrap screen trong observer
const ValidationInputScreen = () => {
.
.
.
}

export default observer(ValidationInputScreen);
Full code
import { observer } from 'mobx-react';
import React from 'react';
import { Alert, Button, SafeAreaView, StyleSheet, Text, TextInput, View } from 'react-native';
import { Colors } from 'react-native/Libraries/NewAppScreen';

import { ValidationRule } from './constants/ValidationRules';
import { useFocusEffect } from '@react-navigation/native';
import FormFields from './FormFields';

const initFields = {
  email: {
    value: '',
    rule: [ValidationRule.Required, ValidationRule.Email],
    error: '',
    name: 'Email',
    fieldAlias: 'Email Address',
  },
};

const ValidationInputScreen = () => {
  const fields = FormFields.Fields;
  useFocusEffect(
    React.useCallback(() => {
      FormFields.initParameter(initFields);
    }, []),
  );

  const onChangeText = (text: string) => {
    if (fields) {
      fields.email.value = text;
    }
  };

  const onValidation = () => {
    FormFields.checkFormValidate();
    if (FormFields.isFormValid) {
      Alert.alert(`Form Data: ${JSON.stringify(FormFields.formData)}`);
    } else {
      Alert.alert(fields.email?.error);
    }
  };

  return (
    <SafeAreaView>
      <View style={styles.body}>
        <View style={styles.inputContainer}>
          <TextInput
            style={styles.input}
            value={fields.email?.value?.toString()}
            underlineColorAndroid="transparent"
            onChangeText={onChangeText}
            autoFocus
            placeholder="Text Input"
          />
          <Text style={styles.errorText}>{fields.email?.error}</Text>
        </View>
        <View style={styles.buttonContainer}>
          <Button title="Validation" color="#841584" onPress={onValidation} />
        </View>
      </View>
    </SafeAreaView>
  );
};

const styles = StyleSheet.create({
  body: {
    backgroundColor: Colors.white,
  },
  inputContainer: {
    width: '100%',
    borderRadius: 4,
    borderStyle: 'solid',
    borderWidth: 1,
    borderColor: '#D3D3D3',
    marginVertical: 30,
    paddingHorizontal: 20,
  },
  input: {
    fontSize: 24,
    color: 'black',
    paddingVertical: 0,
    paddingHorizontal: 0,
    fontWeight: 'normal',
    borderBottomWidth: 0,
    height: 50,
  },

  buttonContainer: {
    textAlign: 'center',
    borderWidth: 1,
    borderRadius: 4,
    width: '100%',
    backgroundColor: 'white',
    color: 'black',
    borderColor: 'black',
  },
  errorText: {
    fontSize: 10,
    color: 'red',
    marginBottom: 10,
  },
});

export default observer(ValidationInputScreen);
Screen Shoot


All rights reserved
