Mobile Automation with Appium, TestNG and Allure Report
Bài đăng này đã không được cập nhật trong 5 năm
Report là một mẫu tài liệu rất quan trọng trong kiểm thử. Hiện nay có một số tool/framework cho bạn lựa chọn mà không cần phải tự tạo. Hôm nay tôi sẽ giới thiệu và hướng dẫn một framework theo mình là khá đầy đủ thông tin đó là Allure Framework.
Allure Framework là một công cụ báo cáo kiểm thử đã ngôn ngữ, không chỉ biểu diễn ngắn gọn về những gì đã kiểm thử trong một report mà còn cho phép mọi người tham gia vào quá trình phát triển để trích xuất tối đa các thông tin hữu ích.
Từ góc nhìn của Dev/QA, nó là một báo cáo rút ngắn vòng đời lỗi phổ biến: test lỗi, bugs, có thể cấu hình logs, steps, thời gian, lịch sử, tệp đính kèm, và tích hợp với TMS và hệ thống theo dõi lỗi. Vì vậy, developer và tester có trách nhiệm sẽ có tất cả các thông tin đó trong tầm tay.
Từ góc nhìn của Manager, Allure cung cấp một bức tranh tổng quan về những tính năng nào đã được đề cập, thời gian thực hiện như thế nào và nhiều thuận tiện khác.
Dưới đây là một ví dụ nho nhỏ về cách tích hợp Allure framework vào mobile test automation project với Appium và TestNG.
Đầu tiên, tôi muốn tổng hợp các tool và framework mà chúng ta sử dụng trong project này:
- Programming Language: Java
- Mobile Test Automation Framework: Appium
- Test Runner Framework: TestNG
- Reporting Framework: Allure Report
- **Build Tool: ** Gradle
- Loggin Framework: Log4j
Bước 1: Gradle Declaration build.gralde Để extend Allure, chúng ta cần phải khai báo dòng dưới đây. Đối với mã hóa UTF-8 trong khi biên dịch JAVA, chúng ta cần thêm dòng dưới đây:
tasks.withType(JavaCompile) {
    options.encoding = 'UTF-8'
}
Dependencies
dependencies {
    agent "org.aspectj:aspectjweaver:1.8.10"
    classpath 'com.android.tools.build:gradle:2.3.0'
    compile group: 'org.testng', name: 'testng', version: '6.9.5'
    compile group: 'io.appium', name: 'java-client', version: '4.1.2'
    compile group: 'com.googlecode.json-simple', name: 'json-simple', version: '1.1.1'
    compile group: 'log4j', name: 'log4j', version: '1.2.17'
    compile group: 'com.relevantcodes', name: 'extentreports', version: '2.41.2'
    compile group: 'ru.yandex.qatools.ashot', name: 'ashot', version: '1.5.4'
    compile group: 'io.qameta.allure', name: 'allure-testng', version: '2.0-BETA20'
    compile group: 'org.springframework.amqp', name: 'spring-amqp', version: '1.0.0.RELEASE'
}
Plugin:
plugins {
    id 'java'
    id 'ru.vyarus.quality' version '2.2.0'
    id "io.qameta.allure" version "2.5"
}
Khai báo TestNG Suite và Test Task
test {
    useTestNG() {
        scanForTestClasses = false
        suites 'TestNG.xml'
        ignoreFailures = true
    }
    testLogging {
        events "PASSED", "STARTED", "FAILED", "SKIPPED"
    }
    systemProperty 'env', System.getProperty('env', 'all')
}
Đối với lệnh "allureServe", chúng ta cần thêm dòng dưới đây:
allure {
    autoconfigure = true
    version = '2.5.0'
    useTestNG {
        version = '2.0-BETA15'
    }
}
Bước 2: Cài đặt thiết bị Để test một ứng dụng sử dụng Appium, thiết bị IOS và Android phải được xác định và cài đặt của chúng nên được khai báo, và những thiết bị này nên được bật lên và chạy trước mỗi lần kiểm thử, sau khi kiểm thử chúng nên được tắt đi. Có thể sử dụng thiết bị thật cũng như giả lập để test, không có sự khác biệt. Trong prepareDevice function, đường dẫn của ứng dụng được kiểm thử thì được đưa ra dưới dạng app.apk trong thư mục ứng dụng. Bạn có thể định nghĩa đường dẫn ứng dụng theo cấu trúc project của bạn.
static AppiumDriver prepareDevice(String deviceName, String version, String url) throws MalformedURLException {
     File appDir = new File("/application");
     File app = new File(appDir, "app.apk");
     DesiredCapabilities capabilities = new DesiredCapabilities();
     capabilities.setCapability(MobileCapabilityType.PLATFORM_NAME, MobilePlatform.ANDROID);
     capabilities.setCapability(MobileCapabilityType.DEVICE_NAME, deviceName);
     capabilities.setCapability(MobileCapabilityType.NO_RESET, false);
     capabilities.setCapability(MobileCapabilityType.PLATFORM_VERSION, version);
     capabilities.setCapability(MobileCapabilityType.APP, app.getAbsolutePath());
     capabilities.setCapability(MobileCapabilityType.NEW_COMMAND_TIMEOUT, 60000);
     capabilities.setCapability("--session-override", true);
     driver = new AndroidDriver(new URL(url), capabilities);
     return driver;
}
Với cả hai, tên thiết bị, phiên bản và thông tin URL của máy chủ Appium nên được xác định. Trong project này, chúng ta đã khái báo thông tin này trong file env.json. Thông tin thiết bị nên được đọc từ tham số build khi các thử nghiệm đang chạy ở cả môi trường local và remote.
env.json File:
Đây là thông tin thiết bị được định nghĩa và nó đã được chuyển đến function prepareDevice như một tham số.
{
  "local": {
    "device": "192.168.56.101:5555",
    "version": "6.0",
    "appVersion": "v.1.0.0",
    "url": "http://127.0.0.1:4723/wd/hub"
  },
  "remote": {
    "device": "remoteDevice",
    "version": "remoteDeviceVersion",
    "appVersion": "appVersion",
    "url": "remoteAppiumServerUrl"
  }
}
Bước 3: Xác định BasePage.class
Trong class BasePage, chúng ta định nghĩa những common function mà chúng ta sẽ sử dụng trong project. Những class kế thừa class BasePage, chúng sẽ sử dụng những common function bên trong class BasePage. Như là: click(), getText(), sendText(), etc
class BasePage {

    public AppiumDriver driver;
    public WebDriverWait wait;

    By closeButton = By.id("com.testm.app:id/back_cancel_button");

    //Constructor
    public BasePage(AppiumDriver driver) {
        this.driver = driver;
        wait = new WebDriverWait(driver,15);
    }

    void click(By element) throws InterruptedException {
        wait.until(ExpectedConditions.elementToBeClickable(element));
        driver.findElement(element).click();
    }
ChargerTestFunction kế thừa class BasePage và sử dụng function click() của nó. Vì vậy chúng ta có thể sử dụng common functions trong các class bằng cách kế thừa class BasePage và chỉ cần gọi chúng. Đây là lợi thế chính của kế thừa trong Object Oriented Design.
public class ChargerTestFunction extends BasePage {

    private By hardwareButton = By.id("com.testm.app:id/hardware_pb");
    private By startButton = By.id("com.testm.app:id/startTestTv");
    /**
     * Charger Test
     */
    private By chargerButton = By.id("com.testm.app:id/charger_bt");
    private By chargerTestResult = By.id("com.testm.app:id/test_details");
    /**
     * Hardware Button Control
     */
    private By hardwareButtonControlResult = By.id("com.testm.app:id/test_details");
    private By hardwareButtonControl = By.id("com.testm.app:id/hardwareButtons_bt");

    public ChargerTestFunction(AppiumDriver driver) {
        super(driver);
    }


    @Step("Click hardware button and charger is tested")
    public void chargerTest() throws InterruptedException {
        click(hardwareButton);
        click(chargerButton);
        click(startButton);
        String chargerTestSuccsessMsg = "The Charger check passed the test";
        Assert.assertEquals(getText(chargerTestResult), chargerTestSuccsessMsg);
        click(closeButton);
    }

    @Step("Click hardware button and hardware button is tested")
    public void hardwareButtonControlTest() throws InterruptedException {
        click(hardwareButton);
        click(hardwareButtonControl);
        click(startButton);
        ((AndroidDriver) driver).pressKeyCode(AndroidKeyCode.KEYCODE_VOLUME_UP);
        ((AndroidDriver) driver).pressKeyCode(AndroidKeyCode.KEYCODE_VOLUME_DOWN);
        ((AndroidDriver) driver).pressKeyCode(AndroidKeyCode.KEYCODE_POWER);
        ((AndroidDriver) driver).pressKeyCode(AndroidKeyCode.KEYCODE_POWER);
        String hardwareButtonControlSuccessMsg = "The Hardware Buttons check passed the test";
        Assert.assertEquals(getText(hardwareButtonControlResult), hardwareButtonControlSuccessMsg);
        click(closeButton);
    }
Bước 4: Viết Test Cases
@Step("Click hardware button and charger is tested")
  public void chargerTest() throws InterruptedException {
      click(hardwareButton);
      click(chargerButton);
      click(startButton);
      String chargerTestSuccsessMsg = "The Charger check passed the test";
      Assert.assertEquals(getText(chargerTestResult), chargerTestSuccsessMsg);
      click(closeButton);
}
@Test
@Description("Test Description: Is charger plugin check of your mobile device")
@Story("Charger Plugin Test")
public void chargerTest() throws InterruptedException {
    ChargerTestFunction chargerTestFunction = new ChargerTestFunction(driver);
    chargerTestFunction.chargerTest();
}
Tất cả các class test đều kế thừa BaseTest. Trong class BaseTest chúng ta sử dụng prepareDevice function mà đã định nghĩa ở bước 2. Trước khi thực hiện test, thiết bị được bật và sau khi thực hiện test, thiết bị sẽ tắt đi.
Trong class BaseTest, chúng ta có thể khai báo những biến common mà chúng ta sử dụng trong tất cả các class test. Tất cả các class test kế thừa class BaseTesst và trong cách này chúng ta không cần viết thêm codes cho biến và functions common. Nó là lợi thế của kế thừa.
private void setDevice(String device) {
    this.device = device;
}

private String getVersion() {
    return version;
}

private void setVersion(String version) {
    this.version = version;
}

private String getUrl() {
    return url;
}

private void setUrl(String url) {
    this.url = url;
}


@BeforeSuite()
public void setUp() throws MalformedURLException, InterruptedException, FileNotFoundException {
    GetEnvironment environment = new GetEnvironment();
    setDevice(environment.getEnvironment("device"));
    setVersion(environment.getEnvironment("version"));
    setUrl(environment.getEnvironment("url"));
    DeviceSetup.prepareDevice(getDevice(), getVersion(), getUrl());
    wait = new WebDriverWait(driver,15);
    SkipAppFunction skipAppFunction = new SkipAppFunction(driver);
    skipAppFunction.clickNextButton();
}

@AfterSuite
public void tearDown() {
    driver.quit();
}
Các hàm setDevice, setVersion, setUrl ở trên đặt các tham số device mà chúng ta đã định nghĩa ở bước 2 và thiết bị bật theo những tham số này. Một lẫn nữa chúng ta nhìn thấy ở trên, những biến common được định nghĩa trong class. Chúng ta sẽ sử dụng chúng trong các class test hoặc class TestListener bằng cách kế thừa class BaseTest.
Bước 5: Test Listener Mục đích của Test Listener là để xác định hành động sẽ được thực hiện trong trường hợp trạng thái thành công hay thất bại và trong phần đầu và phần cuối của bài test. Class này kế thừa class BaseTest. Ngoài ra, class này implements ITestListener để quản lý status của bài test. Chúng ta cần thêm test listener bằng cách sử dụng @Listener annotation trong các class test.
Bước 6: Tạo Allure Report và Allure Report Annotations
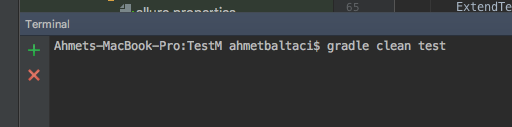
Trong thư mục project, viết câu lệnh "grade clean test". Project được bắt đầu quá trình build, thiết bị được bật và tests bắt đầu chạy.
Khi tests đã được chạy, ExtendTestManager đã được bắt đầu trong method onStart của TestListener. Sau khi thực hiện tất cả các test case qá trình này được dừng lại bằng method onFinish. Sau đó "Gradle allureServe" được viết và thực hiện trong teminal. Báo cáo mở trên trình duyệt.
Report output
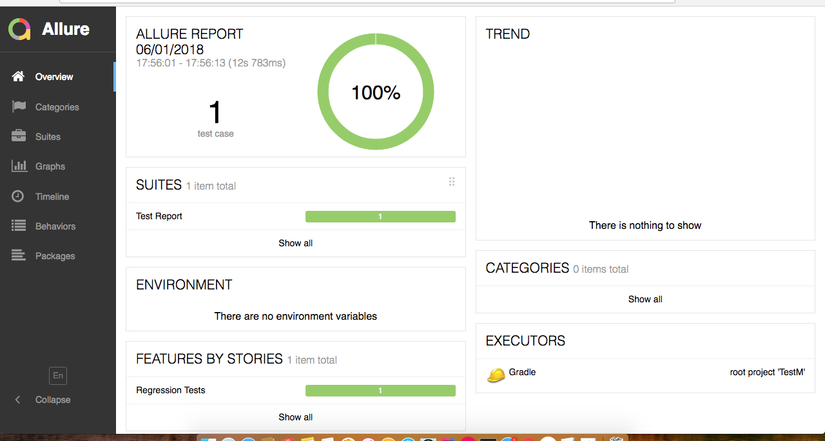
Để tạo report Allure trong project, ''grade allureReport" được viết và thực hiện terminal và report được chỉ định trong alure.properties file được tạo.

Annotations
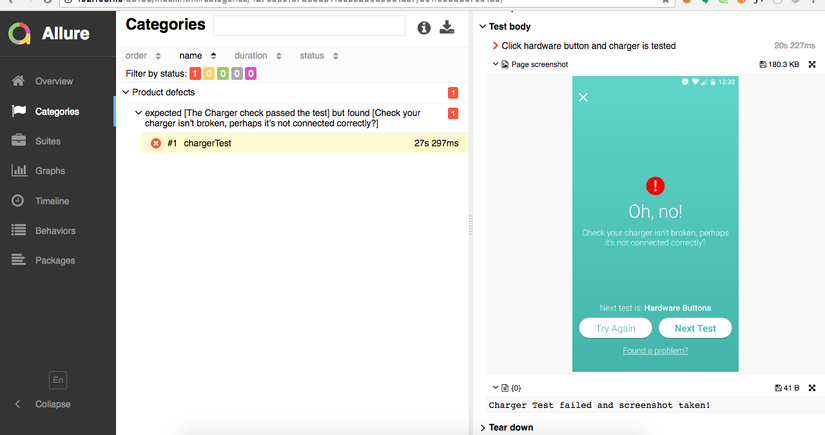
Với annotaion này, chúng ta có thể thêm một ảnh chụp màn hình, file hoặc text trên Allure report. Trong project, định nghĩa tệp đính kèm được khai báo trong Test Listener và được sử dụng trong hàm onTestFailure. Mục đích là tự động thêm ảnh chụp màn hình, tin nhắn, hoặc fule kiểm tra không thành công.
@Attachment(value = "{0}", type = "text/plain")
private static String saveTextLog(String message) {
    return message;
}

@Attachment(value = "{0}", type = "text/html")
public static String attachHtml(String html) {
    return html;
}

private String getTestResult() {
    return testResult;
}

private void setTestResult(String testResult) {
    this.testResult = testResult;
}

@Attachment(value = "Page screenshot", type = "image/png")
private byte[] saveScreenshotPNG(WebDriver driver) {
    return ((TakesScreenshot) driver).getScreenshotAs(OutputType.BYTES);
}
@Override
public void onTestFailure(ITestResult result) {
    setTestResult("FAILED");
    setTestFailedMsg(result.getThrowable().getMessage());
    Object testClass = result.getInstance();
    WebDriver driver = ((BaseTest) testClass).getDriver();
    //Allure ScreenShotRobot and SaveTestLog
    if (driver != null) {saveScreenshotPNG(driver);}
    //Save a log on allure.
    saveTextLog(getTestCaseName() + " failed and screenshot taken!");
    //Take base64Screenshot screenshot for extent reports
    assert ((TakesScreenshot) driver) != null;
    String screenshot = "data:image/png;base64," + ((TakesScreenshot) driver).getScreenshotAs(OutputType.BASE64);
    //Extentreports log and screenshot operations for failed tests.
    ExtendTestManager.getTest().log(LogStatus.FAIL, "Test Failed",ExtendTestManager.getTest().addBase64ScreenShot(screenshot));
}
Nó được định nghĩa trong class Test. Nó thực hiện những hành động được lấy trước và sau khi test, trong trường hợp điều kiện thành công hay thất bại. Bạn có thể định nhĩa listener trong mỗi test class cũng như trong thẻ <listener> bên trong TestNG suite.xml. Trong đoạn mã code dưới đây, tôi sử dụng @Listeners, @Epic, @Feature, @Serverity annotation.
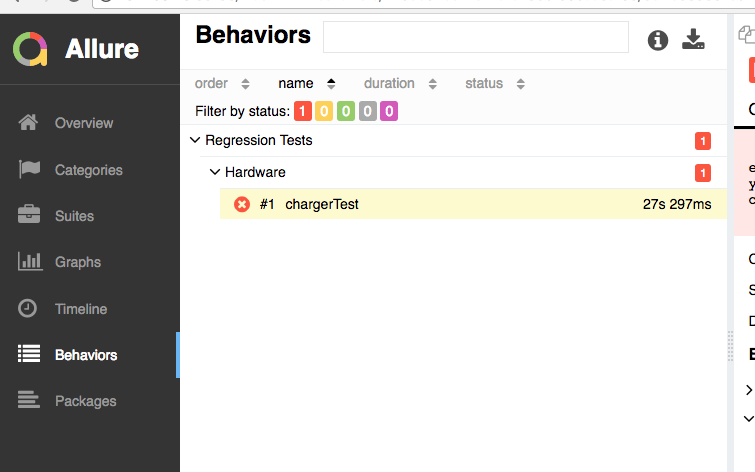
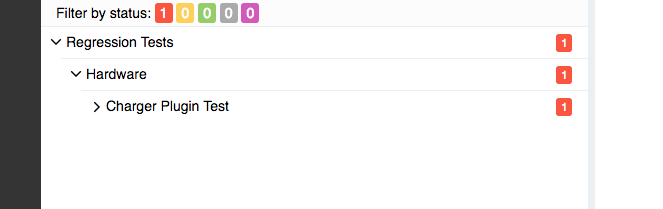
@Listeners({TestListener.class})
@Epic("Regression Tests")
@Feature("Hardware")
@Severity(SeverityLevel.BLOCKER)
public class ChargerTest extends BaseTest {

    @Test
    @Description("Test Description: Is charger plugin check of your mobile device")
    @Story("Charger Plugin Test")
    public void chargerTest() throws InterruptedException {
        ChargerTestFunction chargerTestFunction = new ChargerTestFunction(driver);
        chargerTestFunction.chargerTest();
    }
}
Annotation này được sử dụng để thu thập các bài test theo epic. Ví dụ: nếu bạn sử dụng @Epic (“Regression Tests”), bạn có thể thấy tất cả các test dưới dạng "Regrestion Test" trên tab Behaviors của Allure Report.
@Feature
Trong phần này. chúng tôi mô tả những tính năng của ứng dụng sẽ được test. Ảnh bên dưới cung cấp cho bạn thông tin chi tiết hơn về 2 annotations này.
@Severity
Đặc điểm này của Allure report được sử dụng để xác định mức độ quan trọng của test case. Điểm test của chúng ta là gì? Blocker, Critical, Minor, Normal, v.v...
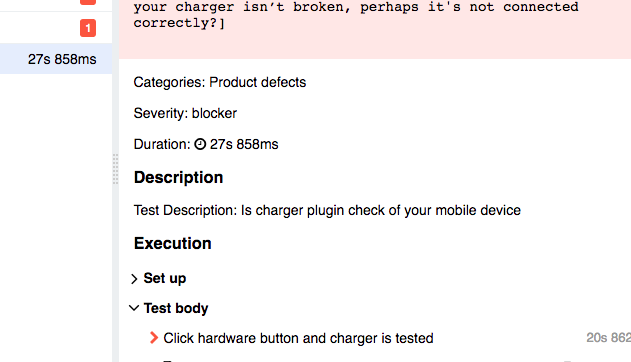
@Story
Ở đây, kịch bản test được định nghĩa. Kích bản nào chúng ta đang thử nghiệm có thể được xác định ở đây.
@Description
Chúng ta có thể cung cấp nhiều thông tin chi tiết hơn cho user về bài test.

@Issue Một trong những đặc điểm nổi bật của Allure Report là @Issue và @Issues annotations. Ở đây, nếu test case đang test một issue trên JIRA, chúng ta định nghĩa mã JIRA để liên kết với nó. Tại thời điểm này, bạn sẽ thấy báo cáo chứa liên kết đến JIRA trong test case. @Issues annotation được sử dụng trong trường hợp được liên kết với nhiều task JIRA.
Ví dụ
@Issues ({
@Issue(“MT-500”),
@Issue(“MT-501”)
})
Để liên kết JIRA với các trường hợp thử nghiệm, bạn có thể xác định JIRA URL trong file allure.properties.
Nguồn tham khảo: https://www.swtestacademy.com/appium-testng-allure/ https://docs.qameta.io/allure/
All rights reserved
