Làm ứng dụng học toán đơn giản với React Native - Phần 2
Bài đăng này đã không được cập nhật trong 3 năm
Ban đầu khi ra mắt bài viết đầu về làm ứng dụng học toán đơn giản, mình cũng không nghỉ mình sẽ viết tiếp phần 2 !^.^ . Nhưng bản thân nhận thấy app có khá nhiều hướng để phát triển nên cứ tiện tay code thêm, nên giờ cũng tiện tay viết tiếp phần 2 cho nó :v. Nên từ giờ, mình sẽ khởi động seri này, biến 1 cái app tưởng chừng không có gì, nhưng thật ra là rỗng tuếch (đùa thôi nhé :v), qua thời gian, mình sẽ áp dụng dần dà các kỹ thuật trong React Native mà mình được tiếp xúc như Notifications, Authentication, Biometric, vân vân và mây mây ...
Mình nghĩ giới thiệu chắc như vậy cũng đủ rồi nhỉ :3, giờ bắt đầu thôi nào
1) Cài đặt
Trong bài viết này, có 2 điều mình sẽ thêm vào app, cũng như giúp các bạn tiếp tục làm quen với những thứ cơ bản nhất trong React Native, đó là @react-navigation/native và mobx, trong đó @react-navigation/native dùng để chuyển qua lại giữa các màn hình, còn mobx dùng để quản lý state (đối với những bạn mới thì mobx là lựa chọn không tệ để bắt đầu học về cách quản lý state)
Docs của 2 em nó mobx : https://mobx.js.org/README.html#getting-started, https://reactnavigation.org/docs/getting-started
2)@react-navigation/native
Chúng ta sẽ chỉnh lại 1 số file và tạo thêm 1 số file mới, đầu tiên là App.js,
import 'react-native-gesture-handler';
import * as React from 'react';
import { NavigationContainer } from '@react-navigation/native';

import WelcomeStack from './src/navigation/welcomeStack';

export default function App() {
  return (
    <NavigationContainer>
      <WelcomeStack />
    </NavigationContainer>
  );
}
ở đây mình có tạo ra 1 Stack Welcome, mục đích là để chứa 3 màn hình con khác, bao gồm welcome, practice và failed
WelcomeStack.js đây :v
import React from 'react';
import Practice from '../screen/practice';
import Failed from '../screen/failed';
import WelcomeScreen from '../screen/welcome';
import { StackRoute } from '../constants/route';
import { createStackNavigator } from '@react-navigation/stack';

const Stack = createStackNavigator();

const WelcomeStack = () => {
  return (
    <Stack.Navigator initialRouteName={StackRoute.Main.Welcome}>
      <Stack.Screen
        name={StackRoute.Main.Welcome}
        component={WelcomeScreen}
        options={{ headerShown: false }}
        backBehavior="none"
      />
      <Stack.Screen
        name={StackRoute.Main.Practice}
        component={Practice}
        options={{ headerShown: false }}
      />
      <Stack.Screen
        name={StackRoute.Main.Failed}
        component={Failed}
        options={{ headerShown: false }}
      />
    </Stack.Navigator>
  );
};

export default WelcomeStack;
Vì để cho tiện việc phát triển sau này, nên tên của các màn hình, hay Stack, mình đều thông báo vào 1 file chung là route.js như trên,
các bạn cũng nên có 1 bố cục sắp xếp folder và file hợp lý để sau này lỡ dự án có phình to ra thì cũng không cần phải sắp xếp lại. Các bạn có thể tham khảo qua file route.js của mình:
export const StackRoute = {
  Main: {
    Welcome: 'Welcome',
    Practice: 'Practice',
    Failed: 'Failed',
  },
};
Tiếp theo là 3 file lần lượt là welcome.js, practice.js, failed.js
// welcome.js
import React, { useRef, useEffect } from 'react';
import {
  StyleSheet,
  View,
  Text,
  TouchableHighlight,
  Image,
  Animated,
} from 'react-native';
import { useNavigation } from '@react-navigation/native';

import {
  colors,
  fonts,
  spaces,
  borderRadius,
  borderWidth,
} from '../constants/theme';

import { PlayIcon } from '../assets/icons/index';
import { StackRoute } from '../constants/route';

export default function WelcomeScreen() {
  const Navigate = useNavigation();
  const fadeAnim = useRef(new Animated.Value(0)).current;

  useEffect(() => {
    Animated.timing(fadeAnim, {
      toValue: 1,
      duration: 3000,
      useNativeDriver: true,
    }).start();
  }, []);
  return (
    <View style={styles.container}>
      <View style={styles.titleContainer}>
        <Text style={[styles.styleTitle, styles.title1]}>Happy</Text>
        <Text style={[styles.styleTitle, styles.title2]}>Math</Text>
      </View>
      <View style={styles.expressionContainer}>
        <View style={styles.numberContainer}>
          <Text style={styles.number}>1 + 1</Text>
          <Text style={styles.number}>= 3</Text>
        </View>
        <Animated.View style={{ opacity: fadeAnim }}>
          <Text style={styles.questionMark}>?</Text>
        </Animated.View>
      </View>
      <TouchableHighlight
        style={styles.imageContainer}
        onPress={() => Navigate.navigate(StackRoute.Main.Practice)}>
        <Image source={PlayIcon} />
      </TouchableHighlight>
    </View>
  );
}

const styles = StyleSheet.create({
  container: {
    flex: 1,
    backgroundColor: colors.bg_primary,
    justifyContent: 'center',
    alignItems: 'center',
  },
  titleContainer: {
    flexDirection: 'row',
    alignItems: 'center',
    borderWidth: borderWidth.normal,
    borderColor: 'transparent',
    paddingHorizontal: spaces.space3,
    borderRadius: borderRadius.header,
  },
  styleTitle: {
    textTransform: 'uppercase',
    color: colors.text,
  },
  title1: {
    fontSize: fonts.header1,
    marginRight: spaces.space2,
  },
  title2: {
    fontSize: fonts.header4,
    fontWeight: 'bold',
  },
  expressionContainer: {
    flexDirection: 'row',
    alignItems: 'center',
    marginBottom: spaces.space4,
  },
  numberContainer: {
    alignItems: 'center',
  },
  number: {
    color: colors.white_milk,
    fontSize: fonts.header2,
    fontWeight: 'bold',
  },
  questionMark: {
    color: 'white',
    fontSize: fonts.header6 + fonts.largest,
    marginLeft: spaces.space4,
    fontWeight: 'bold',
    transform: [
      {
        rotate: '8deg',
      },
    ],
  },
  imageContainer: {
    width: 150,
    height: 100,
    backgroundColor: colors.white,
    borderRadius: borderRadius.header,
    justifyContent: 'center',
    alignItems: 'center',
  },
});
À ngoài ra trong lần update này, mình còn áp dụng React native animation cơ bản nữa, nhưng vì đó 1 chủ đề khá là thú vị và hay ho, xứng đáng có 1 bài viết riêng, mình sẽ không viết nó ở đây 
// practice.js
import { observer } from 'mobx-react';
import 'mobx-react-lite/batchingForReactNative';
import React, { useState, useEffect } from 'react';
import {
  StyleSheet,
  View,
  Text,
  Dimensions,
  TouchableHighlight,
  Image,
} from 'react-native';

import { colors, fonts, spaces, borderWidth } from '../constants/theme';
import { RightIcon, WrongIcon } from '../assets/icons/index';
import { useNavigation } from '@react-navigation/native';
import { StackRoute } from '../constants/route';

import PracticeStore from '../stores/practiceStore';

const windowWidth = Dimensions.get('window').width;

const PracticeScreen = observer(() => {
  const Navigate = useNavigation();
  const [result, setResult] = useState(PracticeStore.calculateResult());

  function randomNumber(to, from) {
    return Math.floor(Math.random() * from) + to;
  }

  useEffect(() => {
    PracticeStore.setFirstParameter(randomNumber(1, 9));
    PracticeStore.setSecondParameter(randomNumber(1, 9));
    setResult(PracticeStore.calculateResult());
  }, []);

  function pressAnswer(type) {
    const isTrue =
      PracticeStore.FirstParameter + PracticeStore.SecondParameter === result;
    if ((type === 'wrong' && isTrue) || (type === 'right' && !isTrue)) {
      Navigate.navigate(StackRoute.Main.Failed);
      return;
    }
    if ((type === 'wrong' && !isTrue) || (type === 'right' && isTrue)) {
      PracticeStore.setFirstParameter(randomNumber(1, 9));
      PracticeStore.setSecondParameter(randomNumber(1, 9));
      setResult(PracticeStore.calculateResult());
      return PracticeStore.setPoint(PracticeStore.Point + 1);
    }
  }
  const Header = () => {
    return (
      <View style={styles.header}>
        <Text style={styles.point}>{PracticeStore.Point} Điểm</Text>
      </View>
    );
  };

  const Body = () => {
    return (
      <View style={styles.body}>
        <View style={styles.expressionContainer}>
          <View style={styles.numberContainer}>
            <Text style={styles.number}>
              {PracticeStore.FirstParameter} + {PracticeStore.SecondParameter}
            </Text>
            <Text style={styles.number}>= {result}</Text>
          </View>
          <Text style={styles.questionMark}>?</Text>
        </View>
      </View>
    );
  };
  const Footer = () => {
    return (
      <View style={styles.footer}>
        <TouchableHighlight
          style={[styles.buttonLeft, styles.buttonFooter]}
          onPress={() => pressAnswer('right')}>
          <Image source={RightIcon} />
        </TouchableHighlight>
        <TouchableHighlight
          style={[styles.buttonRight, styles.buttonFooter]}
          onPress={() => pressAnswer('wrong')}>
          <Image source={WrongIcon} />
        </TouchableHighlight>
      </View>
    );
  };
  return (
    <View style={styles.container}>
      <Header />
      <Body />
      <Footer />
    </View>
  );
});

export default PracticeScreen;

const styles = StyleSheet.create({
  container: {
    flex: 1,
    backgroundColor: colors.bg_primary,
  },
  header: {
    flex: 1,
    flexDirection: 'row',
    justifyContent: 'space-around',
    paddingTop: 20,
    width: '100%',
  },
  point: {
    color: '#fff',
    fontSize: 40,
    fontWeight: 'bold',
  },
  body: {
    width: windowWidth,
    flex: 1,
    justifyContent: 'center',
    alignItems: 'center',
  },
  expressionContainer: {
    flexDirection: 'row',
    alignItems: 'center',
    marginBottom: spaces.space4,
  },
  numberContainer: {
    alignItems: 'center',
  },
  number: {
    color: colors.white_milk,
    fontSize: fonts.header2,
    fontWeight: 'bold',
  },
  questionMark: {
    color: 'white',
    fontSize: fonts.header6 + fonts.largest,
    marginLeft: spaces.space4,
    fontWeight: 'bold',
    transform: [
      {
        rotate: '8deg',
      },
    ],
  },
  footer: {
    width: windowWidth,
    flex: 1,
    flexDirection: 'row',
    alignItems: 'flex-end',
    paddingBottom: spaces.space2,
  },
  buttonFooter: {
    width: windowWidth / 2 - 15,
    alignItems: 'center',
    justifyContent: 'center',
    borderRadius: 10,
    backgroundColor: colors.white,
    borderBottomWidth: borderWidth.bolder,
    borderLeftWidth: borderWidth.bolder,
    borderColor: colors.black_light,
  },
  buttonLeft: {
    marginLeft: 10,
  },
  buttonRight: {
    marginHorizontal: 10,
  },
});
Trong file này, nếu bạn chú ý đọc 1 tí ( nếu không đọc cũng không sao, chỉ là sẽ lỗi tí khi chạy thôi mà  ) ) sẽ thấy
 mobx và PracticeStore đã được thêm vào, mình sẽ nói về nó ở phần tiếp theo.
// failed.js
import React, { useRef, useEffect } from 'react';
import {
  StyleSheet,
  View,
  Text,
  TouchableHighlight,
  Image,
  Animated,
} from 'react-native';
import { useNavigation } from '@react-navigation/native';

import {
  colors,
  fonts,
  spaces,
  borderRadius,
  borderWidth,
} from '../constants/theme';

import { PlayIcon } from '../assets/icons/index';
import { StackRoute } from '../constants/route';
import PracticeStore from '../stores/practiceStore';

export default function FailedScreen() {
  const fadeAnim = useRef(new Animated.Value(0)).current;

  useEffect(() => {
    Animated.timing(fadeAnim, {
      toValue: 1,
      duration: 3000,
      useNativeDriver: true,
    }).start();
  }, []);
  const Navigate = useNavigation();

  const handleReStart = () => {
    PracticeStore.setPoint(0);
    PracticeStore.setFirstParameter(PracticeStore.randomNumber(1, 9));
    PracticeStore.setSecondParameter(PracticeStore.randomNumber(1, 9));
    Navigate.navigate(StackRoute.Main.Practice);
  };
  return (
    <View style={styles.container}>
      <View style={styles.titleContainer}>
        <Text style={[styles.styleTitle, styles.title1]}>Happy</Text>
        <Text style={[styles.styleTitle, styles.title2]}>Math</Text>
      </View>
      <View style={styles.expressionContainer}>
        <View style={styles.numberContainer}>
          <Text style={styles.number}>
            {PracticeStore.FirstParameter} + {PracticeStore.SecondParameter}
          </Text>
          <Text style={styles.number}>
            = {PracticeStore.FirstParameter + PracticeStore.SecondParameter}
          </Text>
        </View>
        <Animated.View style={{ opacity: fadeAnim }}>
          <Text style={styles.questionMark}>!</Text>
        </Animated.View>
      </View>
      <View style={styles.pointContainer}>
        <Text style={styles.pointText}>Điểm: </Text>
        <Text style={styles.pointText}>{PracticeStore.Point}</Text>
      </View>
      <TouchableHighlight
        style={styles.imageContainer}
        onPress={() => handleReStart()}>
        <Image source={PlayIcon} />
      </TouchableHighlight>
    </View>
  );
}

const styles = StyleSheet.create({
  container: {
    flex: 1,
    backgroundColor: colors.bg_primary,
    justifyContent: 'center',
    alignItems: 'center',
  },
  titleContainer: {
    flexDirection: 'row',
    alignItems: 'center',
    borderWidth: borderWidth.normal,
    borderColor: 'transparent',
    paddingHorizontal: spaces.space3,
    borderRadius: borderRadius.header,
  },
  styleTitle: {
    textTransform: 'uppercase',
    color: colors.text,
  },
  title1: {
    fontSize: fonts.header1,
    marginRight: spaces.space2,
  },
  title2: {
    fontSize: fonts.header4,
    fontWeight: 'bold',
  },
  expressionContainer: {
    flexDirection: 'row',
    alignItems: 'center',
    marginBottom: spaces.space4,
  },
  numberContainer: {
    alignItems: 'center',
  },
  number: {
    color: colors.white_milk,
    fontSize: fonts.header2,
    fontWeight: 'bold',
  },
  questionMark: {
    color: 'white',
    fontSize: fonts.header6 + fonts.largest,
    marginLeft: spaces.space4,
    fontWeight: 'bold',
    transform: [
      {
        rotate: '8deg',
      },
    ],
  },
  pointContainer: {
    backgroundColor: colors.bg_primary,
    borderRadius: borderRadius.header,
    borderWidth: borderWidth.bolder,
    borderColor: colors.white,
    marginBottom: spaces.space8,
    flexDirection: 'row',
    paddingHorizontal: spaces.space6,
    paddingVertical: spaces.space2,
  },
  pointText: {
    fontSize: fonts.header2,
    fontWeight: 'bold',
    color: colors.text,
  },
  imageContainer: {
    width: 150,
    height: 100,
    backgroundColor: colors.white,
    borderRadius: borderRadius.header,
    justifyContent: 'center',
    alignItems: 'center',
  },
});
Lưu ý: Nếu trong lúc copy paste, bạn có phát hiện cái library nào lạ lạ thì cái giúp mình với nhé :3
Trong 3 file trên, ngoại trừ phần animation và mobx thì chỉ là update UI cho app thêm đep và tạo cảm giác gần gũi hơn với người dùng thôi. Nên mình sẽ không giải thích nhiều về 3 file này
3) mobx
mobx nếu bạn đã từng làm qua redux thì mục đích của nó cũng là để quản lý state trong store 1 cách hiệu quả. Cùng lướt qua file PracticeStore.js tí nhé
import { observable, action, computed, decorate } from 'mobx';

class PracticeStore {
  firstParameter = 0;
  secondParameter = 0;
  isCorrect = true;
  point = 0;

  setFirstParameter(item) {
    this.firstParameter = item;
  }
  setSecondParameter(item) {
    this.secondParameter = item;
  }

  setPoint(item) {
    this.point = item;
  }

  get FirstParameter() {
    return this.firstParameter;
  }
  get SecondParameter() {
    return this.secondParameter;
  }

  get IsCorrect() {
    return this.isCorrect;
  }

  get Point() {
    return this.point;
  }

  randomNumber = (to, from) => {
    return Math.floor(Math.random() * from) + to;
  };

  calculateResult = () => {
    const isTrue = Math.floor(Math.random() * 4);
    if (isTrue === 0) {
      return this.firstParameter + this.secondParameter;
    }
    const isBigger = Math.floor(Math.random() * 4);
    let resultFalse = 0;
    if (isBigger === 0) {
      resultFalse =
        this.firstParameter +
        this.secondParameter +
        Math.floor(Math.random() * 2);
    } else {
      resultFalse =
        this.firstParameter +
        this.secondParameter -
        Math.floor(Math.random() * 2);
    }
    return resultFalse < 0 ? 0 : resultFalse;
  };
}

decorate(PracticeStore, {
  firstParameter: observable,
  secondParameter: observable,
  isCorrect: observable,
  point: observable,
  FirstParameter: computed,
  SecondParameter: computed,
  IsCorrect: computed,
  Point: computed,
  setFirstParameter: action,
  setSecondParameter: action,
  setPoint: action,
});

const practiceStore = new PracticeStore();
export default practiceStore;
Nếu đọc kỹ, các bạn sẽ thấy các biến được decorate với từ khóa là observable, như vậy nghĩa là sao ? Có thể nói observable giống với state trong React, khi biến được decorate bởi observable thay đổi giá trị, nó sẽ khiến Component có sử dụng chúng được re-render, với điều kiện Component đó phải được bọc bởi observer như thế này export default observer(Component). Với những function để lấy dữ liệu, sẽ được decorate là computed, và các function tác động và xử lý đến các biến observable sẽ được decorate là action. Nghe thật đơn giản phải không nào? Nếu bạn đã dùng qua Redux thì bạn sẽ thấy mobx gọn nhẹ như thế nào, hoặc nếu chưa đọc thì đọc qua bài so sánh của mình đã viết trước đây nhé, link đây :v https://viblo.asia/p/so-sanh-mobx-va-redux-jvEla0zYZkw
Bạn có thể đọc thêm thông tin về mobx trong trang chủ của nó.
4) Kết thúc
Vậy là chúng ta đã update xong cho ứng dụng học toán rồi, giờ hãy xem thử hình dạng của nó nào.
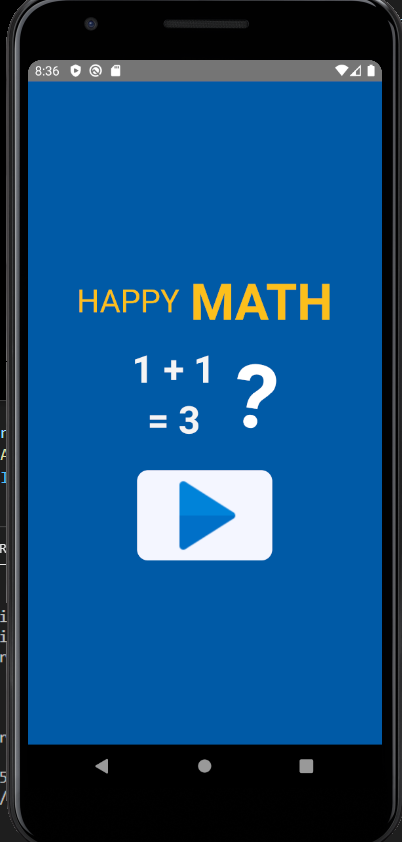
Khi mới vào này
Bấm vào nút play
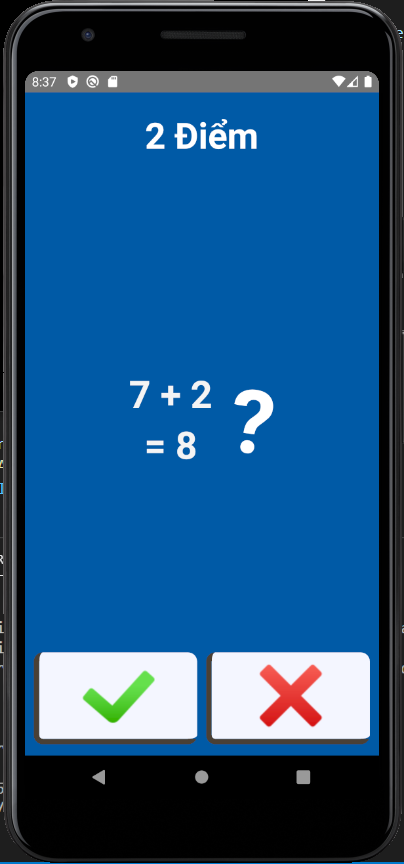
Thắng được 2 câu và lên được 2 điểm )
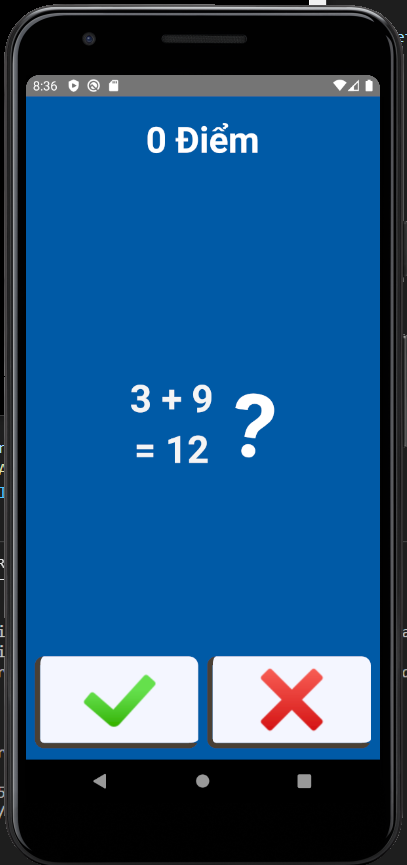
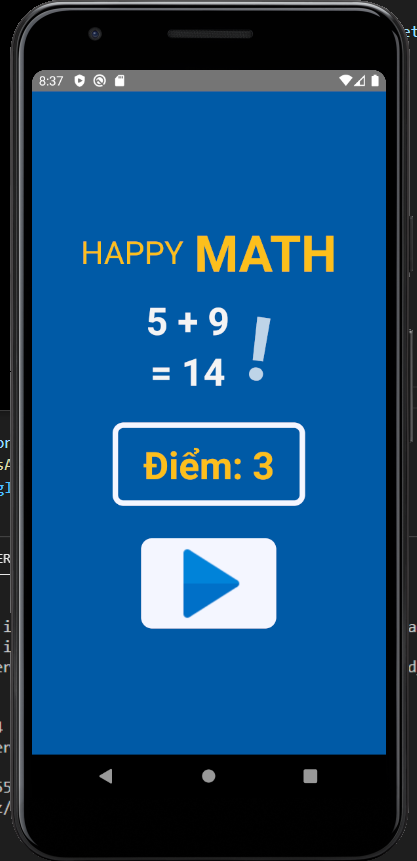
Tới câu thứ 3 thì oẳng mất tiêu
so với version 1 thì nó đã đẹp hơn nhiều phải không nào, nếu bạn đã quên thì có thể xem ở đây, https://viblo.asia/p/lam-ung-dung-hoc-toan-don-gian-voi-react-native-63vKjzNVK2R
Bài viết của mình đến đây đã hết rồi, hy vọng sẽ được gặp các bạn trong phần 3, cảm ơn mọi người đã dành thời gian để đọc bài viết của mình
P/S
Các bạn có thể theo dõi full series của mình tại đây: https://viblo.asia/s/lam-ung-dung-hoc-toan-don-gian-voi-react-native-375z0mxPZGW Mình đã upload app lên Google store, các bạn có thể tải về xem trước, tên app mình có hơi thay đổi 1 tí, mong mọi người vẫn ủng hộ series của mình
Link app : https://play.google.com/store/apps/details?id=com.bloodycotech001
Xin chân thành cảm ơn các bạn!!! 
All rights reserved
